Fire protection for gun safes sounds simple until you compare marketing claims, building science, and what actually survives a house fire. In my work evaluating safes, insulation materials, and post-loss conditions, I have seen owners trust improvised liners, door gaskets, or garage placement decisions that looked sensible but failed under real heat, smoke, and water exposure. The core question is whether DIY fireproofing methods are effective for gun safes, and the honest answer is nuanced: some methods can modestly improve resistance to heat transfer, smoke intrusion, or moisture after suppression, but none can reliably turn a lightly built container into a true fire safe. Understanding that distinction matters because firearms, optics, documents, and ammunition each fail at different temperatures, and because “fireproof” is not a universal standard. Most residential gun safes are better described as fire-resistant for a stated duration at a stated external temperature. Their performance depends on steel thickness, door fit, gypsum-based insulation, intumescent seals, lock protection, anchor method, and where the safe sits inside the home. For anyone planning fireproof and disaster-resistant storage, the practical goal is layered risk reduction: start with a better safe, place it intelligently, control humidity, and use targeted upgrades only where they make technical sense.
A few definitions clarify the discussion. Fire resistance means slowing internal temperature rise during a tested exposure, not preventing exterior damage. Disaster-resistant storage extends beyond flames to include smoke, water from sprinklers or fire hoses, impact from structural collapse, and corrosion after the event. DIY fireproofing usually refers to owner-installed modifications such as lining interiors with ceramic fiber or drywall, adding aftermarket door seals, building a closet enclosure around the safe, applying external fire coatings, or using desiccants and waterproof document boxes inside. These methods are not equal. Some support the safe’s original design. Others interfere with door tolerances, trap moisture, void warranties, or create a false sense of security. This hub article explains what works, what does not, and how to think about fire, smoke, and water as a connected problem rather than a single feature on a product label.
How Gun Safe Fire Ratings Actually Work
To judge DIY methods, you first need to know how factory fire ratings are created and why two safes with similar labels can perform very differently. Gun safe manufacturers commonly publish ratings such as 30, 45, 60, or 90 minutes at temperatures ranging from roughly 1,200 to 1,800 degrees Fahrenheit. Those numbers are not always based on the same protocol. A true independent test from organizations such as UL has more value than an in-house test because the furnace curve, sensor placement, pass criteria, and cool-down process are defined in advance. In practice, many gun safes use layered Type X gypsum board because gypsum contains chemically bound water that absorbs heat as steam is released. Combined with expanding door seals and sufficient mass, that system can buy time. It is effective because it is engineered as a package, not because drywall alone is magical.
Internal temperature is the critical metric. Paper chars around 451 degrees Fahrenheit, many polymers deform much earlier, wood stocks can dry and crack, optics adhesives and lubricants degrade, and ammunition can cook off. Fire ratings therefore attempt to keep interior temperatures below a threshold for a certain time. However, a house fire is dynamic. Flashover, fuel load, room ventilation, and collapse risk matter more than the single number on a sticker. A safe in a basement corner on a slab may see very different conditions than one in an upstairs closet over a garage. That is why any discussion of DIY fireproofing must start with placement and exposure, not just materials.
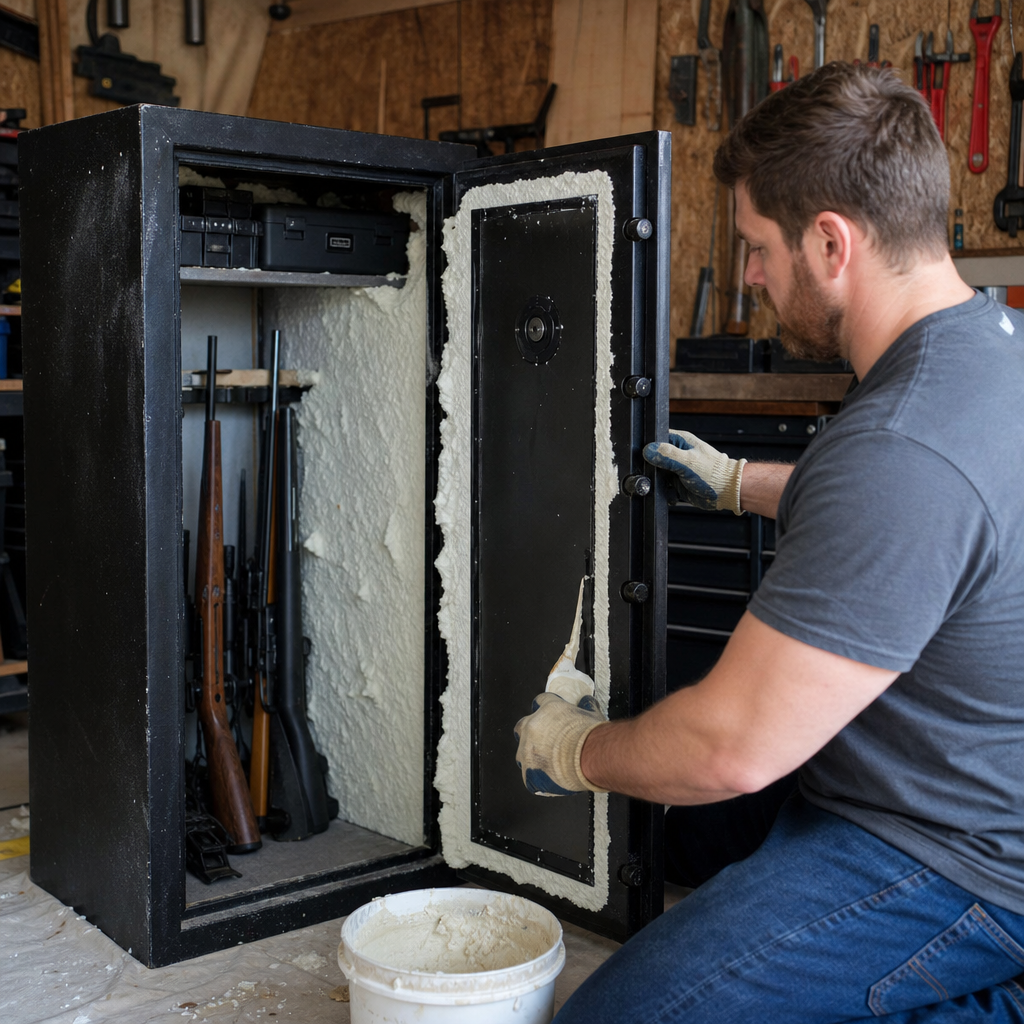
What DIY Fireproofing Can Improve and What It Cannot
DIY fireproofing can help in limited, clearly defined ways. It can reduce direct radiant exposure if you build a surrounding barrier. It can slow smoke entry if you add a compatible expanding seal. It can protect small, highly sensitive items by placing them in a secondary rated container inside the safe. It can reduce post-fire corrosion if you manage humidity and quickly dry contents after suppression. What it cannot usually do is create a tested fire-resistance rating where none existed. The shell, door gap geometry, body-to-door interface, locking bolt penetrations, and insulation layout all govern performance. If the steel body conducts heat rapidly and the door leaks, an extra interior panel or spray coating will not transform the whole system.
I have opened safes after fire events where owners added extra drywall sheets to the interior walls. On paper, that looked logical. In reality, they lost shelf space, blocked circulation, introduced dust, and in some cases trapped moisture against gun stocks for years before any fire occurred. More importantly, the door remained the weak point. Heat entered through seams, lock areas, and uninsulated spots. By contrast, owners who spent the same money on a better-rated safe, anchored it on a basement slab, and placed important documents in a UL-classified media box inside had substantially better outcomes. The lesson is straightforward: targeted DIY improvements can support a strong foundation, but they are poor substitutes for core design quality.
Common DIY Methods, Likely Benefit, and Main Risk
| DIY method | Likely benefit | Main limitation or risk |
|---|---|---|
| Adding interior drywall or cement board | Small increase in thermal mass if properly fitted | Unverified performance, reduced space, trapped moisture, stress on shelves |
| Aftermarket intumescent door seal | Can reduce smoke and hot gas intrusion through door gaps | Poor adhesion or wrong thickness may affect door closure and security |
| Building a fire-resistant closet around the safe | Often the most effective DIY upgrade because it lowers direct heat exposure | Must use correct wall assembly, avoid trapping humidity, maintain access |
| Spray-on fireproof coating | Usually modest benefit on a steel box in residential use | Many coatings are not intended for this application and lack test data |
| Document box or media box inside safe | Excellent protection for passports, cash, drives, and paperwork | Does not improve firearm protection; capacity is limited |
| Desiccants and dehumidifier rods | Strong protection against rust before and after suppression water exposure | No direct fire resistance; requires monitoring and power or recharging |
The Most Effective DIY Upgrade: Improve the Environment Around the Safe
If you want the highest return from a do-it-yourself project, focus on reducing fire intensity around the safe rather than altering the safe itself. A properly built enclosure can materially improve survival odds. For example, placing a safe in a basement on concrete, against an exterior wall, away from fuel-rich storage, is often better than any interior modification. If a basement is not available, a closet built with Type X drywall on both sides of studs, tightly taped joints, mineral wool in cavities, and a solid core or rated door creates a buffer zone that delays heat rise. This approach helps because you are managing room conditions before heat reaches the safe shell.
Real-world fire investigators often note that compartmentation changes outcomes. A safe in a dedicated closet under a stair landing or in a utility room with fewer combustibles may avoid the peak temperatures seen in open living spaces during flashover. The same logic applies to wildfire zones. Exterior walls, ember-resistant vents, and reduced combustible clutter near the home can indirectly protect a safe. This is why disaster-resistant storage is broader than the box itself. The safe is one layer inside a building envelope, and that envelope can either shield it or expose it.
Door Seals, Insulation Add-Ons, and Why Details Matter
Among direct safe modifications, aftermarket intumescent seals are the most defensible when the safe has a clear door gap and enough tolerance for expansion. Intumescent material swells under heat, helping choke off smoke and hot gases. The idea is sound, but execution is critical. If the seal is too thick, the latch may not fully engage. If the adhesive fails after years of garage heat cycles, the seal can peel away. If the safe already has a factory seal, layering another one may distort closure. Choose products with known expansion temperatures and install them only where they will not interfere with locking bolt travel.
Interior insulation add-ons are less predictable. Ceramic fiber has excellent temperature resistance, but loose or poorly encapsulated fiber is messy and not ideal around firearms. Cement board is durable but heavy and a poor answer if seams are unsealed. Additional gypsum can help, yet it works best when arranged in layers that cover bridges and are paired with a controlled cavity. Most owners cannot reproduce that engineering inside an existing safe. Worse, many adhesives off-gas or fail under heat. Unless you are fabricating a purpose-built enclosure with known materials, internal retrofits usually provide limited value compared with external protection and secondary containers.
Water, Smoke, and Corrosion After the Fire
Many gun owners think only about flame exposure, but the more common loss pattern after a residential fire is a combination of smoke contamination, steam, and water. Fire hoses and sprinklers can flood a room. A hot safe cools, drawing moist, acidic air inside through seams. Soot residues hold corrosive compounds that attack bluing, stainless surfaces, brass, optics coatings, and electronics. In several post-incident inspections I have seen firearms survive the heat threshold yet suffer severe rust within days because the safe stayed closed, wet, and warm. That is why humidity control is a disaster-resistance feature, not merely routine maintenance.
Use rechargeable desiccant packs or a dehumidifier rod if the safe location allows power. Keep important documents, NFA paperwork, cash, and digital backups in a separate waterproof and fire-rated insert. For optics, suppressors, and serialized receivers, maintain an inventory with photos and serial numbers stored off-site or in encrypted cloud storage. After any fire or suppression event, open the safe as soon as authorities allow, document the condition, remove contents, and begin drying and cleaning. A fire-rated safe buys time; it does not eliminate the need for recovery steps.
Choosing a Better Safe Versus Modifying a Basic One
When budgets are limited, many buyers ask whether to upgrade a modest gun safe with DIY fireproofing or put that money toward a better model. In most cases, buying better wins. Look for thicker steel, more insulation mass, continuous welds, robust door construction, a tested seal system, relockers, protected lock areas, and an independently credible fire rating. Brands and models differ widely, but the decision framework is stable: prioritize structural quality first, then fire package, then interior accessories. A safe with thin steel and a generous marketing claim is a poor platform for upgrades because security and thermal performance both begin with the shell and door.
There are exceptions. If you already own a decent safe, a surrounding closet build-out, improved placement, better anchoring, and a secondary document container can be highly cost-effective. But if the safe is a lightweight residential security container with minimal insulation, no amount of aftermarket patchwork will make it equivalent to a purpose-built fire-resistant safe. Spend where testable performance exists. Marketing language is cheap; steel, insulation, and certification are not.
Hub Guidance for Fireproof and Disaster-Resistant Storage
As the hub for fireproof and disaster-resistant storage, this page connects the main decisions gun owners need to make. Start with risk assessment: house type, wildfire exposure, flood zone, garage versus interior placement, and the value of firearms versus documents and digital media. Next, compare fire ratings and understand who tested them. Then evaluate placement, because a great safe in a bad location can underperform a good safe in a smart one. After that, add environmental controls such as dehumidification, waterproof containers, inventory records, and anchoring that resists both theft and tipping during structural movement. Finally, consider limited DIY upgrades only when they support the safe’s original design rather than fight it. That sequence reflects how losses actually happen.
For most owners, the best plan is simple: buy the strongest safe you can justify, install it on concrete in a low-fuel area, create a fire-resistant room or closet if possible, protect paper and digital media in secondary rated boxes, and maintain humidity control year-round. DIY fireproofing methods are effective only when expectations are realistic and the method addresses a specific weakness. They are not a substitute for engineering, credible testing, or smart placement. If you are building out your broader Gun Safes & Safety strategy, use this hub as the starting point, then audit your current setup and upgrade the weakest layer first.
Frequently Asked Questions
Are DIY fireproofing methods actually effective for gun safes?
DIY fireproofing methods can help in limited, specific ways, but they are not a substitute for a gun safe that was engineered and tested for fire resistance as a complete system. That distinction matters. Many owners assume that adding drywall, ceramic wool, heat-resistant caulk, or aftermarket door seals will meaningfully “upgrade” a basic safe into a fire safe. In practice, real fire performance depends on more than just insulation thickness. It depends on how the body, door, seams, lock area, hinges, relockers, and interior airspace behave when exposed to sustained high heat, pressure changes, smoke infiltration, and then water from suppression efforts.
Some DIY measures may reduce minor heat transfer or slow smoke entry in a short-duration event, but house fires are chaotic and uneven. Temperatures can spike quickly, move from one side of the safe to another, and continue long after visible flames are knocked down. Improvised materials may crack, settle, absorb moisture, release corrosive residues, or create false confidence without delivering meaningful protection where it matters most. In other words, the idea is not always wrong, but the expectations usually are. If the goal is serious fire protection for firearms, optics, ammunition, and important documents, the most reliable approach is still a quality safe with verified fire design, proper placement, and smart interior moisture management rather than relying on retrofit fixes alone.
Which DIY fireproofing upgrades help the most, and which ones are mostly marketing or wishful thinking?
The most useful DIY upgrades are usually the least dramatic. Improving smoke resistance at obvious gaps, reducing internal moisture risk after a fire event, and choosing a better installation location can all provide practical benefits. For example, adding a high-quality heat-activated door seal may help limit smoke and steam intrusion if the safe body and door fit support it. Elevating the safe slightly off a concrete floor can help reduce water exposure during firefighting or flooding. Anchoring the safe securely and placing it in a lower-risk interior location may improve both theft resistance and fire survivability. Using interior document pouches or small UL-rated fire document boxes inside the safe can also protect especially sensitive contents better than lining the whole safe with improvised materials.
By contrast, some popular DIY ideas are overrated. Lining the inside with generic drywall, cement board, welding blankets, or insulation scraps often sounds logical because those materials are associated with heat resistance, but they are rarely installed in a way that replicates tested fire-safe construction. They may leave thermal bridges, reduce usable space, trap humidity, interfere with door operation, or add materials that break down unpredictably under heat. Spray foams, household sealants, and unknown “fireproof coatings” are especially questionable because some can produce smoke, corrosive gases, or lose integrity rapidly. The bottom line is that small, targeted upgrades can help at the margins, but broad DIY “fireproofing” claims often exceed what the materials and installation methods can realistically deliver.
Can I improve a gun safe’s fire resistance by adding insulation like drywall, ceramic wool, or fireboard?
You can add insulation, but whether it truly improves fire resistance in a meaningful way is another question. Materials such as gypsum board, mineral wool, ceramic fiber, and specialty fireboard do have legitimate thermal properties. The problem is that a gun safe does not perform like a simple insulated box. Heat enters through seams, the door gap, thin steel sections, bolt channels, lock penetrations, and any area where the insulation is compressed, interrupted, or poorly supported. If added insulation does not create a coherent, durable barrier across the entire enclosure, the real-world benefit may be modest.
There are also tradeoffs. Interior liners reduce storage space and can make long guns fit poorly. Some insulation materials shed dust or fibers, which is not ideal around firearm actions, optics, or collectible finishes. Others retain moisture, which can increase corrosion risk during normal storage or after a fire event involving steam and hose water. Gypsum-based products may release water vapor when heated, which is part of how some fire linings work, but in an improvised setup that moisture can also affect contents. More importantly, adding insulation does not address whether the lock, relocking system, or door frame will stay functional and sealed under heat. So yes, insulation can slightly slow heat transfer in some cases, but it should be viewed as a limited enhancement, not a reliable conversion of a non-fire-rated safe into a true fire-resistant unit.
Does where I place my gun safe matter as much as trying to fireproof it myself?
Yes, placement often matters more than most DIY fireproofing modifications. A safe’s location affects how quickly it is exposed to heat, how long it remains in the hottest conditions, and how vulnerable it is to structural collapse, smoke, and water. A garage may seem like a practical location, but garages can contain fuel, vehicles, solvents, and tools that intensify fire conditions. They may also have poor temperature control and humidity swings that are hard on guns even before any fire occurs. An exterior wall location can be a mixed bag: in some fires it may reduce exposure time, but in others it may place the safe near collapsing materials or direct flame paths depending on the structure and fuel load.
In general, a lower-risk interior location on a stable floor, away from obvious fuel sources and excessive moisture, is often a better choice than simply adding more material to the safe itself. Concrete slab placement can help with structural support, but owners should also think about water runoff and avoid leaving the safe directly vulnerable to pooling water. Basements can be good in some homes and terrible in others depending on flood risk and fire behavior. The larger point is that a safe does not exist in isolation. Fire outcome is shaped by the room, the building materials, ventilation, suppression response, and what burns nearby. A smart placement decision can do more for survivability than many improvised “fireproofing” add-ons.
If I really want better fire protection for firearms and valuables, what is the most effective approach?
The most effective approach is layered protection, not reliance on one DIY fix. Start with the best safe you can justify from a manufacturer with credible fire design and transparent specifications. Independent testing is preferable to vague time-and-temperature claims with no context. Then focus on installation: anchor the safe properly, place it in a lower-risk part of the home, and keep it away from obvious combustible hazards. Inside the safe, use desiccants or a powered dehumidifier to control moisture and protect metal finishes, wood stocks, paper records, and optics. For the most vulnerable items such as passports, titles, backup drives, suppressor paperwork, cash, and heirloom documents, consider a separate UL-rated fire document container or media-rated box placed inside the gun safe.
It is also wise to think beyond fireproofing alone. Smoke, steam, and firefighting water regularly damage contents that were never directly burned. That means sealed packaging for critical papers, corrosion prevention for firearms, insurance documentation, serial number records stored off-site, and photographs of your collection all matter. If you are evaluating whether to spend money on DIY materials or upgrade to a better safe, the better safe usually wins in terms of predictable protection. DIY efforts are best used to support a solid overall setup, not to compensate for a weak safe with inflated expectations. That is the nuanced but honest answer: some do-it-yourself measures can help around the edges, but real fire protection comes from design quality, placement, and planning.