
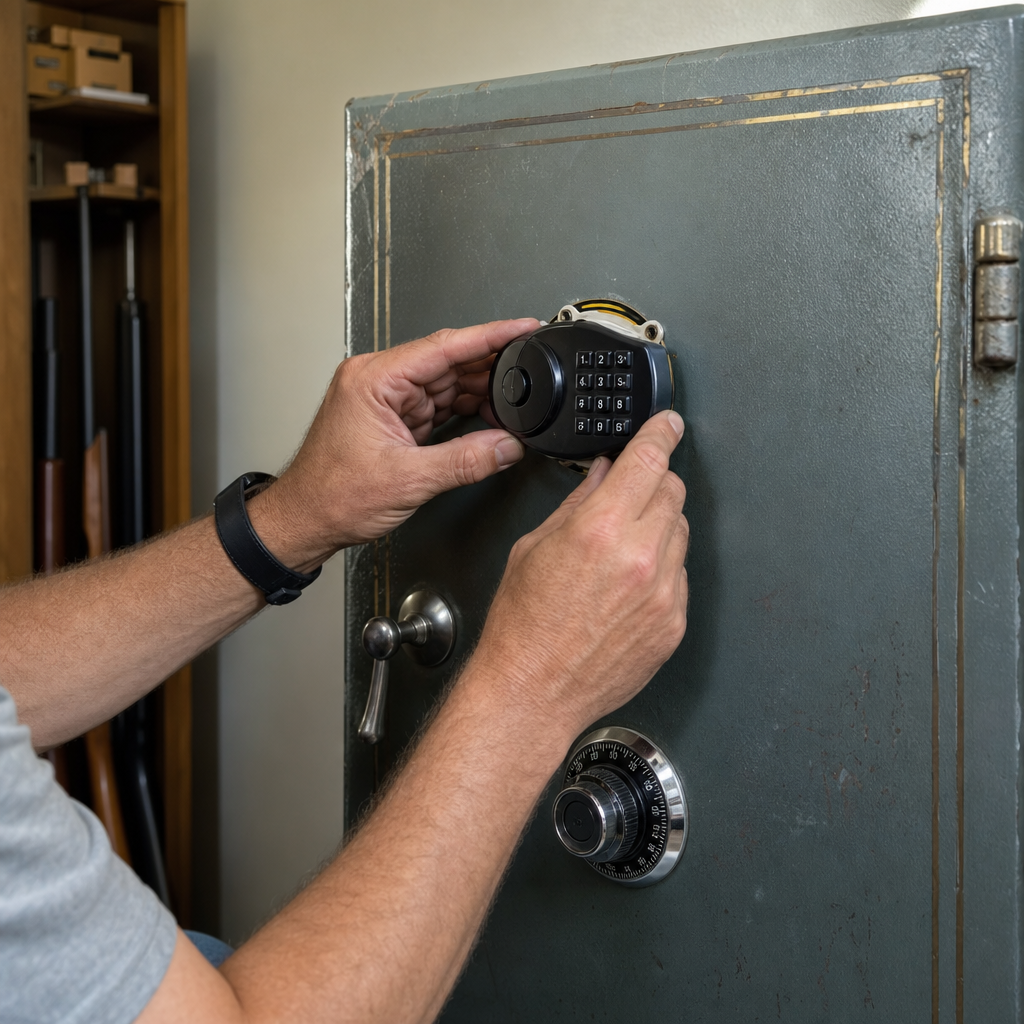
Installing a keypad lock on an older mechanical gun safe is one of the most practical upgrades a gun owner can make, especially when a dial lock is still reliable but no longer convenient for daily use. In simple terms, this project replaces a traditional combination lock and spindle-driven dial with an electronic keypad lock that retracts the safe’s boltwork through a compatible lock body. I have helped plan and evaluate this retrofit on older Browning, Liberty, Cannon, AMSEC, and no-name import safes, and the first lesson is always the same: not every safe should be modified, and not every lock fits every door. That matters because a gun safe is not just storage furniture. It is a security container, a fire barrier, and, in many homes, the primary control that keeps children, visitors, and thieves away from firearms. A well-executed keypad lock installation can improve access speed, reduce user error under stress, and extend the usable life of an older safe. A poor installation can disable the relocker, weaken the lock mounting area, void a warranty, or leave the safe stuck shut. This hub article explains how the retrofit works, how to judge compatibility, what parts and tools are involved, what standards matter, and which related custom and DIY gun safe modifications are worth considering next.
How keypad lock retrofits work on older gun safes
An older mechanical gun safe usually uses a Group 2 dial combination lock mounted on the inside of the door. The exterior dial turns a spindle, the spindle drives the lock, and the lock bolt blocks or releases the safe’s boltwork. A keypad retrofit typically removes the dial ring, spindle, and mechanical lock body, then installs an electronic safe lock with a keypad on the exterior and a lock case on the interior. Most retrofits rely on the same industry-standard lock footprint, often the common 2.75-inch by 4-inch mounting pattern used by Sargent and Greenleaf, SecuRam, La Gard, and AMSEC-compatible locks. That standardization is the reason many older safes can accept an upgrade without cutting the door.
The key question is whether the existing door prep supports the replacement. On many gun safes, the spindle hole is already in the right position, and the keypad base covers the old dial opening cleanly. On others, especially very old safes or low-cost imported models, the hardplate placement, relocker geometry, and lock bolt direction create fit problems. I have also seen doors where aftermarket carpet liner, organizer panels, or added insulation interfered with the lock body. Before buying anything, remove the inner door panel and inspect the lock area carefully. You should identify the lock brand, mounting screw pattern, bolt direction, cable path, relocker location, and any interference points. If the safe uses direct-drive boltwork, the lock simply blocks a cam or lever. If it uses a more unusual linkage, compatibility becomes less certain.
Another point many owners miss is that electronic safe locks are not all equal. A residential gun safe should use a UL-listed safe lock, not a generic cabinet keypad. Look for a Type 1 electronic lock when possible. Recognized options include the S&G Titan, S&G Spartan, SecuRam SafeLogic series, and La Gard Basic or ComboGard families, depending on the safe and installer preference. These locks are built for security container use and have defined attack resistance, unlike cheap keypad latches sold for lockers and office furniture.
How to judge whether your safe is a good candidate
The best candidate for installing a keypad lock on an older mechanical gun safe has three traits: sound boltwork, a standard lock footprint, and no evidence of prior tampering or door sag. If the handle already binds, the door scrapes badly, or the dial lock occasionally fails to open on the first try, solve those mechanical issues first. An electronic lock does not cure bent linkage, worn handle hubs, or misaligned locking bolts. In fact, a marginal door often feels worse after conversion because users expect instant operation.
Fire lining also matters. Many gun safes built in the 1990s and early 2000s use gypsum-based fireboard behind the inner door panel. When removing the old dial ring or feeding a keypad cable, that material can crumble. Work slowly to avoid enlarging openings or dropping debris into the lock. On some stacked-sheet steel doors, the exterior skin around the spindle hole may be thin. If so, use the keypad manufacturer’s escutcheon and mounting hardware exactly as specified so the keypad sits flat and resists prying.
If your safe is still under warranty, verify the manufacturer’s policy. Some brands allow lock swaps only through authorized locksmiths and may deny coverage if the door is drilled, welded, or modified incorrectly. If the safe is a true burglary-rated safe rather than a typical residential gun safe, consult the maker before changing anything. Insurance and rating implications can be real when a certified container is altered outside approved procedures.
| Checkpoint | What to Verify | Why It Matters |
|---|---|---|
| Lock footprint | Standard mounting pattern and bolt direction | Determines whether a new electronic lock fits without drilling |
| Door condition | No sag, handle binds, or warped inner panel | Prevents lockout caused by boltwork misalignment |
| Relocker setup | Location and engagement method are visible and understood | Avoids disabling a security feature during installation |
| Hardplate | Existing hardplate does not block mounting or cable routing | Maintains drill resistance while allowing proper assembly |
| Power access | Battery replacement can be done from the keypad side | Ensures the safe remains serviceable without opening the door panel |
| Warranty status | Manufacturer and dealer modification terms | Protects coverage and avoids unsupported changes |
Parts, tools, and standards that matter
A proper retrofit starts with the correct parts, not just the correct lock. At minimum you need the keypad, lock body, cable, mounting screws, spindle or shaft components if required by that model, fresh batteries, and the manufacturer’s installation template or instructions. You may also need a drill guide, threadlocker approved by the manufacturer, a replacement dial ring cover plate, or a relocker bracket depending on the original configuration. Keep the old mechanical lock until the electronic one has been tested repeatedly with the door open.
For tools, the basics are modest: screwdrivers, nut drivers, hex keys, flashlight, inspection mirror, painter’s tape, calipers, and a small torque driver if specified. I strongly recommend a borescope for older safes because it helps inspect cable routing and hidden interference without disturbing fire lining. A digital camera or phone is equally important. Photograph every stage before removing parts. That record is invaluable if a spring, cam plate, or relocker arm shifts out of position.
Standards are not paperwork trivia here. UL 768 is the common benchmark for combination locks used on safes and vaults, and electronic locks are categorized by type. On many gun safes, manufacturers originally fitted Group 2 mechanical locks because they were durable and economical. Replacing them with a reputable electronic equivalent preserves expected security better than installing a low-cost consumer keypad. Battery chemistry matters too. Use branded alkaline 9-volt batteries if the lock maker specifies them, and avoid rechargeables unless explicitly approved. Low-voltage errors cause many service calls, especially in cold garages where battery output drops.
If you are building a broader custom plan, this is also the moment to think about adjacent upgrades. Door panel organizers, LED lighting, dehumidifier rods, hygrometers, anchored bases, rifle rack reconfiguration, and shelf reinforcement all interact with how you access and use the safe. As the hub for custom and DIY gun safe modifications, this project sits at the center of those decisions because the lock determines daily usability.
Step-by-step installation process and common mistakes
The safest workflow is straightforward. First, open the safe and keep it open until the new lock has been tested many times. Remove firearms, documents, and anything fragile from the door area. Second, take off the inner door panel carefully and expose the lock, linkage, relocker, and hardplate. Third, photograph the existing mechanical lock from several angles. Fourth, relieve tension on the handle if needed and remove the old lock body, spindle, dial, and ring in the order recommended by the manufacturer. Fifth, clean the mounting surface and compare the old and new lock dimensions before attaching anything permanently.
Next, mount the electronic lock body on the inside of the door using the correct screws and length. Screws that are too long can bottom out or interfere with the mechanism; screws that are too short can loosen under vibration. Route the cable exactly as directed so it does not contact moving boltwork. On several retrofits I have inspected, the cable was pinched behind a linkage bar and failed within months. Install the keypad base on the exterior, connect the cable, insert the battery, and program the factory code change while the door remains open. Then test the lock repeatedly with the handle and boltwork under normal operation. Many locksmiths use at least ten complete open-close cycles before reinstalling the door panel.
The biggest mistakes are surprisingly basic. Owners rush and close the door before verifying operation. They reuse old screws. They ignore a relocker plate that was held in place by the original lock body. They route the keypad cable through a sharp-edged hole without protection. They install decorative organizers that press on the lock case after the panel goes back on. Another frequent error is choosing a lock with features they do not need, such as multiple user codes, time delay, or audit capability, then forgetting the programming sequence. For most residential gun safes, reliability beats complexity. A simple, name-brand keypad lock with a clear low-battery warning is usually the right choice.
Security tradeoffs, reliability, and when to hire a locksmith
Electronic keypad locks are faster than dials for most people, but they are not automatically more secure. Their real advantage is consistent, quick access with less dialing error. For a bedside long-gun safe or a frequently accessed collection safe, that convenience has real value. The tradeoff is dependence on electronics, batteries, and membrane or rubber keypad components that age over time. A quality mechanical lock can run for decades with minimal service. A quality electronic lock can also be dependable, but it should be treated as a service item with periodic battery replacement and occasional professional inspection.
Environment matters. Gun safes in climate-controlled rooms tend to have fewer keypad failures than safes in damp garages, barns, or workshops with temperature swings. Corrosion on battery contacts, brittle keypad overlays, and condensation inside the door are all predictable problems in poor conditions. If your safe lives in a garage, pair the lock upgrade with humidity control and anchor inspection. Moisture management is one of the most overlooked gun safe modifications, yet it affects both firearms and lock longevity.
There are clear situations where hiring a safe technician or locksmith is the better move. If the safe has a glass relocker system, nonstandard boltwork, previous drill repairs, or a hardplate that appears to block the lock screws, call a professional. The same applies if you cannot positively identify the original lock footprint or if the door must be drilled for cable clearance. In my experience, one paid service call is cheaper than one lockout. A competent technician can also service the boltwork, lubricate pivot points correctly, and verify that the handle torque feels right after the retrofit.
Related custom and DIY gun safe modifications worth planning next
A keypad conversion often becomes the gateway to a full modernization project. Once the inner door panel is off, owners naturally notice wasted space, poor lighting, weak shelving, and neglected anchoring. The best next modification is usually improved interior organization. Door panel organizers from companies like Gun Storage Solutions and factory kits from major safe brands can free shelf space for pistols, magazines, and documents, but they must not interfere with lock clearance. Test fit every pocket panel against the lock body before final installation.
Lighting is another high-value upgrade. Motion-activated LED strips or hardwired low-voltage kits make it far easier to identify firearms and accessories without keeping the door open. Choose low-heat lighting and route wires away from boltwork and fireboard edges. Humidity control should follow. A GoldenRod-style dehumidifier, silica canisters, and a digital hygrometer help keep relative humidity in a safer range, generally around 40 to 50 percent for most firearm storage. Too much dryness can affect wood stocks over time; too much humidity invites rust.
Anchoring and structural improvements also belong in this hub topic. Many older gun safes are heavy but still vulnerable to tipping or pry attacks if left unanchored. Use manufacturer-approved anchor points, proper concrete anchors, and a base that keeps the door swing unobstructed. Inside the safe, reinforced shelves and modular rifle racks can dramatically improve capacity, especially for scoped rifles and modern sporting rifles that do not fit older rack spacing well. The guiding principle across all custom and DIY gun safe modifications is simple: every change should improve access, preservation, or theft resistance without compromising lock function.
Installing a keypad lock on an older mechanical gun safe is a worthwhile upgrade when the safe has solid boltwork, a compatible lock footprint, and a clear need for faster, simpler access. The project matters because the lock is the part of the safe you use every day, and usability directly affects whether firearms stay secured consistently. Done correctly, the retrofit replaces an aging dial with a modern, UL-listed electronic lock, preserves the safe’s basic security, and often extends the life of a well-built cabinet or safe body for many more years. Done poorly, it creates cable damage, relocker problems, alignment issues, and preventable lockouts.
The practical path is to inspect first, buy a reputable lock second, and install only when you fully understand the door’s lockwork, hardplate, and relocker arrangement. Keep the door open during testing, use the right screws and batteries, and treat the lock as one part of a broader storage system that also includes anchoring, humidity control, lighting, and interior organization. As the hub for custom and DIY gun safe modifications, this topic connects directly to every other upgrade you may plan, because all of them depend on reliable entry and secure operation. Evaluate your safe carefully, map the retrofit before ordering parts, and bring in a qualified safe technician when the door design is anything less than straightforward.
Frequently Asked Questions
Can any older mechanical gun safe be upgraded from a dial lock to an electronic keypad lock?
Not every older safe can accept a keypad lock, but many can. The biggest factor is whether the safe uses a standard lock footprint, mounting pattern, and spindle location that matches common electronic safe lock bodies. A lot of older Browning, Liberty, Cannon, AMSEC, and even unbranded import safes were built around fairly common lock formats, which is why this retrofit is often possible without modifying the door in a major way. That said, “possible” does not always mean “simple.” Differences in internal relockers, boltwork geometry, door panel clearance, hardplate placement, and cable routing can all affect compatibility.
In practical terms, the old mechanical dial, spindle, and lock body are removed, and the new electronic lock body and keypad are installed in their place. The keypad itself may mount on the door face using the existing spindle hole and a base plate, while the lock body mounts inside the door where the original mechanical lock sat. Before ordering parts, it is important to confirm the lock type, hand of the swing if relevant, the distance between mounting holes, and whether the safe’s boltwork will properly engage with the new lock’s bolt. Some safes also have decorative dial rings or door skins that make exterior fitment a little more involved.
If the safe is very old, heavily customized, imported with nonstandard hardware, or built with unusual boltwork, a direct swap may not be advisable. In those cases, a locksmith who works regularly on safes can determine whether a retrofit is realistic or whether keeping the dial lock is the safer choice. The main takeaway is that many older mechanical gun safes can be upgraded successfully, but compatibility should always be verified first instead of assuming every dial-lock safe is a universal candidate.
What are the main benefits of replacing a traditional dial lock with a keypad lock?
The biggest advantage is speed. A keypad lock eliminates the need to carefully dial a multi-number mechanical combination every time you want access. For gun owners who open their safe regularly, that convenience is hard to overstate. Entering a code on a keypad is usually much faster, especially in low light, under stress, or when quick access matters. A quality electronic lock can also reduce user error compared with a dial, since mechanical locks require precise turning sequences that some owners find frustrating over time.
Another benefit is ease of day-to-day use. As long as the lock is from a reputable manufacturer and installed correctly, electronic keypad locks are straightforward to operate and typically allow simple code changes without disassembling the lock. For households where authorized users need access, changing a code is often more practical than reworking a mechanical combination lock. Many owners also appreciate that keypads can be easier for aging hands and eyes, since they remove the need to read a dial and make exact alignment marks repeatedly.
That said, convenience should not be confused with automatic superiority in every category. Mechanical locks still have a strong reputation for longevity, and some owners prefer their simplicity because they do not rely on batteries or electronics. The real value of a keypad retrofit is that it modernizes an older safe without replacing the entire safe itself. If the safe body and boltwork are still solid, upgrading the lock can provide a meaningful improvement in usability while preserving the investment you already have in the safe.
Is installing a keypad lock on an older gun safe a do-it-yourself project, or should it be handled by a locksmith?
That depends on your comfort level, the safe’s design, and the exact lock you are installing. On some safes, the process is straightforward enough for a careful owner with basic mechanical skills: remove the interior door panel, document the existing lock setup, take off the dial and spindle, mount the new lock body, route the keypad cable correctly, attach the keypad, test operation repeatedly with the door open, and then reassemble the panel. If the safe uses a standard lock layout and the replacement lock is known to be compatible, the job can be very manageable.
However, there are real risks if you are inexperienced. Safe locks are not complicated in the same way a full door rebuild is complicated, but they are unforgiving when installed incorrectly. A misaligned lock body, binding boltwork, pinched keypad cable, incorrect screw length, or failure to account for relock devices can leave the safe inoperable or unreliable. The most important rule is to test the lock extensively with the door open before ever closing and locking the safe. If that step is skipped and something is wrong, you may create a lockout situation that requires professional opening service.
Hiring a qualified safe technician or locksmith is usually the best route if the safe is high-value, the lockwork is unfamiliar, or you want certainty that the retrofit is done correctly. A professional can also identify hidden issues such as worn linkage, interference points, previous modifications, or nonstandard parts that are easy to miss. In short, some owners can absolutely handle this project themselves, but if there is any doubt about compatibility or installation technique, professional help is money well spent.
Are electronic keypad locks reliable enough for a gun safe, and what about battery failure?
Modern electronic safe locks from established manufacturers are generally reliable when they are authentic, properly installed, and used as intended. Most problems people associate with keypad locks come from one of three sources: low-quality off-brand hardware, poor installation, or neglected battery replacement. A good electronic lock is designed specifically for secure storage applications and is not the same as the lightweight keypad hardware found on inexpensive cabinets or residential door locks. When matched correctly to the safe and boltwork, it can provide years of dependable service.
Battery concerns are common, but in practice they are manageable. Most keypad safe locks give clear signs of a weakening battery, such as dim lights, slow response, weak beeps, or inconsistent actuation. Replacing the battery on schedule is a simple preventive step, and many owners make it part of a routine maintenance calendar. On most keypad systems, the battery is in the keypad itself, so it can be changed from the outside without opening the safe. The key is to use the battery type specified by the lock manufacturer and avoid cheap cells that may leak or produce unstable performance.
Electronic locks are still electronic devices, so they are not immune to failure. That is why brand selection matters. A trusted commercial-grade lock from a recognized safe lock manufacturer is very different from an unknown low-cost alternative. If reliability is your top concern, choose a proven model, have it installed correctly, replace the battery proactively, and function-test it periodically with the door open. For most gun owners, that approach delivers a strong balance of security and convenience without the daily hassle of a dial.
What should you check before and after installing a keypad lock on an older mechanical gun safe?
Before installation, start with compatibility. Confirm that the electronic lock body matches the safe’s mounting pattern, bolt engagement requirements, and internal clearance. Examine the existing mechanical lock setup carefully and take photos before removing anything. Pay attention to the lock’s orientation, the travel of the safe’s boltwork, any relock devices, and the amount of space behind the interior panel for the new keypad cable. Also verify whether the old spindle hole and dial ring area will properly accept the keypad base. Ordering the right lock is not just about brand preference; it is about making sure the lock physically and mechanically fits the safe.
During installation, protect the keypad cable, use the correct mounting screws, and avoid overtightening anything that could distort the lock body or keypad base. Make sure the lock bolt and the safe’s boltwork interact smoothly without dragging or partial engagement. On older safes especially, it is wise to clean out dust, inspect linkage wear, and check that nothing inside the door is loose or bent. This is also a good time to evaluate whether the interior panel insulation or upholstery could interfere with cable routing or moving parts once everything is reassembled.
After installation, the most important step is repeated testing with the door open. Enter the code multiple times, confirm that the lock retracts and secures consistently, and cycle the safe’s handle and boltwork through full travel over and over. Listen and feel for any hesitation, rubbing, or inconsistent operation. Only after the system has proven reliable with the door open should you close the door and test normal locking. Once the retrofit is complete, document the lock model, battery type, programming instructions, and your code storage process so future maintenance is simple and safe. A careful final test routine is what separates a successful upgrade from an expensive lockout.