Buying your first safe is a strong start, but the best DIY gun safe modifications can make an entry-level cabinet or premium vault dramatically more secure, organized, and practical for daily use. A gun safe is a locked storage container designed to restrict unauthorized access, reduce theft risk, and help protect firearms from fire, humidity, and careless handling. Modifications are aftermarket changes you add after purchase, ranging from simple lighting kits and dehumidifiers to door organizers, anchor systems, rifle rests, and electronic monitoring. For first-time owners, the goal is not to turn a safe into a science project. It is to correct common weaknesses, improve access, and build habits that support safe storage.
I have worked on enough home safe setups to see the same pattern repeatedly: people spend heavily on the safe, then live with poor interior layout, dark shelves, moisture problems, and loose installation. Those issues matter because a safe that is hard to use gets used poorly. A crowded interior increases the chance of bumping optics, scraping stocks, or storing loaded magazines haphazardly. Weak anchoring gives thieves leverage. High humidity invites rust. Dim interiors slow identification and retrieval. Bad cable management creates snag points around long guns. Smart modifications solve those problems without compromising the safe’s fire seal, lock reliability, or structural integrity.
This hub covers custom and DIY gun safe modifications comprehensively for beginners. You will learn which upgrades provide the biggest return first, what tools and materials are appropriate, and which changes should be avoided because they reduce burglary resistance or void a warranty. The most effective approach is incremental. Start with installation and environmental control, then add organization, lighting, monitoring, and convenience features. Done correctly, these upgrades make a safe easier to maintain and safer to use while preserving the core purpose of secure firearm storage.
Start With Security Upgrades That Improve the Safe Itself
The first modifications should address physical security, because no amount of interior customization matters if the safe can be tipped, pried, or removed. The most important DIY upgrade for first-time owners is anchoring. Most residential gun safes under about 1,000 pounds can be moved with an appliance dolly, pry bars, and time. Bolting the safe to a concrete slab with wedge anchors or concrete screw anchors greatly reduces that risk. On wood floors, lag bolts into joists with steel backing plates are the better option. In my experience, many owners bolt only to subflooring, which is weaker than they think. If your floor system is elevated, verify joist direction and spacing before drilling.
Placement is part of the modification strategy. Positioning the safe in a closet, corner, or alcove limits access to the sides and rear, which are often more vulnerable than the door. Tight placement reduces pry bar working room. If the safe is in a garage, elevate it slightly with a steel or pressure-treated platform to protect against minor water intrusion, but do not create leverage points underneath. A good install also includes checking for plumb and level so the door swings correctly and the locking bolts align as intended.
Do not drill new holes through the body unless the manufacturer explicitly permits it. Fire-lined safes rely on layered steel and insulation systems, and random penetrations can weaken fire performance or create moisture ingress points. If you need cable pass-through for power, use existing factory ports and seal around them with approved grommets. The same caution applies to lock replacement. Swapping a keypad for a different model is not a casual DIY job unless you understand relocker systems, spindle alignment, and lock footprint compatibility. For many first-time owners, physical installation is the high-value security mod; major lock work belongs with a qualified safe technician.
Control Humidity and Prevent Rust Before It Starts
Moisture management is the most overlooked gun safe upgrade, and it is one of the most important. Firearms rust when metal surfaces remain exposed to high relative humidity long enough for oxidation to begin. Wood stocks can swell, leather slings can mildew, and optics can suffer from corrosion on screws and battery contacts. The practical target for most safes is around 45 to 50 percent relative humidity. Higher than that raises corrosion risk; much lower can dry out wood over long periods.
There are two common DIY approaches: desiccants and gentle heating rods. Rechargeable silica gel canisters work well in smaller spaces if you monitor them and dry them out on schedule. Electric dehumidifier rods, such as GoldenRod-style units, raise the internal temperature slightly so moisture does not condense on cooler steel surfaces. In real use, I prefer a heating rod plus a digital hygrometer because it provides continuous control and visible feedback. Without a hygrometer, owners are guessing. Place the sensor away from the door opening so readings reflect average internal conditions, not room air each time the safe is opened.
Safe location changes humidity load. Basements and garages often need more active control than conditioned interior rooms. If your safe sits on concrete, even with anchors, use a moisture barrier between the base and floor where appropriate and check for seasonal changes. Avoid damp cardboard boxes, foam that traps moisture against metal, and untreated fabric cases inside the safe for long-term storage. Silicone-treated gun socks can help, but they are not a substitute for humidity control. A rust prevention plan is simple: measure humidity, reduce it consistently, and inspect exposed steel on a routine schedule.
Organize the Interior for Access, Capacity, and Protection
Most factory interiors are compromises. They advertise a high long-gun count, but that number usually assumes slim rifles with no optics, no slings, and almost no spacing. Once you add scoped hunting rifles, AR-pattern carbines, suppressor-ready barrels, or shotguns with extended controls, the interior becomes inefficient fast. Better organization is one of the best DIY gun safe modifications because it increases usable capacity without making storage chaotic.
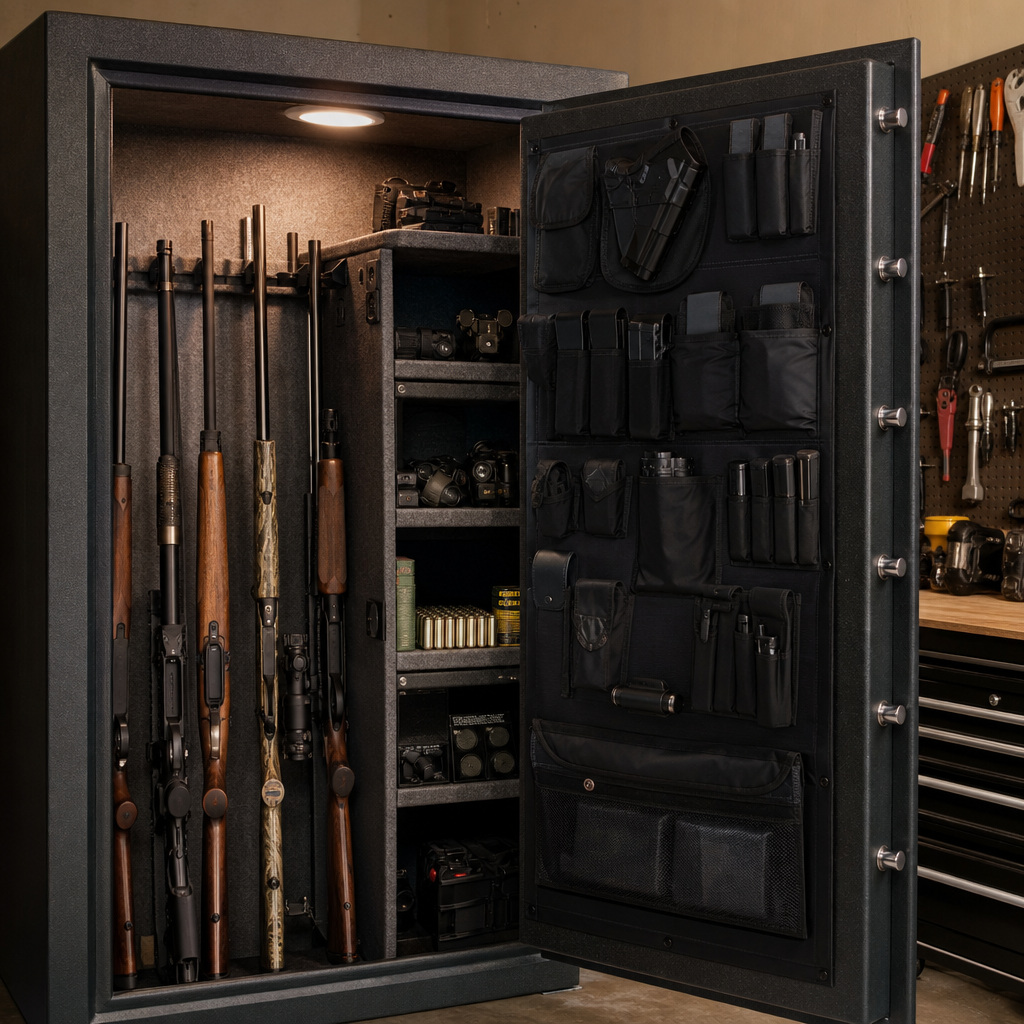
Door panel organizers are usually the first upgrade I recommend. A well-designed panel adds pistol holsters, magazine pouches, zippered document pockets, and dedicated slots for small accessories. That clears shelf space for ammunition, range gear, and valuables. It also keeps handguns visible and separate from long guns, reducing accidental bumps during retrieval. Choose systems that attach without stressing the fire seal or interfering with boltwork. Adjustable hook-and-loop backed panels are easier to tune than fixed pockets.
Shelf reconfiguration is the next step. Many owners benefit from replacing a full-width shelf with modular half shelves or adding vertical dividers. This creates zones: defensive rifles, hunting guns, handguns, paperwork, and maintenance gear. Rifle rods, barrel saddles, and stock supports can improve spacing, especially for AR-platform rifles with optics that prevent tight side-by-side placement. Closed-cell foam and felt liners protect finishes better than rough carpet remnants. If you build custom shelves, use stable materials and avoid raw wood that off-gasses moisture or acids in enclosed spaces.
| Modification | Main Benefit | Best For | Common Mistake |
|---|---|---|---|
| Door organizer | Frees shelf space and improves visibility | Handguns, magazines, documents | Overloading the door and blocking shelves |
| Rifle rods or barrel supports | Increases long-gun spacing efficiency | Scoped rifles and AR-style carbines | Ignoring optic height and muzzle clearance |
| Modular shelving | Creates dedicated storage zones | Mixed firearm collections | Using weak brackets or unstable materials |
| Soft liners and mats | Protects finishes and reduces slipping | Shelves and accessory areas | Using foam that traps moisture |
Think in terms of retrieval paths. The firearm you access most should not require moving three others. Keep muzzle direction controlled during removal, and avoid stacking loose gear in front of stocks or grips. A clean layout is not cosmetic. It reduces handling errors and preserves equipment.
Add Lighting, Power, and Smart Monitoring the Right Way
Interior lighting turns a frustrating safe into a usable one. Adhesive LED strip kits with motion sensors are popular because they are inexpensive and easy to install. For most first-time owners, neutral white LEDs around 4000K to 5000K provide the best color accuracy when identifying finishes, labels, and accessories. Battery-powered lights are simple, but hardwired low-voltage systems are better for larger safes because brightness stays consistent. If your safe includes a factory power port, use it. If not, avoid drilling your own unless the manufacturer allows it and provides guidance.
Route cables neatly along corners and secure them with clips rated for the safe’s interior surfaces. Keep wires clear of hinges, locking bolts, and adjustable shelves. I have seen magnetic lights work well on bare steel interiors, but on carpeted panels they can shift. Adhesive-backed channels usually hold better if the surface is cleaned first. Motion activation is useful, though a manual override switch is worth having when you need longer illumination during maintenance or inventory checks.
Smart monitoring adds another layer of awareness. Small sensors can track temperature, humidity, vibration, or door opening and send alerts through Wi-Fi or a local hub. This is especially useful for vacation homes, detached garages, or anyone storing high-value optics and documents alongside firearms. Choose sensors with long battery life and confirm signal strength at the safe location before mounting them. Monitoring does not stop theft, but it shortens response time and records environmental problems before damage becomes obvious. If you use battery-powered devices, set a replacement schedule and log it with your safe combination records kept in a separate secure location.
Build Convenience Features Without Undermining Safety
The best custom gun safe upgrades make routine tasks easier while respecting the safe’s core function. Pistol racks, magazine bins, suppressor stands, and labeled bins for choke tubes, bolts, and tools all save time. A pull-out document drawer can separate passports, titles, and insurance paperwork from firearm accessories. Small magnetic trays are useful on steel interiors for keys, batteries, and turret tools, but they should not be placed where they can fall into door gaps or lockwork channels.
There is also room for low-cost quality-of-life improvements. A laminated inventory sheet inside the door helps track serial numbers, optic models, and maintenance dates. QR-coded labels can link to digital records, photos, and purchase receipts stored securely elsewhere. Some owners add a handgun staging shelf near chest height for temporary handling during unloading or cleaning preparation. If you build one, keep it shallow and padded so it does not interfere with long guns or door closure.
What should you avoid? Do not mount loaded firearms in novelty displays inside the safe. Do not add interior foam cutouts that hold moisture against metal in humid climates. Do not disable factory shelves or fireboard supports without understanding how they contribute to the structure. And do not confuse speed with readiness. A fast-access handgun safe near the bed serves a different role than the main long-gun safe. For first-time owners, convenience should support safer handling and better organization, not shortcut basic storage discipline.
Know the Limits of DIY and Plan Future Upgrades
Not every modification belongs in a weekend project. Structural welding, hardplate changes around locks, hinge alterations, and lock body replacement can create expensive problems if done wrong. Some changes may void the manufacturer warranty or affect insurance claims after a burglary or fire. Read the safe manual, verify anchor hole locations, and check whether added accessories change door weight beyond design limits. On imported safes especially, thin interior panels can hide wiring or insulation that is easy to damage accidentally.
A smart upgrade plan is phased. First, anchor the safe and improve placement. Second, control humidity with a dehumidifier and hygrometer. Third, reorganize the interior with a door panel, shelf changes, and long-gun supports. Fourth, add lighting and simple monitoring. Fifth, refine convenience features based on actual use over a few months. That sequence prevents waste because you are solving the biggest risks before buying accessories that may not fit your final layout.
As your collection changes, your safe should evolve with it. Hunters may need wider spacing for scoped bolt guns before deer season. Competitive shooters may prioritize magazine storage and quick inventory checks. Families with children should review access controls, backup keys, and combination management regularly. The best DIY gun safe modifications are not the flashiest ones. They are the ones that make secure storage reliable every day, under real household conditions.
For first-time owners, custom and DIY gun safe modifications are about function, not decoration. Anchor the safe so it stays put. Control humidity so rust never gets a foothold. Rebuild the interior around the firearms you actually own, not the optimistic capacity number on the sales tag. Add lighting and monitoring so you can see problems early and use the safe confidently. Then layer in convenience features that reduce clutter and improve handling.
If you follow that order, even a modest safe can perform far better than it did on delivery day. You will protect finishes, preserve optics, speed up access, and reduce the chance of careless storage mistakes. Just as important, you will avoid risky modifications that weaken security or compromise fire protection. A safe should fit your collection, your room, and your habits. Thoughtful DIY upgrades make that possible.
Use this hub as your starting point for every gun safe customization decision. Evaluate your current setup, list the pain points, and tackle one high-value upgrade at a time. A better-organized, better-protected safe is easier to trust, easier to maintain, and far more likely to be used correctly every day.
Frequently Asked Questions
What are the best DIY gun safe modifications for first-time owners?
For most first-time owners, the best DIY gun safe modifications are the ones that improve security, visibility, moisture control, and organization without changing the safe’s core structure. A practical starting list includes a dehumidifier or desiccant system to control moisture, interior LED lighting so you can clearly see contents, a door panel organizer for handguns, documents, and magazines, upgraded shelving or barrel supports to improve storage efficiency, and proper anchoring hardware to secure the safe to the floor or wall where appropriate. These upgrades solve the most common real-world problems people discover after purchase: dark interiors, wasted space, humidity buildup, clutter, and the risk of a lighter safe being tipped or removed.
For an entry-level cabinet, these modifications can dramatically improve day-to-day usability. A simple lighting kit makes it easier to retrieve firearms safely in low light. A door organizer frees up shelf space and keeps small gear from piling up loosely. Moisture control is especially important in garages, basements, and humid climates because rust prevention is one of the most overlooked parts of firearm storage. If your safe has a basic interior, adding rifle rods, foam supports, or adjustable shelves can help separate firearms and reduce knocks, scratches, and awkward stacking.
That said, first-time owners should prioritize modifications that do not compromise the safe’s fire lining, locking system, or body construction. In other words, focus on upgrades that work with the existing design rather than drilling unnecessary holes or altering the door, boltwork, or seal. The smartest DIY approach is usually to make the safe more efficient and protective, not to turn it into a major fabrication project. If you start with moisture control, lighting, organization, and anchoring, you will cover the biggest weaknesses most new owners experience.
Which DIY modifications actually improve gun safe security, and which ones are mostly about convenience?
Security-focused modifications are the ones that reduce the chance of theft, unauthorized access, or accidental exposure. The biggest example is anchoring the safe properly. Many first-time owners are surprised to learn that even a decent safe can be vulnerable if it is not bolted down, especially smaller models that can be moved, pried, or tipped for attack. Anchoring the unit to concrete or a structurally sound floor can make a major difference in resisting smash-and-grab theft. Strategic placement also matters. Positioning the safe in a corner or closet can reduce pry access and make forced entry more difficult.
Other modifications that support security include replacing weak factory mounting hardware with higher-quality anchors, improving concealment around the safe location, and organizing the interior so firearms are not stored loosely or in unstable positions. A better interior layout is not just convenient; it can reduce careless handling when you access the safe. Some owners also add motion-sensing interior lights that activate as soon as the door opens, making quick access more controlled and safer.
Convenience upgrades, by contrast, include interior LED strips, door organizers, handgun racks, magazine holders, labeled bins, and document pouches. These may not directly stop a thief, but they strongly improve usability and consistency. When the safe is easier to use, owners are more likely to store firearms properly every time. In that sense, convenience can indirectly support security. The key distinction is this: if a modification strengthens resistance to theft or unauthorized removal, it is security-oriented; if it improves access, layout, visibility, or storage efficiency, it is primarily convenience-oriented. Both matter, but anchoring, placement, and preserving lock integrity should come first.
Can DIY gun safe modifications damage the fire rating, lock, or warranty?
Yes, they can if you are not careful. This is one of the most important issues for first-time safe owners to understand. Many safes use specific fireboard materials, door seals, internal wiring layouts, and lock assemblies that should not be drilled into, cut, compressed, or modified without guidance from the manufacturer. If you drill through the body or door in the wrong place, you could compromise fire insulation, create entry points for moisture, interfere with relockers or boltwork, or void parts of the warranty. Even something that seems minor, like routing a power cable through an improvised opening, can reduce the safe’s protective performance if it bypasses a designed pass-through.
Lock components deserve special caution. Electronic locks, hard plates, relock devices, and mechanical linkages are not good DIY experiment zones. If a first-time owner tries to replace, relocate, or modify lock hardware without expertise, the result can be reduced security or even a lockout. The same is true for weather seals and expanding fire seals around the door frame. Damaging or removing them can affect how the safe performs under heat and smoke conditions.
The safest route is to use manufacturer-approved accessories and non-invasive upgrades whenever possible. Adhesive-backed lights, removable organizers, rechargeable dehumidifiers, shelf inserts, and existing bolt-down holes are usually much safer choices than structural alterations. Before making any permanent modification, review the owner’s manual, warranty terms, and any documentation showing approved cable ports, mounting points, or electrical pass-through locations. If the change involves drilling, the lock area, or fire-protective materials, it is wise to pause and confirm the design details with the manufacturer or a qualified locksmith or safe technician first.
How do I control humidity and prevent rust inside a gun safe with DIY upgrades?
Humidity control is one of the most valuable DIY upgrades because firearms, optics, magazines, and important documents can all suffer from excess moisture. The right setup depends on your climate, safe location, and how often the door is opened. For first-time owners, the most effective strategy is usually a layered approach: use a dehumidifier or desiccant product inside the safe, monitor humidity with a compact hygrometer, and place the safe in the driest reasonable indoor location. Basements, exterior walls, sheds, and garages often create more moisture risk than a climate-controlled room inside the home.
There are two common DIY options. The first is an electric dehumidifier rod designed for safes, which gently raises the interior temperature to reduce condensation. These work well for long-term, low-maintenance control if your safe has a manufacturer-approved power access point. The second is a rechargeable desiccant unit or silica packs, which absorb moisture and can be dried and reused. Desiccants are simple and useful, especially in smaller safes or spaces without power access, but they require regular attention. In very humid regions, many owners use both a heating rod and desiccant for extra protection.
Good airflow inside the safe also matters. Avoid packing firearms and soft cases too tightly together, and do not store guns long-term in foam-lined cases or sleeves that can trap moisture against metal surfaces. Wipe down firearms with appropriate protective oil or rust preventive before storage, especially if they have been handled, carried, or exposed to temperature swings. A hygrometer lets you stop guessing and start measuring. If you consistently see humidity creeping too high, you can adjust your setup before rust becomes visible. For most owners, steady monitoring and a modest humidity-control system are far more effective than waiting for corrosion and trying to fix it later.
What should first-time owners avoid when modifying a gun safe?
First-time owners should avoid any modification that weakens the safe, interferes with the lock, creates uncertainty about fire protection, or encourages unsafe storage habits. One of the biggest mistakes is drilling new holes without knowing what is behind the steel panel. A safe door or body may contain lock linkages, relockers, insulation, or other components that are easy to damage and expensive to repair. Another common mistake is overloading shelves or door panels with more weight than they were designed to hold. Handguns, loaded magazines, and document bundles add up quickly, and a poorly supported organizer can sag, warp, or interfere with door closure.
Owners should also avoid cheap adhesive products that fail in heat, humidity, or time. If a light strip, hook system, or organizer falls off inside the safe, it can create clutter or obstruct proper storage. Similarly, avoid routing extension cords into the safe through improvised gaps or pinched door seals. If electrical access is needed, use only manufacturer-approved pass-throughs or professionally safe methods. Modifying around the seal area is particularly risky because a damaged seal can affect the safe’s protective performance.
Another thing to avoid is turning organization into overcrowding. A safe that technically holds a certain number of firearms on paper often becomes much less practical once optics, slings, documents, ammunition, and handguns are added. Cramming too much inside increases the chance of bumps, scratches, awkward retrieval, and careless handling. Good modifications should make the safe cleaner, safer, and easier to use. They should not create a tighter, heavier, more confusing space. For most first-time owners, the safest rule is simple: improve visibility, moisture control, anchoring, and layout, but do not alter structural or lock-related components unless the manufacturer explicitly supports it.