Best DIY projects for enhancing gun safe organization start with one practical goal: make every firearm, accessory, and document easier to access, inventory, and protect without compromising security. In the gun safes and safety category, organization means the deliberate arrangement of long guns, handguns, optics, magazines, ammunition, documents, and maintenance tools inside or around a safe using layouts, storage hardware, labeling, and controlled access practices. Custom and DIY gun safe modifications are homeowner-installed improvements such as shelf reconfiguration, door panel systems, lighting, dehumidification mounts, rifle rack inserts, and accessory bins. I have worked on safe interiors where a basic factory layout wasted a third of the usable space, and the biggest gains rarely came from expensive upgrades; they came from measuring accurately, matching storage to the collection, and using materials that tolerate humidity, weight, and repeated use.
This topic matters because poor safe organization creates real problems. Firearms bang into each other, optics lose zero from careless handling, magazines disappear into corners, and important papers end up under ammo cans. A crowded safe also slows retrieval, which increases administrative handling and raises the chance of avoidable mistakes. Good organization, by contrast, improves capacity, visibility, corrosion prevention, and routine safety checks. It also supports compliance with household rules by separating defensive firearms, hunting rifles, training pistols, and restricted items into clearly managed zones. The best DIY gun safe organization projects do not weaken the safe shell, interfere with locking bolts, or create ignition risks. They work with the safe’s structure, preserve warranty where possible, and solve specific storage problems with measured, reversible, low-risk upgrades.
As a hub for custom and DIY gun safe modifications, this guide covers the projects that deliver the best return in usable space and day-to-day function: planning the layout, building better racks and shelves, upgrading the door panel, adding power and lighting safely, managing humidity, creating dedicated storage for handguns and valuables, and labeling the system so it remains organized months later. If you want one rule before starting, it is this: unload everything, document your current setup, and design around actual dimensions, not guesses.
Plan the safe interior before you buy materials
The most effective DIY gun safe organization project is a planning session with a tape measure, notebook, and inventory list. Measure interior height, width, and depth at several points because many safes narrow near fireboard panels, shelves, door seals, and interior corners. Then measure the longest firearm with its optic, sling, muzzle device, or bipod attached. Factory capacity ratings are optimistic because they assume slim stocks and no accessories. A “24-gun” safe often holds far fewer scoped rifles in a practical layout. When I redesign a safe, I map four zones: long guns, handguns, support gear, and protected documents or valuables. That simple zoning prevents the common mistake of mixing tall, heavy items with small accessories that should live in bins or on the door.
Material choice matters. For shelves and dividers, 3/4-inch plywood, melamine, or medium-density fiberboard can work, but plywood usually handles screw retention and humidity changes better. Closed-cell foam is preferable to open-cell foam where moisture control matters. Industrial hook-and-loop, magnetic trays rated for load, adhesive-backed LED channels, and polymer bins all perform well if selected for temperature and weight. Avoid cheap household adhesives that soften in summer heat inside garages. Also avoid drilling through safe walls unless the manufacturer explicitly allows it. Most organizational upgrades can be built as free-standing inserts, pressure-fit panels, or components attached to interior liner surfaces rather than steel body panels.
Build a modular rifle rack system that fits optics and modern stocks
Long-gun storage is where the biggest space savings usually appear. Standard notched barrel rests waste width because they assume each rifle can stand upright with identical spacing. In real collections, one rifle has a 50-millimeter scope objective, another has offset irons, and a shotgun may have a side saddle. A better DIY project is a modular rack insert with staggered slots and alternating heights. Build a base tray from plywood with a lip at the front, then add a vertical backer panel lined with marine carpet or felt. Cut stock supports from dense polyethylene foam, hardwood, or layered plywood with semicircular notches sized to your barrels or fore-ends. Stagger every other notch by one to two inches to let scopes overlap without touching.
This approach can increase real capacity significantly while reducing contact damage. In one crowded safe, replacing the factory rack with a staggered insert allowed twelve long guns to store comfortably where nine had fit before, because optic bells no longer collided. Keep muzzle ends oriented consistently, and reserve edge positions for the bulkiest rifles. If you store AR-platform rifles, make dedicated slots for pistols with braces or short carbines only where legal and appropriate in your jurisdiction. Add a removable divider so hunting rifles with soft slings do not drape into neighboring slots. The key is precision: each slot should match the actual collection, not a generic outline.
Upgrade shelves, bins, and soft surfaces for accessories
Factory shelves are often too tall for pistol cases and too deep for small items, which causes stacking and wasted air space. One of the best DIY gun safe shelf modifications is to replace one large shelf with two or three shallower levels using adjustable cleats or a freestanding cubby tower. Use shelf heights based on categories: magazines, ear protection, cleaning gear, handgun rugs, and documents should each have dedicated vertical clearance. Add low-front bins so items stay visible from the door. Label every bin. If a family member or range partner can return an item to the right place without asking, the system will last.
Soft surfaces prevent abrasion and make inventory checks easier. Line shelves with toolbox drawer liner, wool felt, or automotive trunk liner rather than loose carpet scraps that shed fibers. For handguns, individual rests made from PVC covered in heat-shrink tubing or silicone sleeves work well because they hold shape and keep pistols separated. Small parts like choke tubes, batteries, screws, and sight tools should go into compartment organizers with positive latches. Fireproof document pouches can sit on an upper shelf, but they should not block dehumidifier airflow. Every accessory should have a home, and every shelf should support the actual weight placed on it.
Use the door panel as premium storage space
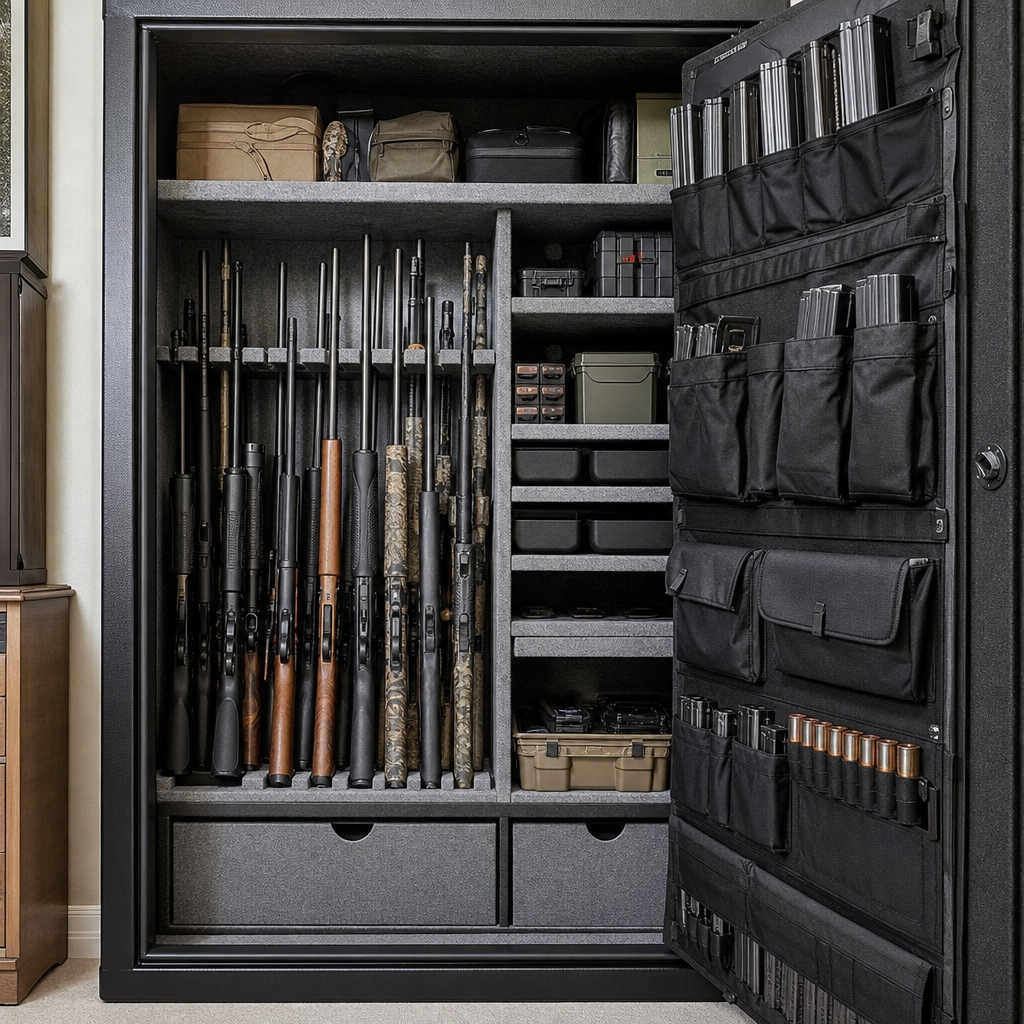
The inside of the safe door is the most underused area in many setups. A DIY door panel organizer can hold handguns, magazines, documents, knives, flashlights, and maintenance tools while freeing the floor and shelves for larger items. Commercial systems from brands such as Liberty, Rhino, and Gun Storage Solutions show the concept clearly: a fabric or panel-backed organizer attaches to the existing door liner and distributes weight across the surface. You can build a similar system using a rigid backer of corrugated plastic or thin plywood, covered in loop fabric, then mount pouches and holsters with hook backing or mechanical fasteners into the backer itself, not the steel door.
The best practice is to store lighter, flatter items on the upper half of the door and reserve lower pockets for magazines or compact pistols only if the hinge side and door seal still close smoothly. Test clearance carefully. A pouch that protrudes too far can press into rifle stocks or optics when the door shuts. For documents, use zippered sleeves or fire-resistant envelopes attached high on the panel. For handgun access, orient grips consistently and use trigger-cover holsters or fitted sleeves so nothing snags. Door storage feels simple, but it transforms workflow because the most frequently handled items become immediately visible.
| DIY project | Main benefit | Best materials | Common mistake |
|---|---|---|---|
| Modular rifle rack | Fits more scoped long guns safely | Plywood, felt, dense foam | Using uniform slot spacing |
| Adjustable shelf tower | Stops stacking and wasted height | 3/4-inch plywood, bins, liner | Building shelves too deep |
| Door panel organizer | Uses vertical space for handguns and gear | Rigid backer, loop fabric, pouches | Ignoring door clearance |
| LED lighting and power | Improves visibility and maintenance | Low-voltage LEDs, cable clips | Loose wiring near hinges |
| Humidity control mounts | Reduces rust and mildew risk | Rod brackets, hygrometer, desiccants | Blocking airflow with bins |
Add lighting and power without creating clutter or hazards
Lighting is one of the highest-value gun safe DIY upgrades because it improves visibility instantly. LED strip lighting or LED bars are preferred because they run cool, draw little power, and can be placed along door frames or shelf undersides. Choose warm or neutral white in the 3000K to 4000K range so blued steel, brass, and labels are easy to distinguish. Motion-activated systems are convenient, but manual switches are often more reliable over time in enclosed spaces. If your safe includes a factory power pass-through, use it. If not, look for manufacturer-approved access points before considering any cord routing. Do not pinch power cables through the door seal.
Organized cable management is essential. Secure wires with adhesive cable mounts rated for heat and aging, and keep them away from moving bolts, hinge points, and long-gun muzzles. If you add charging for optics, flashlights, or a small dehumidifier rod, use a surge-protected low-profile strip placed on a shelf side, not the floor where moisture can collect. In my experience, lighting often exposes other layout problems immediately: hidden magazines, duplicate tools, and dead batteries become obvious. That is a benefit. Good light turns the safe from a dark box into a controlled storage system.
Control humidity with airflow, monitoring, and smart placement
Gun safe humidity control is not optional in basements, garages, coastal regions, or any home with seasonal swings. Corrosion starts long before severe rust becomes visible. The practical target is stable, moderate humidity rather than the driest air possible. Many owners aim for roughly 45 to 50 percent relative humidity, monitored with a digital hygrometer placed at mid-height inside the safe. The two common tools are desiccants and electric dehumidifier rods, often sold under the GoldenRod name. Desiccants absorb moisture and need recharging or replacement. Rods slightly warm the air, encouraging circulation and reducing condensation. In larger safes or damp rooms, using both can work well.
Organization affects moisture control more than people expect. If ammo cans, pistol cases, and document boxes are packed tightly against the back wall, airflow stalls. Leave small gaps between bins and avoid stuffing soft cases into every cavity. Do not store wet slings, recently cleaned firearms with excess solvent, or silica packs that are already saturated. A simple DIY improvement is to mount the hygrometer where it can be read quickly and place desiccants on upper shelves while keeping a rod low, where warm air can rise. Check readings regularly. Consistency prevents surprises, and prevention is cheaper than refinishing steel.
Create dedicated handgun, magazine, and document zones
A mixed pile of pistols, magazines, passports, tax records, and spare optics is not organization. It is delayed frustration. One of the smartest DIY gun safe organization strategies is to create fixed zones by use case. Defensive handguns should live in a clearly defined area, often on the door panel or on individual pistol stands at chest height. Training or range pistols can sit on lower shelves with their mag loaders, dummy rounds, and hearing protection nearby. Magazines should be stored by platform in labeled bins or upright racks so capacity and caliber are obvious at a glance. If you own multiple similar magazines, color-coded labels prevent mix-ups between cartridges such as 5.56 NATO and .300 Blackout.
Documents deserve their own protected section. Place serial number records, insurance riders, trust paperwork, passports, and emergency contact sheets in sealed document sleeves or a secondary fire-rated pouch. Keep them accessible without requiring you to move firearms first. That separation pays off during audits, moves, or emergency claims. I also recommend a small inventory card or QR-coded list inside the door for maintenance dates, battery changes for optics, and dehumidifier service intervals. The most organized safes operate like tool chests: category-based, labeled, and easy to reset after every use.
Follow safety, warranty, and legal limits on every modification
Not every DIY safe modification is wise. The best projects improve organization without compromising fire lining, steel integrity, lock reliability, or household safety protocols. Before attaching anything permanently, check the safe manual and manufacturer guidance. Some interior panels hide relockers, boltwork channels, or fireboard that should not be disturbed. Avoid drilling into the body, door, or frame unless you have explicit approval and understand the construction. Added shelves must be stable enough that they cannot collapse onto firearms. Adhesives should be low-odor and fully cured before reloading the safe. Battery-powered lights should use quality cells and be checked for leakage.
There are also practical and legal boundaries. Ammunition storage practices vary by household preference, local codes, and safe capacity; if ammo is kept inside the safe, separate it logically and avoid blocking access to firearms or humidity control components. Any arrangement involving loaded defensive firearms must align with your training, household rules, child-access prevention plan, and applicable law. A well-organized safe is not just neat; it is safer because every item has a predictable location, handling is reduced, and inspections become routine. Start with one project this week, measure carefully, and build a system that supports secure ownership for years.
Frequently Asked Questions
What are the best DIY projects for improving gun safe organization without reducing security?
The best DIY gun safe organization projects are the ones that make storage more efficient while preserving quick visibility, controlled access, and safe firearm handling. A great starting point is a custom door panel organizer. Many safe doors have unused vertical space that can hold handguns, magazines, documents, bore snakes, and small maintenance tools. Adding a purpose-built organizer with secure pockets and holsters can free up shelf space inside the safe and make commonly used items easier to locate.
Another highly effective project is adjustable interior shelving. Factory shelves do not always match a real-world collection, especially if you have a mix of long guns, optics-equipped rifles, revolvers, pistol cases, and important paperwork. DIY shelf risers, modular dividers, and reconfigurable cubbies can help separate categories of gear so items are not stacked loosely or hidden behind one another. This supports faster access and better inventory control.
Handgun racks are also one of the most practical upgrades. Instead of laying pistols flat on shelves where they consume valuable space, simple DIY handgun hangers or foam-cut racks can store multiple pistols upright and clearly visible. Magazine bins, labeled ammo containers, and dedicated document sleeves for serial records, tax stamps, manuals, and insurance papers are equally useful. For many owners, a small interior lighting upgrade, such as battery-powered LED motion or touch lights, is another easy project that significantly improves visibility inside a dark safe.
The key principle is that every DIY project should support organization, not clutter. Avoid anything that blocks locking bolts, interferes with fire seals, introduces unnecessary moisture, or creates snag points around triggers. Good organization should make each firearm, accessory, and record easier to inspect, retrieve, and secure while maintaining the safe’s intended level of protection.
How can I organize long guns, handguns, magazines, and accessories inside a gun safe more efficiently?
Efficient gun safe organization begins by dividing contents into functional zones rather than placing everything wherever it fits. Long guns should usually occupy one clearly defined section with enough spacing to prevent stocks, optics, and slings from tangling. If your collection includes scoped rifles or firearms with different heights and profiles, a staggered rack layout or custom barrel rests can help maximize capacity without crowding. In many cases, shifting from a basic straight-line arrangement to an offset setup creates more room and improves visibility.
Handguns are often best stored separately from long guns, either on the safe door, on dedicated shelf racks, or in labeled soft sleeves arranged in a stable row. This prevents them from being piled on top of ammunition boxes or documents and makes it much easier to identify what is in the safe at a glance. Magazines should ideally be grouped by platform and caliber, then stored in upright bins, elastic loops, or divided containers. Labeling matters here because it reduces mix-ups and speeds up both range prep and inventory checks.
Accessories such as optics, suppressor accessories where legally applicable, slings, cleaning kits, batteries, ear protection, and small tools should be assigned to specific shelves or bins instead of being scattered loosely. A simple but effective DIY method is to use clear labeled containers so you can identify contents immediately without digging through stacks. Important documents should be placed in a dedicated folder, fire-rated pouch, or document sleeve positioned where they will not be crushed by heavier equipment.
One of the biggest improvements comes from organizing by frequency of use. Firearms and accessories you access often should be positioned in the most reachable areas, while seasonal, backup, or archival items can go higher, lower, or farther back. That approach makes the safe more functional day to day and reduces unnecessary handling of everything else inside.
What materials are safest and most effective for DIY gun safe shelves, racks, and organizers?
The safest and most effective materials are those that are sturdy, low-lint, non-abrasive where they contact firearms, and unlikely to trap moisture. Plywood, sealed hardwood, thin sheet metal components, polymer bins, and closed-cell foam are all commonly used in well-planned DIY projects. If you are building shelves or dividers, smooth finished wood is often a practical choice because it is easy to cut and customize. However, it should be properly sealed and lined where firearms or optics may rest, since unfinished wood can hold moisture and rough edges can mar finishes.
Closed-cell foam is especially popular for handgun racks, barrel rests, and custom cutouts because it provides cushioning without absorbing as much moisture as more porous materials. Adhesive-backed felt, carpet, or fabric lining can also help protect finishes, but it should be applied carefully using products that do not produce strong lingering fumes in an enclosed safe. Materials that shed fibers excessively or break down over time can create maintenance issues, so durability matters.
For magazine bins, document holders, and accessory caddies, rigid plastic containers often work well because they are lightweight, easy to label, and resistant to oil or solvent residue. Magnets can sometimes be useful for temporary tool placement, but they should be used thoughtfully and not in ways that interfere with firearms, electronics, locking components, or the safe’s interior finish. Fasteners should be selected with the safe’s construction in mind, especially if you are attaching anything to existing panels or shelving systems.
In general, avoid materials that are overly bulky, fragile, highly absorbent, chemically harsh, or likely to corrode. The ideal DIY organizer material should help maintain structure, visibility, and safe contact surfaces while supporting the larger goals of protection, preservation, and controlled access.
How do I add labels, inventory tracking, and storage zones to a gun safe in a smart way?
Adding labels, inventory tracking, and storage zones is one of the smartest DIY upgrades because it turns a crowded safe into a manageable system. Start by assigning broad categories to distinct areas, such as long guns, handguns, magazines, ammunition, documents, cleaning supplies, and valuables. Once those zones are established, use clear and durable labels on bins, shelves, pouches, and file sleeves. The goal is not to advertise contents to unauthorized viewers, but to make the interior intuitive for the authorized owner when the safe is open.
For inventory tracking, many owners create a simple record that includes make, model, serial number, caliber, purchase information, and accessory notes for each firearm. That can be maintained digitally in a secure location and backed up with printed copies stored in a protected document sleeve. You can also track magazine counts, optic serial numbers, batteries, spare parts, and maintenance intervals if you want a more complete system. A well-kept inventory is useful for insurance, estate planning, theft reporting, and routine collection management.
Storage zones work best when they are maintained consistently. For example, all pistol magazines for one platform should go back into the same labeled section every time. Cleaning rods, brushes, lubricants, and patches should stay together in one kit area rather than being spread around the safe. If you frequently rotate carry pistols, range guns, or defensive long guns, a front-access zone can help reduce handling of less frequently used items behind them.
A smart labeling system should remain simple enough to use under normal conditions and clear enough to support fast checks. If you overcomplicate the structure with too many micro-categories, it can become harder to maintain. The best system is one you can follow consistently, update easily, and rely on whenever you need to confirm what is stored, where it belongs, and whether anything is missing.
What mistakes should I avoid when doing DIY gun safe organization projects?
The biggest mistake is focusing only on fitting more items into the safe instead of improving access, protection, and control. Overcrowding can cause firearms to bump against each other, hide critical documents, and make it harder to remove one item without disturbing several others. A better approach is to organize with space, visibility, and safe handling in mind. If a shelf, rack, or pouch forces awkward movement around triggers, optics, or muzzles, it is not an improvement.
Another common mistake is ignoring moisture management. Adding fabric, foam, paper products, or untreated wood without considering humidity can undermine long-term storage conditions. Any DIY modification should work alongside a dehumidifier, desiccant system, or other moisture-control plan appropriate to the safe and environment. It is also a mistake to place cleaning chemicals, oils, or solvent containers carelessly where they can leak onto firearms, documents, or optics.
Many people also underestimate the importance of preserving the safe’s original function. DIY organizers should not obstruct door closure, locking mechanisms, internal hinges, fire lining, or factory shelving supports. Permanent modifications should be approached carefully, especially if they could affect warranty coverage or damage interior panels. Before attaching anything, confirm that it will not interfere with operation or compromise the safe structure.
Finally, avoid disorganized “temporary” solutions that become permanent clutter. Loose ammo boxes, unlabeled magazines, mixed spare parts, dead flashlight batteries, and random tools can quickly consume the very space you were trying to optimize. The best DIY project is not just clever to build; it is easy to maintain over time. A successful gun safe organization system should help you store firearms and related gear more safely, retrieve them more efficiently, and keep better track of everything that matters.