
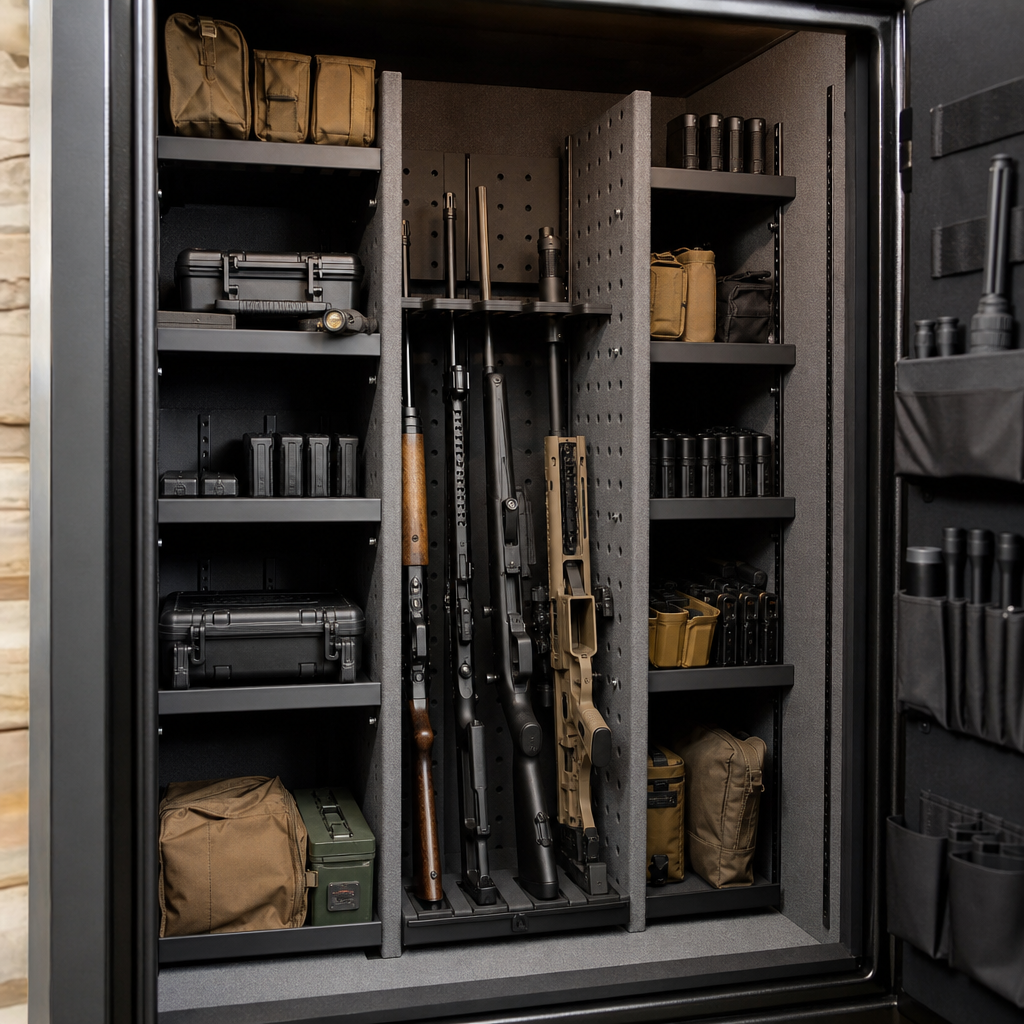
A DIY modular gun safe interior lets you replace fixed racks and wasted corners with adjustable storage that fits your firearms, optics, magazines, documents, and accessories safely. In practical terms, “modular” means the interior can be reconfigured without rebuilding the safe each time your collection changes. “Adjustable storage” means shelves, barrel rests, bins, handgun pockets, and tool panels can move, expand, or come out entirely. This matters because most factory gun safe interiors are built for a showroom layout, not for real ownership patterns where scoped rifles take more width, AR platforms need different spacing, and handguns, suppressors, batteries, and paperwork compete for room.
I have rebuilt several safe interiors for households that started with a simple long-gun setup and quickly ran into the same problem: the safe’s rated capacity did not match usable capacity. A “24-gun” safe often holds far fewer once you add slings, bipods, larger bolt handles, or soft cases. The solution is not random foam and adhesive hooks. A good modular interior uses predictable attachment methods, stable materials, and clear load planning so the system remains organized, secure, and easy to update. It also respects core safety rules: the safe must still lock properly, humidity must stay controlled, and nothing in the modification should interfere with fire lining, door seals, anchoring points, or access to stored defensive firearms.
As a hub for custom and DIY gun safe modifications, this guide covers the full picture: how to assess your existing interior, which materials actually work in a safe environment, how to build adjustable panels and shelves, how to use the door efficiently, and where DIY projects can create risks. The goal is simple. You should be able to turn a cramped, inefficient gun safe into a flexible storage system that protects firearms better, improves access, and adapts as your needs change without committing to a permanent one-size-fits-all layout.
Start With a Safe Interior Audit and a Real Capacity Plan
The best DIY modular gun safe interior projects begin with measurement, not cutting. Remove every loose item and document the interior width, depth, height, door clearance, hinge-side intrusion, shelf pin positions, power outlet location, dehumidifier placement, and any carpeted panels that may hide fastening limitations. Measure the widest firearm at its broadest point, not just barrel or receiver width. Optics, turrets, charging handles, slings, magazine wells, and bipods determine spacing more than barrel diameter does. In my experience, most owners overestimate vertical capacity and underestimate side-to-side interference between rifles with mounted optics.
Create zones before you buy materials. Dedicate one zone to long guns, one to handguns, one to documents and valuables, one to support gear such as magazines and hearing protection, and one to maintenance or battery-powered accessories. If the safe serves home defense, separate immediate-access items from deep storage. This is also where you decide whether to retain any factory shelving. Many safes have a serviceable upper shelf and poor lower long-gun layout. You do not need to replace everything. Often the most effective custom gun safe modification is a hybrid approach: keep the strong, square factory shelf and rebuild only the lower divider, barrel support, and door panel.
Capacity planning should be honest. A typical scoped hunting rifle may need 2.5 to 3.5 inches of center-to-center spacing. AR-style rifles with optics and extended controls may need 3.5 to 5 inches depending on orientation. Pistols on door organizers save shelf space but add door weight, so balance matters. Build around current inventory plus modest growth, not fantasy capacity numbers. An interior that securely stores twelve firearms with room for airflow is better than one that crushes sixteen together and scuffs optics every time you reach inside.
Choose Materials That Are Stable, Safe, and Easy to Reconfigure
Material choice determines whether your adjustable gun safe storage feels professional or temporary. The most reliable base panels are 1/2-inch or 3/4-inch plywood, cabinet-grade birch plywood, medium-density fiberboard with sealed edges, corrugated plastic for light accessories, or steel pegboard panels when load and corrosion are addressed properly. For shelf faces and dividers, plywood generally beats particleboard because screws hold better and edges survive repeated adjustment. If you use MDF, seal exposed edges with water-based polyurethane or shellac-based primer to reduce moisture absorption and fiber shedding.
Covering matters too. Safe interiors should not expose metal edges, abrasive fasteners, or rough wood to firearm finishes. Automotive trunk liner, marine carpet, adhesive-backed felt, and loop fabric are common coverings. Loop fabric is especially useful because hook-backed organizers can attach directly to it. However, choose low-odor adhesives and let materials off-gas outside the safe before installation. Trapped solvent smell inside an enclosed safe is unpleasant and unnecessary. I prefer mechanical fastening where possible and only enough adhesive to stabilize fabric, because future replacement is easier and there is less mess around humidity control devices.
Magnets, hook-and-loop systems, shelf-pin cabinets, French cleats, slotted standards, and pegboard all have valid use cases. Hook-and-loop panels are excellent for lightweight handgun holsters, document pouches, and small bins. Shelf pins work well for adjustable upper shelving. French cleats are strong and flexible for larger removable modules. Slotted standards, the type used in utility shelving, provide precise shelf adjustment but require careful installation to keep the system square. Magnetic accessories can work on steel walls or doors, but verify holding force under vibration and door movement. Inside a gun safe, reliability beats novelty every time.
| Material or System | Best Use | Main Advantage | Tradeoff |
|---|---|---|---|
| Birch plywood | Shelves, dividers, backer panels | Strong screw holding and durability | Heavier than plastic panels |
| Loop fabric panels | Handgun pockets, pouches, soft organizers | Highly reconfigurable | Limited for heavy loads |
| French cleats | Removable modules and bins | Excellent strength and flexibility | Requires accurate cutting |
| Shelf-pin system | Adjustable shelves | Clean look and easy height changes | Not ideal for oddly shaped gear |
| Steel pegboard | Tools and accessory hanging | High load capacity | Can scratch finishes if uncovered |
Build the Modular Back Panel and Long-Gun Support System
The core of most adjustable safe interiors is a back panel or side panel that accepts movable storage components. A simple and effective method is to cut a plywood or composite panel to fit the rear wall, wrap it with loop fabric or carpet, and secure it to the existing shelf structure or a noninvasive compression frame. Avoid drilling into the safe body unless the manufacturer explicitly allows it and you understand the fire liner, steel thickness, and warranty implications. Many projects can be built as freestanding insert systems that slide in and lock into place under the existing top shelf.
For long-gun organization, the lower rack and upper barrel rest should work together. Factory barrel notches are often too widely spaced or cut for iron-sight rifles only. A better design uses a carpeted lower platform with individual buttstock cups or staggered channels, paired with a removable upper support rail. Closed-cell polyethylene foam, EVA foam, or layered Kaizen foam can be shaped into barrel rests, but foam alone should not carry structural loads. Attach foam to a rigid backer board. For scoped rifles, staggering the upper supports forward and backward by an inch or two reduces optic collisions and increases real capacity.
Adjustability comes from slots, movable blocks, or hook-and-loop-mounted cradles. For example, a rail covered in loop fabric can accept separate barrel cradles with hook backing, allowing you to change spacing as firearm mix changes. Another proven method is a wooden rail with routed slots and sliding blocks locked by hand knobs. That takes more fabrication time but gives a more rigid result for heavier rifles. In safes with mixed firearm types, split the lower section into two zones: one with deeper spacing for modern sporting rifles and one with tighter spacing for hunting rifles or shotguns. That alone usually solves the “rated for 18, holds 9” problem.
Make Adjustable Shelves, Bins, and Pistol Storage Work Together
A modular gun safe interior is most useful when shelves do more than hold random boxes. Build shelves around categories and retrieval frequency. Upper shelves should hold lighter, infrequently accessed items such as paperwork, spare optics in cases, and seasonal accessories. Mid-height shelves work best for magazines, ammunition stored within manufacturer and local legal guidelines, range tools, and hearing protection. Lower shelves must account for kneeling access and should not become dead space behind long-gun stocks. Pull-forward bins, shallow trays, and labeled containers make a major difference.
Use dividers to prevent collapse into clutter. Small plywood cubbies, polymer bins, and magazine trays keep weight distributed and make inventory visible at a glance. If you store pistol magazines, build trays sized to common patterns rather than dumping them into a box. The same principle applies to bolts, choke tubes, batteries, and suppressor accessories. Clear labeling is not cosmetic. In a defensive or time-sensitive context, knowing exactly where a light battery or passport is stored matters.
Pistol storage offers several DIY options. Door-mounted handgun pockets save shelf space, while under-shelf racks can suspend pistols by the slide and free up flat storage below. Individual soft holsters on loop panels are more protective than stacking pistols in foam cutouts that trap dust and limit flexibility. If you use handgun rods inserted into barrels for shelf display, use coated rods and verify they do not stress sights or optics. For most owners, a mixed system works best: two or three frequently accessed handguns on the door, overflow pistols in soft sleeves on shelves, and magazines in dedicated trays nearby.
Use the Door, Sidewalls, and Empty Vertical Space Without Creating Hazards
The door panel is the most underused area in a standard safe, but it also has the most potential to go wrong. Added weight can affect door swing, hinge wear, and closing alignment if you overload it with ammunition, tools, or too many pistols. Focus the door on medium-light items: handguns, documents, passports, jewelry pouches, small flashlights, suppressor tools, and serialized accessory paperwork. Commercial door organizer panels often use reinforced fabric over a rigid board, and that basic design is easy to replicate with a thin plywood insert, loop fabric, and sewn or riveted pouches.
Sidewalls can support slim storage if you preserve clearance. Magnetic bins for desiccants, cleaning rods, or chamber flags work well on steel sidewalls. Narrow vertical organizers can hold choke tubes, bore snakes, and spare batteries. Just confirm that firearm stocks and optics do not strike them when removing long guns. Vertical space above shorter firearms is ideal for removable bins or a floating shelf. I often add a shallow top-front shelf for documents and a deeper rear shelf for less-used valuables, which keeps the front opening area clear and reduces the tendency to stack items on top of rifle scopes.
Do not block lockwork covers, relocker access, interior hinge pockets, power pass-through holes, or dehumidifier airflow. Also maintain clearance for interior lighting. A motion-activated LED strip is a worthwhile upgrade during a safe interior rebuild, but route wiring neatly and avoid pinch points near the door frame. The standard to follow is simple: every added component should either increase organization, protect firearm finishes, or improve access. If it only fills empty space, it probably should not be there.
Control Humidity, Protect Finishes, and Avoid Common DIY Mistakes
Any custom gun safe modification must respect the safe’s microclimate. Firearms, optics, documents, and wood stocks all react poorly to moisture swings. Use a hygrometer so you are not guessing. In most indoor situations, keeping relative humidity around 45 to 50 percent inside the safe is a practical target. GoldenRod-style convection heaters, rechargeable desiccants, and silica gel can all work, but they work differently. Heaters reduce condensation risk by slightly warming air; desiccants remove moisture. Large safes in humid garages often need both. A beautifully organized interior will still fail if rust develops on barrels or mildew forms on slings.
Protective surfaces matter as much as climate control. Avoid raw rubber, low-grade foam, or pressure-sensitive adhesives that can degrade and transfer residue to wood or metal finishes. Closed-cell foam is preferable to open-cell craft foam because it absorbs less moisture and holds shape better. Wrap wood edges, countersink fasteners, and use nonmarring contact points anywhere a firearm rests. If you stain or paint wooden modules, let them cure fully before bringing them inside the safe. I have seen fresh coatings trap odor for weeks and contaminate the interior environment unnecessarily.
The most common mistakes are predictable: building to exterior rather than interior dimensions, ignoring door clearance, overloading shelves without load paths, using thick carpet that steals usable width, relying on glue alone, and designing for identical rifles when the collection is mixed. Another common error is forgetting maintenance access. You should be able to remove a shelf, replace a dehumidifier, inspect the back corners, and vacuum dust without dismantling the entire system. A modular interior succeeds when it stays serviceable over years, not just on installation day.
When to DIY, When to Buy Components, and How This Hub Connects Your Next Projects
Not every safe interior part needs to be homemade. In many builds, the smartest path is to fabricate the structural pieces yourself and buy specialized accessories such as handgun hangers, LED lighting, silica canisters, zippered document pouches, and hook-backed magazine holders. Commercial parts from brands like Gun Storage Solutions, SnapSafe, Liberty Safe accessories, and Lockdown can save time, especially for door panels and lighting. The test is whether the bought component integrates cleanly into your layout and solves a real problem better than a custom part would.
DIY makes the most sense when your safe has odd dimensions, your firearm mix is unusual, or you want maximum efficiency per inch. Buying makes sense when a product is already optimized, low risk, and cheaper than your time. For example, I will gladly build a custom staggered rifle rack, but I usually buy a proven hygrometer instead of improvising moisture monitoring. The strongest custom and DIY gun safe modifications use that kind of judgment.
As the hub page for this subtopic, this guide should inform your next steps. From here, the natural follow-on projects are a dedicated gun safe door organizer build, a shelf and divider plan for ammo and magazines, a humidity-control setup for safes in garages or basements, a lighting retrofit, and a detailed long-gun rack redesign for scoped rifles. Start with the interior audit, choose one modular attachment method, and rebuild the layout in stages. A good DIY modular gun safe interior does more than create space. It gives every firearm and accessory a defined place, reduces handling damage, improves readiness, and makes the safe easier to live with every day. Measure carefully, build conservatively, and upgrade the section that delivers the biggest improvement first.
Frequently Asked Questions
What does a DIY modular gun safe interior actually include?
A DIY modular gun safe interior is a customizable storage system built inside your safe so you can change the layout without tearing everything apart every time your collection evolves. Instead of relying on fixed wooden racks and permanently placed shelves, a modular setup uses movable components such as adjustable shelves, removable barrel supports, handgun holsters or pockets, magazine bins, document trays, door organizers, and hook-and-loop or panel-based mounting surfaces. The main idea is flexibility. If you add a scoped rifle, need more room for handguns, or want to create a dedicated section for ammunition, paperwork, suppressor accessories, or cleaning tools, you can reconfigure the interior rather than starting from scratch.
In practice, many DIY builds combine a lightweight backer panel with repositionable accessories. Some owners use carpeted panels with hook-and-loop attachments, while others prefer slotted standards, pegboard-style systems, magnetic retention for limited applications, or custom-cut foam inserts inside bins and drawers. A well-designed modular interior also considers protection, not just storage density. Firearms should stand securely without rubbing against optics or stocks, magazines should be contained in a way that prevents clutter, and important documents should be easy to access while staying protected from damage. The goal is to make every inch of the safe usable, especially the dead space above shelves, along side walls, on the door, and in corners that factory interiors often waste.
Why is adjustable storage better than the factory layout in most gun safes?
Most factory gun safe interiors are built to satisfy a broad market, not the specific gear you own. They often assume a basic mix of long guns with minimal optics, a few shelves, and limited accessory storage. That sounds fine until you try to fit modern rifles with larger scopes, tactical shotguns, AR-style platforms, handguns in cases, spare magazines, hearing protection, documents, and maintenance supplies into the same space. Fixed racks can force awkward spacing, shelves may be set at heights that waste vertical room, and corners frequently become unusable because nothing fits cleanly. Adjustable storage solves those problems by allowing the interior to match the size, shape, and number of items you actually need to store.
Another major advantage is future-proofing. Collections change. You might sell one rifle, add two handguns, change optics, or decide to dedicate more room to valuables and paperwork. With a modular interior, the safe evolves with you. You can raise or lower shelves, move handgun storage to the door, add bins for magazines, or shift long-gun spacing to prevent crowding. That adaptability improves both organization and protection. Firearms are less likely to bump into each other, accessories are easier to inventory, and you can retrieve what you need without disturbing the whole safe. For many owners, adjustable storage also makes the safe feel larger because it eliminates inefficient layout choices that come standard from the factory.
What materials work best for building a modular gun safe interior?
The best materials depend on your safe size, budget, tools, and how much weight the interior needs to support, but the general rule is to choose materials that are sturdy, low-profile, and gentle on firearm finishes. Common DIY choices include plywood, MDF, rigid foam board, PVC sheets, aluminum rails, carpet, felt, automotive trunk liner, and industrial hook-and-loop fasteners. Plywood is often the preferred structural material for shelves, dividers, and backer panels because it is strong, easy to cut, and holds fasteners better than many alternatives. Thin plywood can be used for lightweight liners, while thicker panels work well for shelf frames or upright supports.
For surfaces that contact firearms, soft coverings matter. Felt, low-pile carpet, microsuede, and similar non-abrasive materials help reduce scratches and vibration. Closed-cell foam can be useful for cradles, barrel rests, and insert pads inside bins, especially when customized to a particular shape. If you want highly adjustable mounting, hook-and-loop systems are popular because they allow pouches, holsters, and barrel supports to be repositioned quickly. For shelf adjustability, metal shelf standards or cleat systems provide better load support than relying solely on adhesive-backed products. Moisture resistance should also be part of the material decision. Since safes can experience humidity swings, finishes such as paint, sealant, or edge banding can help wood components last longer. Avoid materials that shed fibers excessively, trap moisture easily, or off-gas strong chemicals in a confined space.
How do I plan the layout so the safe stays secure, organized, and easy to reconfigure?
The smartest approach is to begin by emptying the safe and grouping your contents by type: long guns, handguns, magazines, optics, documents, valuables, ammunition if stored there, and maintenance gear. Measure the interior width, depth, height, door clearance, shelf depth, and any obstructions such as hinges, fire lining bulges, dehumidifiers, or interior lips. Then measure your tallest firearms with optics attached, because optics and mounted accessories often determine real spacing needs more than barrel length alone. Once you know what must fit, sketch zones rather than exact final placements. For example, dedicate one section to scoped long guns, one shelf stack to handguns and accessories, one door area to pouches or document pockets, and one small bin zone to magazines and loose gear.
Reconfigurability comes from planning around change, not perfection. Leave some open capacity. Use movable shelves instead of fixed cubbies whenever possible. Create storage categories that can expand or shrink. A bin system for magazines, batteries, and parts is far easier to adjust than building custom compartments for every item. Keep frequently accessed items near the front and place high-value documents where they can be removed quickly. Make sure nothing mounted to the door interferes with shelves or firearm stocks when the door closes. It also helps to think in layers: back wall support for long guns, side or upper wall storage for light accessories, shelf modules for compact items, and door storage for flat gear. A good modular layout should let you swap positions, remove one module, or add another without rebuilding the whole interior.
Are there any safety or performance concerns to keep in mind when modifying a gun safe interior?
Yes, and they are important. The first concern is that your modifications should not interfere with the safe’s door seal, locking mechanism, relockers, hinges, interior fire lining, or dehumidification setup. Avoid drilling into the safe body unless you are absolutely certain it will not affect structural integrity, fire protection, or warranty coverage. Many DIY modular interiors are intentionally designed to be freestanding, friction-fit, attached to existing interior panels, or mounted with non-destructive methods so the steel shell remains untouched. Weight distribution also matters. If you add heavy shelving, dense ammo storage, or thick wood modules to one side, make sure the layout remains stable and does not create pressure points that interfere with closing or opening the door.
Protection of the firearms themselves is another key issue. Storage surfaces should not be abrasive, and rifles should be supported in a way that prevents tipping, sliding, or constant pressure on delicate optics. Keep silica gel, a dehumidifier rod, or another humidity-control method active, because better organization does not replace moisture management. Also be cautious about overcrowding. A modular interior should improve access and reduce contact between firearms, not simply cram more into the same footprint. Finally, always maintain safe firearm handling practices during the reorganization process. Verify all firearms are unloaded before placing them into a new layout, and separate live ammunition if that aligns with your storage plan and local legal requirements. A successful DIY modular interior is not just space-efficient; it should make the safe safer, cleaner, and easier to use over the long term.