Extra padding inside a gun safe is one of the simplest upgrades you can make to prevent firearm scratches, reduce stock dents, and protect optics from rubbing during daily use. In the context of custom and DIY gun safe modifications, padding means any added protective material—foam, felt, carpet, neoprene, rack sleeves, door panel liners, or shelf covers—installed to create softer contact points wherever firearms, magazines, accessories, and hard interior surfaces meet. This matters because most cosmetic damage does not happen at the range or in transit; it happens at home when long guns shift in a crowded safe, metal parts touch painted steel, or a scope bell knocks against a shelf edge. I have seen expensive blued finishes marked by a single rough rack slot and polymer stocks permanently scuffed by repeated pressure against unlined dividers. A well-padded safe solves that problem without changing the safe’s fire rating, locking system, or basic structure.
As the hub for custom and DIY gun safe modifications, this guide explains how to add extra padding correctly, what materials work best, where to install them, and which mistakes create moisture, adhesive failure, or access issues. It also connects the broader modification category: better rack spacing, shelf reconfiguration, door storage upgrades, humidity control, LED lighting, and organization systems all work better when surfaces are protected. The goal is not to turn the interior into soft clutter. The goal is to build a controlled environment where every firearm has a stable, cushioned point of contact, enough clearance around sights and optics, and a layout that minimizes handling damage over time. If you want your gun safe to store firearms securely while preserving finish, fit, and function, padding is the foundation.
Why firearms get scratched inside safes
Most safe-related scratches come from friction, impact, and compression rather than dramatic drops. Common causes include tight spacing between long guns, bare metal shelf lips, rough factory carpeting, worn barrel rests, and accessories hanging from the door that press into neighboring firearms when the door closes. In larger collections, the problem gets worse because each removal and return introduces lateral movement. A rifle does not need to fall over to get damaged; a quarter inch of side-to-side drift can scrape a scope turret, mar a stock finish, or wear a bright line into a blued barrel where it repeatedly contacts a divider.
Humidity management also plays a role. Condensation is rare in a conditioned home, but trapped moisture can make some fabrics abrasive over time as dust and residue accumulate. I have opened safes with factory interiors that felt soft at first touch yet had embedded grit along shelf edges from years of use. That grime acts like sandpaper. Another overlooked source is hard accessory storage. Metal magazines, bipods, cleaning rods, and handgun cases can shift onto wood or steel shelves and then into firearms. Padding works because it lowers the coefficient of friction at contact points, spreads pressure more evenly, and absorbs minor impacts before they become visible damage.
Best padding materials for a gun safe interior
The best material depends on the contact point, the firearm finish, and whether you need cushioning, abrasion resistance, or structural support. Closed-cell foam is excellent for shelf tops, rack inserts, and side walls because it resists moisture better than open-cell foam and keeps its shape under moderate load. Neoprene sheets are especially useful under handguns and optics because they provide grip and cushion without shedding fibers. Adhesive-backed felt works well on shelf edges and small high-contact spots, but low-quality felt can peel in heat and collect lint. Marine carpet is durable for large shelf surfaces and safe floors, though it adds thickness and can trap debris if not vacuumed regularly.
For barrel rests and divider slots, soft silicone sleeves, fleece wraps, or hook-and-loop-compatible fabric often outperform generic foam because they reduce abrasion where movement is concentrated. EVA foam is a strong DIY option because it is easy to cut, available in several densities, and stable enough for custom inserts. Avoid crumbly upholstery foam, rubber mats with strong off-gassing, and absorbent household carpet padding. Some adhesives and foams release volatile compounds that can leave odors in an enclosed safe. Others break down and stick to wood, polymer, or optics. Choose neutral-smelling materials from reputable brands such as neoprene sheet suppliers, EVA craft foam manufacturers, or marine-grade carpet lines designed for enclosed spaces and temperature swings.
| Material | Best Use | Main Advantage | Watch For |
|---|---|---|---|
| Closed-cell foam | Shelves, walls, floor panels | Good cushion and moisture resistance | Can compress if too thin |
| Neoprene sheet | Handgun shelves, optic contact areas | Non-slip, clean finish | Costs more than felt |
| Adhesive felt | Edges, dividers, small contact points | Easy to apply and trim | Adhesive may fail in heat |
| Marine carpet | Large shelves and safe floors | Durable and widely available | Can hold dust and add bulk |
| EVA foam | Custom inserts and rack modifications | Easy to cut and shape | Needs precise measuring |
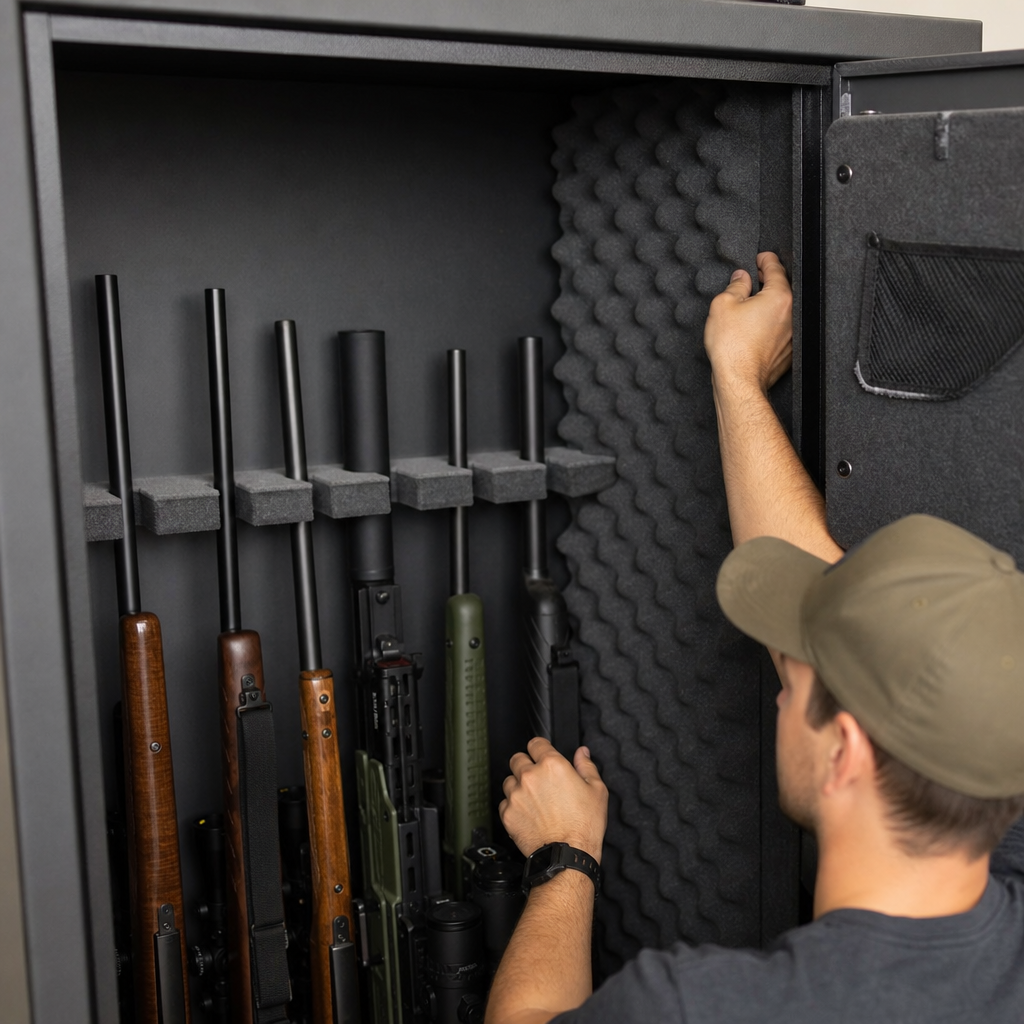
Where to add extra padding for the most protection
Start with the locations where firearms actually touch the safe. The highest-value areas are barrel rests, buttstock bases, shelf edges, side walls near muzzle devices, and any divider that sits between adjacent long guns. On handgun shelves, line the entire shelf surface, then add a second strip where slides or optics tend to settle. If your safe has adjustable shelving, pad both the top surface and the front lip. That front lip is a common scratch source when a rifle is angled in or out. On door organizers, inspect every holster pocket, retention strap, and zipper pull. If a hard edge can touch a firearm when the door shuts, it needs a soft barrier or a layout change.
For scoped rifles, create wider padded lanes rather than trying to squeeze more guns into the same footprint. Optics amplify crowding because turrets and bell housings create off-center pressure points. In practical terms, a safe advertised to hold twenty-four long guns may store far fewer scoped rifles without contact. Padding cannot fix overcrowding by itself, but it can prevent normal movement from turning into finish damage. I often recommend adding side-wall pads at the level of forends and muzzle brakes, because those protruding components are the first to tap steel during retrieval. Safe floors also deserve attention. A padded floor protects stocks when a rifle butt is set down slightly off position and prevents hard cases or ammo cans from scraping nearby firearms.
How to install padding without creating new problems
Installation starts with cleaning. Vacuum the interior, wipe hard surfaces with a non-residue cleaner, and let everything dry before applying adhesives. Measure twice, then cut with a sharp utility knife or rotary cutter for straight edges. Dry-fit every piece before removing adhesive backing. On shelves, I prefer removable panels made from thin rigid board wrapped in neoprene or carpet, because they can be lifted out for cleaning and do not bond directly to the safe. On metal walls and fixed dividers, use adhesive only where mechanical fastening is impractical, and press firmly across the full surface to avoid bubbles that later lift at the corners.
Do not block dehumidifier rods, electrical pass-throughs, anchor bolt access, or door seal surfaces. Keep added thickness away from hinges and lockwork covers. If you are modifying barrel racks, preserve enough clearance so firearms slide in and out smoothly without snagging front sights or suppressor-ready muzzle devices. Test the safe with the door closed before fully loading it. I have seen good-looking DIY padding jobs fail because door organizers compressed against rifle scopes once the door latched. The right approach is incremental: pad one zone, load the firearms you actually store there, and observe contact points. Then refine spacing, add strips where needed, and only after that complete the rest of the interior.
DIY rack, shelf, and door panel upgrades that work with padding
Padding becomes more effective when paired with structural organization upgrades. A custom rifle rack with wider slot spacing reduces lateral pressure between long guns, while soft sleeves inside each slot eliminate finish wear where barrels rest. Shelf risers can separate handguns from magazines and optics, preventing stacked items from rubbing together. Door panel systems can free shelf space, but they should be chosen carefully. If added storage causes the door side to bulge into the main cavity, no amount of felt will fully protect neighboring firearms. Low-profile handgun holsters, magazine pouches with covered snaps, and flat document pockets generally work better than bulky universal bins.
Modular pegboard-style interior panels are useful for DIY safe modifications because they let you move support points as your collection changes. Pair them with padded hooks or rubber-coated hangers rather than bare steel accessories. Another upgrade is a removable muzzle guide at the top of the safe, lined with closed-cell foam or fleece, which helps direct barrels into position without scraping. For collectors storing wood-stocked rifles, individual buttstock cups lined with neoprene reduce finish compression compared with hard plastic cradles. If you are building custom shelves, seal any raw wood first. Unsealed MDF or plywood can shed dust and absorb humidity, and rough fibers under thin fabric eventually telegraph through to the firearm.
Safety, maintenance, and limitations of gun safe padding
Padding protects finishes, but it is not a substitute for safe handling, corrosion control, or realistic storage capacity. Never allow soft materials to interfere with the locking bolts, relockers, hinges, or fire seal. Do not drill into a safe body unless the manufacturer explicitly approves the location, because you can compromise fire protection or wiring. Be cautious with powerful spray adhesives; they are messy in confined interiors and can create fumes that linger. For most owners, peel-and-stick felt is easy but temporary, while wrapped removable panels provide a cleaner long-term result. Check all materials periodically for peeling, compression, mold, dust buildup, and residue transfer.
Maintenance is straightforward. Vacuum shelves and floor liners, wipe non-fabric surfaces, and inspect high-contact zones every few months. Recharge desiccants or verify that an electric dehumidifier is functioning, because even moisture-resistant padding performs better in a controlled environment. If you notice repeated marks in one spot, treat that as a layout problem, not just a padding problem. Add spacing, change orientation, or remove one firearm from that lane. It is also worth acknowledging limits: padding reduces scratches and dings, but it cannot guarantee protection during improper loading, heavy overcrowding, or rapid emergency access when guns are pulled past each other. The best setup combines soft contact surfaces, stable organization, and enough room to handle each firearm deliberately.
Adding extra padding to your gun safe is the most practical first step in custom and DIY gun safe modifications because it improves protection immediately, costs far less than replacing firearms or refinishing stocks, and supports every other organization upgrade you make later. The essential approach is simple: identify where contact happens, choose materials that match the task, install them cleanly, and refine the layout until each firearm rests without pressure or abrasion. Closed-cell foam, neoprene, EVA inserts, felt strips, and marine carpet all have a place when used intentionally. The best results come from combining padding with smarter spacing, better racks, lower-profile door storage, and consistent humidity control.
For anyone building a complete gun safe interior plan, think of this article as the hub: padding leads naturally into shelf redesign, rifle rack customization, lighting, door panel optimization, and moisture management. Start with the highest-risk areas—barrel rests, shelf lips, side walls, and floors—then test with your actual firearms rather than relying on the safe’s advertised capacity. Small changes make a visible difference over time. A few carefully placed padded surfaces can prevent years of avoidable finish wear. Review your safe this week, note every hard contact point, and make one upgrade that gives your firearms a softer, safer place to rest.
Frequently Asked Questions
What types of padding work best inside a gun safe to prevent firearm scratches?
The best padding depends on where contact happens inside your safe and how your firearms are stored. For general surface protection, adhesive-backed felt, closed-cell foam, neoprene, low-pile automotive carpet, and shelf liner material are all strong options. Felt is popular because it is soft, affordable, and easy to apply to shelves, walls, and dividers, but it can wear down faster in high-friction spots. Closed-cell foam offers more cushioning and resists moisture better than many open-cell products, which makes it a smart choice around rifle rests, barrel channels, and areas where optics or stocks may bump the interior. Neoprene is especially useful where you want a soft but durable barrier that will not flatten too quickly under repeated use.
For rifle racks and barrel rests, padded sleeves or foam-wrapped supports help prevent finish wear caused by repeated insertion and removal. On shelves and door panels, carpet or felt liners create a softer landing area for handguns, magazines, and accessories. If you store scoped rifles, protecting contact points near the optic, turret area, and fore-end matters just as much as padding the stock. The key is choosing a non-abrasive, low-shed material that will not trap grit against the firearm’s finish. In most safes, a combination approach works best: foam or neoprene where impact protection is needed, and felt or carpet where broad surface coverage is the goal.
Where should I add extra padding inside my gun safe for the most protection?
Start by identifying every place where a firearm touches a hard surface or another stored item. The most important areas are rifle rests, shelf surfaces, side walls, door interiors, dividers, and any metal edges near barrels, stocks, or optics. Rifle barrels often rest in notched supports that may look lined but still create pressure points, so adding foam or a softer sleeve there can significantly reduce rubbing. Lower stock contact areas are another common source of finish wear, especially if firearms shift slightly when the safe door is opened or closed.
Shelves used for handguns, magazines, and accessories should also be lined, because repeated placement on bare metal or wood can cause scratches and dents over time. Door organizers deserve special attention as well. If you use handgun holsters, pouches, or accessory pockets on the door, make sure the surrounding panel is padded enough that items do not swing into stored firearms when the door moves. Interior walls and corners can also benefit from added cushioning, especially in tighter safes where long guns sit close together. If your safe feels crowded, extra padding alone will help, but spacing solutions like rack inserts, barrel separators, and door panel organizers should be added too. Padding works best when combined with a layout that minimizes unnecessary contact in the first place.
How do I install padding in a gun safe without creating moisture or maintenance problems?
Proper installation is just as important as the padding material itself. Before applying anything, completely empty the safe and clean all mounting surfaces so dust, oil residue, and loose debris do not interfere with adhesion. Choose padding materials that are dry, clean, and intended for enclosed storage environments. Closed-cell foam, synthetic felt, neoprene, and low-pile carpet are generally better choices than absorbent household materials that may hold moisture. It is also wise to avoid products with strong chemical odors or unstable adhesives, since enclosed safes can trap fumes that linger longer than expected.
When attaching padding, use adhesive products carefully and keep coverage neat. Trim material to fit each area rather than layering uneven scraps that can bunch up and create pressure points. Do not block vents, dehumidifier access, electrical passthroughs, or moving parts such as shelves or door bolts. After installation, inspect the safe regularly for loose edges, peeling adhesive, trapped grit, or compressed spots that no longer protect the firearm. Padding should be part of a broader moisture-control plan, not a substitute for one. Continue using desiccants or an electric dehumidifier if your safe needs humidity management. The goal is a clean, soft, stable interior that cushions firearms without creating a damp, dusty, or difficult-to-maintain storage environment.
Can I use DIY materials for gun safe padding, or should I buy purpose-made products?
DIY padding can work very well if you choose the right materials and install them thoughtfully. Many gun owners successfully use automotive carpet, tool drawer liner, neoprene sheets, closed-cell foam, and adhesive-backed felt to customize their safe interiors. A DIY approach is often more affordable and gives you the flexibility to pad unusual shelf sizes, custom racks, or specific problem areas like optic contact points and tight side clearances. If you have a mix of rifles, shotguns, handguns, and accessories, custom-cut materials may provide a better fit than generic kits.
That said, purpose-made gun safe products can save time and often look cleaner when finished. Pre-cut shelf liners, rack sleeves, handgun hangers with soft coatings, and door panel systems are designed with firearm storage in mind and may offer better fit, durability, and compatibility. The decision usually comes down to your budget, storage layout, and how polished you want the final result to look. If you go the DIY route, avoid rough fabrics, cheap foams that crumble, and anything that sheds fibers excessively. Also avoid reusing old household padding of unknown composition. The safest approach is to use clean, non-abrasive, stable materials and test them in a small area first. Whether DIY or store-bought, the real objective is the same: eliminate hard contact points and reduce movement that causes scratches over time.
How much extra padding is too much inside a gun safe?
More padding is not always better. The goal is to create soft contact surfaces, not to overcrowd the safe or press firearms tightly against each other. If padding is too thick, it can reduce usable space, alter how rifles sit in racks, and force stocks, barrels, or optics into awkward positions. That can actually increase friction instead of reducing it. Thick padding may also interfere with door clearance, shelf placement, and accessory storage if it is installed without considering how the safe closes and how items shift during use.
A good rule is to use enough material to cushion contact points while maintaining proper spacing and easy access. Thin felt or liner material is often enough for shelves and walls, while slightly thicker foam or neoprene makes sense on barrel rests, dividers, and impact-prone edges. After installation, close the door slowly and confirm that nothing compresses excessively or gets pushed into another item. Then remove and replace firearms several times to check whether the new padding improves movement or creates drag. Effective gun safe padding should make storage gentler and more organized, not tighter and more complicated. If you find yourself forcing firearms into position, the issue is usually spacing, layout, or over-padding rather than a lack of protection.