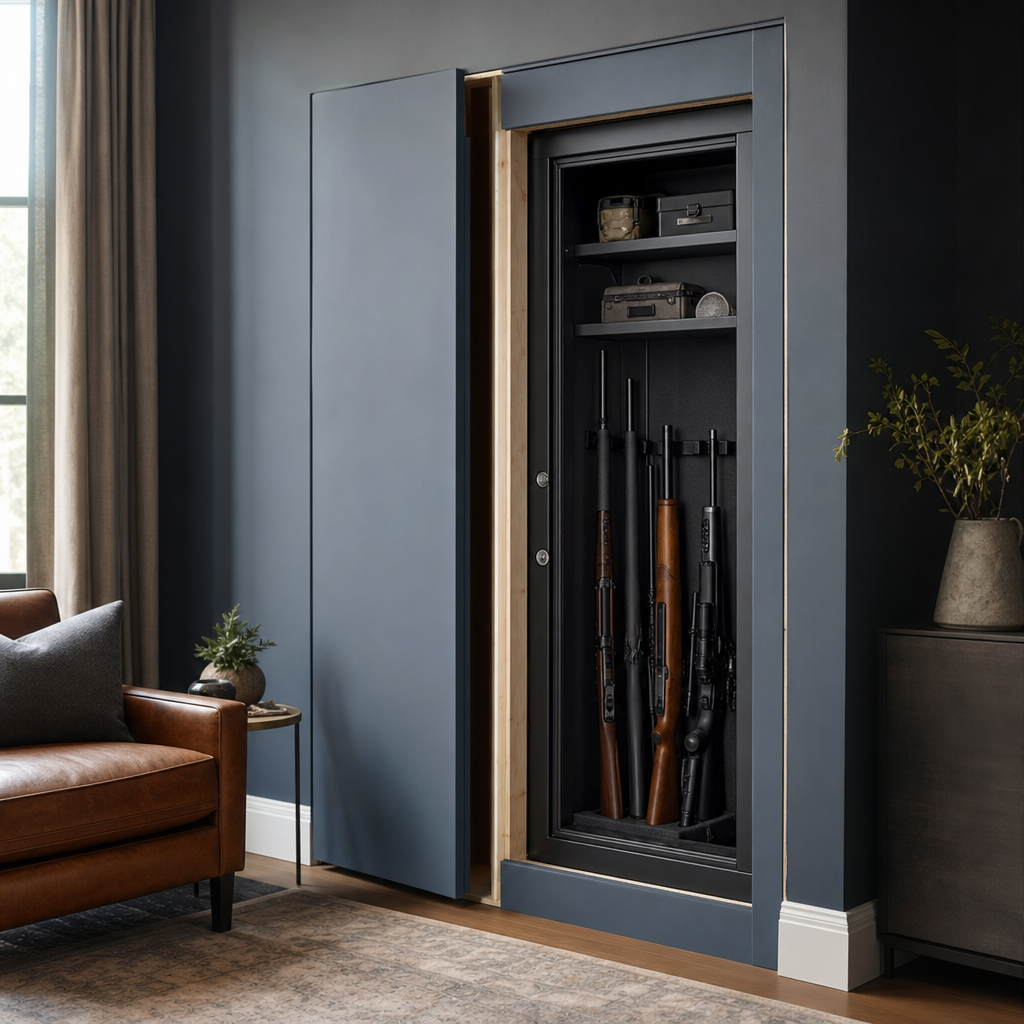
Installing a gun safe inside a false wall is one of the most effective ways to combine firearm security, discreet storage, and efficient use of space. In practical terms, a false wall is a secondary framed surface built in front of an existing wall to create a concealed cavity, while a gun safe is a locking steel enclosure designed to restrict unauthorized access, deter theft, and, in many models, provide fire protection. When these two elements are planned together, the result can be far more secure than leaving a freestanding safe visible in a closet, garage, or bedroom corner. I have worked on projects where a visible safe became the first target during a break-in, and others where a properly hidden installation bought crucial time and prevented discovery altogether.
This topic matters because concealment changes the security equation. Most residential burglaries are fast, noisy, and opportunistic. Thieves typically look for jewelry, cash, electronics, and obvious safes they can pry, attack, or remove. A hidden safe behind a finished wall panel, bookcase, cabinet face, or trim-integrated access door is less likely to be found in the first place. That said, concealment is not a substitute for structural anchoring, adequate steel thickness, a reliable lock, and legal compliance. A false wall installation should be treated as part of a layered firearm storage strategy that also accounts for child access prevention, humidity control, emergency retrieval, and code-aware remodeling.
As a hub for custom and DIY gun safe modifications, this guide covers more than the wall itself. It explains how to assess room layout, choose the right safe profile, frame a cavity without weakening the structure, route power for dehumidifiers or lighting, design hidden access, and avoid common mistakes such as trapping heat, blocking swing clearance, or creating a concealment feature that telegraphs its own existence. It also connects the broader modification mindset: custom shelving, interior retrofits, anchoring upgrades, lock changes, finish integration, and environmental controls all become more important when a safe is built into a concealed space rather than simply set down and forgotten.
The central principle is simple: the best concealed gun safe installation balances three goals at once. It must remain genuinely hidden from casual view, it must retain or improve the safe’s resistance to theft and misuse, and it must still be practical for the owner to access safely and consistently. If one of those goals is ignored, the installation usually fails in the real world. A beautiful hidden wall means little if the door cannot open fully, if moisture builds up inside the cavity, or if the safe can be tipped because anchoring was sacrificed for aesthetics.
Why a false wall can outperform a visible safe
A visible safe sends a message: valuables are here. Even a heavy safe can be attacked with pry bars, grinders, or by removing it entirely if it was not anchored into concrete or substantial framing. By contrast, a false wall reduces the odds that an intruder will identify a target quickly. In homes where time on site is short, that concealment is often the strongest advantage. I have seen small rooms, basements, and walk-in closets transformed so that a narrow safe disappeared behind millwork that looked original to the house. In those cases, concealment did what extra steel alone could not: it prevented engagement.
False wall installations also improve space efficiency. A standard closet may have enough depth for a safe but not enough room for the door to swing freely or for long guns to be removed without awkward rotation. Building a shallow chase in a larger room can create exactly the cavity dimensions needed, especially for slim rifle safes, in-wall safes, or modular cabinets. This is especially useful in spare bedrooms, home offices, basement finished areas, and under-stair zones where the wall can be designed around the safe rather than forcing the safe into leftover space.
There are limits. A false wall usually costs more than dropping a safe in place, and poorly designed concealment can create maintenance and safety issues. Fire-rated drywall, ventilation gaps, stud spacing, and clear access to lock components all matter. If the surrounding assembly traps humidity, electronics, or stale air, the safe’s contents can suffer. If the hidden opening relies on a fragile magnetic catch or undersized hinge hardware, daily use becomes frustrating. Concealment works best when treated as finish carpentry layered over sound security engineering.
Choosing the right safe for concealed installation
The best gun safe for a false wall is rarely the biggest model that fits on paper. You need to evaluate exterior dimensions, handle projection, hinge geometry, door swing, anchor locations, interior layout, and serviceability. Many owners underestimate door clearance. A safe body that fits inside a 24-inch cavity may still fail if the handle, keypad, or door edge collides with trim or a hidden door frame. Before construction, review the manufacturer’s specification sheet and physically map door travel with cardboard or painter’s tape.
For concealment, low-profile designs often work better than oversized trophy safes. Slim rifle safes, firearm cabinets with reinforced bodies, and select in-wall safes can integrate cleanly into a false wall system. If theft resistance is the priority, look for thicker steel bodies, hard plate protection, relockers, and robust boltwork rather than focusing only on advertised gun capacity. Capacity claims are notoriously optimistic. A “24-gun” safe may hold far fewer scoped rifles in practical use, which affects both sizing and accessibility once hidden in a tight enclosure.
Lock choice matters too. Electronic locks provide fast entry and work well when the safe is concealed behind another panel, but they need battery management and sometimes more front clearance. Mechanical dial locks reduce battery concerns and can be highly reliable, though they are slower and less convenient in cramped concealed spaces. Biometric locks vary widely in quality. For a hidden wall installation, I generally favor proven electronic locks from established safe lock manufacturers because they allow quick access without forcing the user into an awkward dialing position behind a partially opened panel.
| Safe Feature | Why It Matters in a False Wall | Best Practice |
|---|---|---|
| Door swing | Determines whether firearms can be removed cleanly | Mock up full swing before framing |
| Handle depth | Can hit trim, hidden doors, or decorative panels | Measure maximum front projection |
| Anchor points | Affects floor and wall reinforcement needs | Match bolt pattern to framing or slab |
| Lock type | Changes speed, ergonomics, and maintenance | Use a reputable UL-listed lock system |
| Interior power | Supports lights and dehumidifiers | Plan concealed electrical access early |
Planning the wall cavity without creating structural problems
A false wall is not usually load-bearing, but the existing wall behind it might be. That distinction matters. If you are adding a secondary wall in front of an existing finished wall, the job is mostly about layout, fastening, and finish work. If you intend to recess the safe into the original wall cavity or modify studs, you need much more caution. Cutting structural studs, altering fire blocking, or interfering with electrical and plumbing lines can create serious safety and code issues. In older homes, you may also encounter irregular stud spacing, masonry surfaces, or hidden utilities that complicate the plan.
The safest DIY approach is usually building a new false wall in front of the existing one, anchored to floor joists, ceiling framing, and sidewalls as appropriate. This keeps the original structure intact while giving you control over cavity depth and concealment details. I prefer to begin with a measured layout that accounts for the safe body, minimum side clearance, door swing, electrical needs, and finish thickness. Even half an inch of extra clearance on each side can make installation, leveling, and future servicing dramatically easier.
Material selection should match the security goal. Standard kiln-dried studs and drywall are fine for basic construction, but the assembly can be improved with plywood backing, fire-rated gypsum board where appropriate, and strategically placed blocking for hinges, latches, or a disguised door system. If the hidden opening will support a bookcase or decorative panel, overbuild the framing. Sagging hardware is one of the most common failures in concealed safe projects. A hidden door that binds or drifts out of alignment quickly becomes obvious.
Anchoring, reinforcement, and real theft resistance
Concealment delays discovery, but anchoring prevents removal. A gun safe inside a false wall still needs to be bolted down according to the manufacturer’s instructions and the conditions on site. For slab-on-grade installations, concrete anchors are usually the strongest option. On framed floors, anchoring should tie into substantial joists or engineered reinforcement, not just subfloor sheathing. If the safe backs up to solid framing or masonry, rear anchoring can add another layer of resistance. The goal is to make removal slow, loud, and tool-intensive.
Floor loading deserves attention, especially with larger safes. A compact cabinet may pose no issue, but a fire-lined gun safe can weigh several hundred to well over a thousand pounds before firearms and ammunition are added. In upper-floor rooms, distribute load where possible and verify framing capacity if the safe is heavy. I have seen owners focus entirely on hiding the safe while forgetting that a concealed installation may concentrate weight in a corner or along a span with less support than a basement slab would provide.
Reinforcement around the opening also matters. If a concealed panel is discovered, the surrounding finish should not peel away with a few quick prying attempts. Backing material, longer fasteners, tight tolerances, and concealed hardware all help. Some builders add expanded metal mesh or plywood beneath finish surfaces around the opening to resist easy breach. This will not turn a wall into a vault, but it does increase the time and noise required to get near the safe itself. In residential security, added minutes matter.
Designing believable concealment and hidden access
The best false wall concealment does not look clever. It looks ordinary. That means matching room proportions, trim profiles, paint sheen, flooring transitions, and use patterns. A hidden door disguised as a bookcase can work well, but only if the room supports that feature naturally. In many homes, a simple paneled section, cabinet bank, or closet rear wall is more believable than an elaborate secret-door concept. If a concealment element looks out of place, it attracts attention instead of deflecting it.
Access methods should favor reliability over novelty. Touch latches, magnetic catches, pivot hinges, SOSS invisible hinges, and RFID cabinet locks each have roles, but every mechanism introduces tradeoffs. Magnetic releases are simple, yet they can feel flimsy on heavier panels. Hidden bookcase doors are dramatic, yet they require precise weight distribution and quality hardware from brands such as Murphy Door or specialty pivot manufacturers. For daily use, I prefer sturdy concealed hinges, a positive latch, and an opening method that works consistently even if power is out or hands are full.
Noise control is often overlooked. A concealment panel that scrapes the floor, rattles at the latch, or thumps against framing advertises itself. Felt pads, soft-close hardware, proper reveals, and careful shimming solve most of these issues. Also think about sightlines. If the panel opens inward or slides aside, make sure it does not expose raw framing, wiring, or unfinished surfaces that immediately signal hidden construction. The compartment should look intentional, clean, and integrated at every stage of opening.
Electrical, lighting, and moisture control inside the cavity
A concealed gun safe installation often benefits from power, but power must be planned safely. Common additions include LED lighting, a dehumidifier rod, rechargeable task lighting, and in some cases a hardwired outlet serving the safe’s internal pass-through. If you are adding wiring, follow local electrical code, protect cable runs, and avoid drilling or fastening blindly near existing circuits. In finished basements and exterior walls, moisture management becomes just as important as wiring. Hidden cavities can trap damp air, especially if insulation and vapor control were already marginal.
For rust prevention, maintain stable humidity rather than relying on concealment alone. GoldenRod-style dehumidifiers, desiccant packs, and digital hygrometers are practical tools. In my experience, owners who hide safes in basements but skip humidity control often discover corrosion on optics mounts, magazines, and shotgun barrels before they notice issues on the safe body itself. A small powered dehumidifier inside the safe combined with reasonable airflow in the surrounding cavity usually works better than sealing the space tightly and hoping for the best.
Lighting should help access without creating heat or visible light leaks. Low-voltage LED strips triggered by a door switch are ideal if installed neatly. Avoid bright spill around panel edges that could reveal the compartment in a dark room. If the safe contains defensive firearms, verify that the concealed access routine remains simple under stress. A hidden wall feature is only useful if you can open the outer panel, reach the lock, and retrieve the firearm without fumbling.
How this project connects to broader custom and DIY gun safe modifications
Installing a gun safe inside a false wall is the hub concept for custom and DIY gun safe modifications because it forces you to think beyond the factory safe as a standalone box. Once a safe becomes part of the room, interior and exterior modifications matter more. Interior shelving can be reconfigured for optics, handguns, documents, and suppressor accessories. Door organizers increase usable capacity but may affect depth clearance. Anchor upgrades, lock swaps, lighting kits, and humidity systems are easier to plan before the wall is closed than after.
This project also connects directly to related upgrades such as safe room integration, closet conversions, cabinetry wraparounds, under-stair firearm storage, decoy storage strategies, and concealment furniture. Each approach follows the same rule set: preserve security, maintain access, and avoid modifications that weaken the safe or violate manufacturer guidance. Drilling unauthorized holes through a fire-lined body, blocking vents or lock access, or overloading door panels are common mistakes. Good modifications improve function without compromising the tested core of the safe.
If you are building out a full storage system, think in zones. Reserve fast-access defensive items for the most reachable positions, long-term storage for the rear or lower interior, documents in fire-rated pouches, and moisture-sensitive accessories near monitored humidity control. Labeling, inventory tracking, and periodic maintenance should remain part of the plan. Concealment is valuable, but it should not turn the safe into a neglected cavity behind drywall and trim.
Installing a gun safe inside a false wall delivers ultimate concealment only when concealment is paired with solid anchoring, realistic access planning, and disciplined execution. The strongest projects start with the right safe, preserve the structure of the home, use believable finish design, and account for electrical needs, humidity control, and hardware durability. In real-world security, the biggest win is often simple: if thieves do not find the safe quickly, they usually cannot attack it at all. That advantage becomes even stronger when the safe is bolted properly and the surrounding assembly resists easy prying.
As the hub for custom and DIY gun safe modifications, this topic sets the standard for every related upgrade. A false wall installation naturally leads into better interior organization, lock selection, concealment carpentry, environmental control, and anchoring practices. Done well, it turns a basic firearm storage product into an integrated security system tailored to your home and habits. Done poorly, it creates inconvenience, moisture risk, and a false sense of security. The difference is planning, measurement, and respect for both construction details and firearm safety principles.
If you are considering this project, start by measuring your space, reviewing safe specifications, and mapping how the door, panel, and anchoring will work before buying materials. Then build the concealment around proven security fundamentals, not the other way around. That approach will give you a hidden gun safe installation that looks natural, works reliably, and protects what matters.
Frequently Asked Questions
Is installing a gun safe inside a false wall legal, and what laws should I check first?
In many areas, installing a gun safe inside a false wall is legal, but legality depends on several layers of rules: firearm storage laws, building codes, landlord restrictions if you do not own the property, and any local regulations covering renovations, electrical work, or concealed compartments. The safe itself is generally not the legal issue. What matters is whether your storage method still complies with requirements for preventing unauthorized access, especially in homes with children, prohibited persons, or frequent visitors. Some jurisdictions require firearms to be stored unloaded, locked, or secured with a locking device, and concealed storage does not replace those obligations. If your false wall changes framing, affects a load-bearing wall, alters fire-rated assemblies, or includes new outlets, lighting, or low-voltage access systems, you may also need permits or inspections. Before starting, review state and local firearm storage laws, verify building code requirements, and confirm whether your homeowner’s insurance has any conditions for firearm safes, theft claims, or fire-rated storage. If you are unsure, consult a qualified contractor and a local attorney or firearms law professional. The goal is not just concealment, but compliant, secure, and defensible storage.
What type of gun safe works best for installation inside a false wall?
The best safe for a false wall installation is usually a compact, high-quality model designed for secure anchoring, tamper resistance, and realistic access needs rather than just one that physically fits in the cavity. In most cases, homeowners choose between a dedicated wall safe, a shallow-profile rifle safe, or a compact full-body safe placed within a framed bump-out. A true in-wall safe may work well for handguns, documents, and valuables, but it is often too small and too shallow for long guns unless you build a deeper false wall. For rifles, shotguns, magazines, and accessories, a deeper steel safe with reinforced door construction, internal hinges or protected external hinges, anti-pry features, and a reliable lock is usually the better option. Pay close attention to dimensions, including door swing clearance, handle projection, ventilation needs, and interior organization. Fire protection is another important factor. Some false-wall installations reduce visibility but do not improve fire resistance, so if fire rating matters, choose a safe independently rated for heat protection rather than assuming the wall will provide it. Also consider weight and anchoring. A concealed safe still needs to be bolted to structural members or a reinforced floor system so it cannot be tipped, pried loose, or carried away. In short, the ideal safe is one that balances concealment, storage capacity, burglary resistance, anchoring capability, and practical day-to-day access.
How do you build a false wall around a gun safe without compromising security or structural integrity?
A secure false-wall installation starts with planning the safe location around the structure of the room, not forcing the structure to fit the safe. The safest approach is usually to build a secondary framed wall in front of an existing wall, creating a concealed cavity large enough for the safe, door clearance, and anchoring points. Before any framing begins, identify studs, electrical wiring, plumbing, HVAC runs, insulation, and whether the original wall is load-bearing. You do not want to notch or remove critical framing just to gain a few inches. If the existing wall is load-bearing or contains mechanical systems, bring in a professional. The false wall itself should be framed solidly, typically with proper stud spacing and reinforced blocking where concealment features such as panels, shelving, or doors will attach. The safe should then be anchored independently to structural framing, a concrete slab, or reinforced floor supports rather than relying on the false wall alone. That point is critical: the false wall conceals the safe, but the safe must still resist forced removal and prying. Access design matters too. Hidden doors, removable panels, and built-in cabinetry should not interfere with the safe door, lock, or emergency battery access if you are using an electronic lock. You also want clean, quiet operation so the concealment system does not draw attention. Finally, think long term: leave enough serviceability for lock maintenance, humidity control, interior lighting, and code-compliant electrical work if power is needed. A good false wall should look natural, preserve room function, and make the safe harder to detect and harder to attack without weakening the surrounding structure.
Will a false-wall gun safe installation affect fire protection, moisture control, or access speed?
Yes, and these are three of the most overlooked parts of a concealed safe installation. Fire protection depends primarily on the safe’s own construction and rating, not the fact that it sits behind a false wall. While being hidden may reduce immediate exposure during a theft, it does not automatically improve survivability in a house fire. In some cases, enclosing a safe too tightly can even complicate heat behavior, smoke exposure, or post-fire access. If fire resistance is important, choose a safe with a documented fire rating and install it according to the manufacturer’s guidelines. Moisture control is equally important because concealed cavities can trap humidity, especially on exterior walls, in basements, or in rooms with poor airflow. Over time, excess moisture can damage firearms, optics, documents, and the safe interior. Use a dehumidifier rod, desiccants, or climate control accessories as appropriate, and avoid placing the safe where condensation is likely. Access speed is the third consideration. Concealment adds a layer between you and the safe, which may be fine for long-term storage but less ideal if quick defensive access is part of your plan. That does not mean the setup is wrong; it means you should be honest about the purpose of the safe. For many homeowners, a concealed false-wall safe is best for secure storage and theft deterrence, while a separate quick-access handgun safe handles immediate defensive needs. A well-designed installation can still be fast enough for practical use, but only if the hidden entry point, lock type, lighting, and door swing are planned carefully.
What are the biggest mistakes people make when hiding a gun safe inside a false wall?
The most common mistake is focusing so much on concealment that security, access, and building practicality get pushed aside. A hidden safe is not automatically a secure safe. One frequent error is choosing a location based only on convenience, then discovering there is not enough depth, no proper anchoring surface, or interference from wiring, plumbing, vents, or door swing. Another is using a false wall as a cosmetic cover while failing to bolt the safe to structural framing or concrete, which leaves the entire unit vulnerable to removal. People also underestimate weight. Even a modest gun safe can place serious loads on certain floor systems, especially upstairs or over long spans, so floor capacity should be considered early. Poor concealment design is another issue. If the hidden door, panel, or built-in cabinet looks out of place, rattles, or has obvious seams and hardware, it may draw more attention than the safe would have on its own. Accessibility mistakes are common too, including insufficient clearance for the safe door, awkward kneeling height, blocked lock access, or concealment features that make the safe frustrating to use. Then there is environment control: ignoring humidity, airflow, and electrical planning can lead to rust, dead lock batteries, or poor visibility inside the cavity. Finally, many homeowners skip permits or professional input when needed, especially if the project touches structural walls or electrical circuits. The best concealed installations succeed because they are treated as both a security project and a construction project, with careful attention to code, structure, concealment, and real-world usability.