
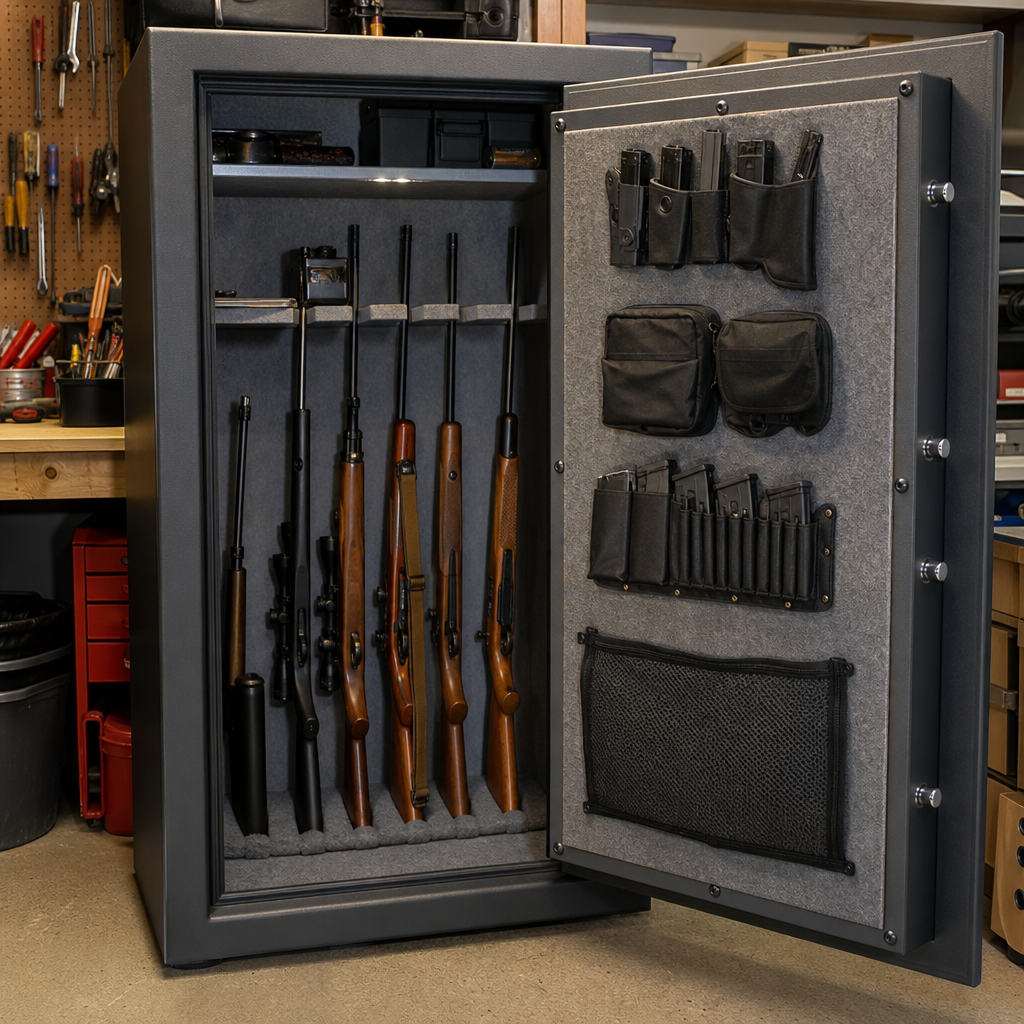
Budget-friendly gun safe modifications can meaningfully improve security, organization, moisture control, and daily usability when they are chosen carefully and installed with attention to fire ratings, lock integrity, and safe firearm handling. In the field, I have seen modest upgrades outperform expensive gimmicks, especially when owners focus on access control, anchoring, interior protection, and environmental management instead of cosmetic extras. For this hub on custom and DIY gun safe modifications, the goal is simple: explain which changes deliver the most security for the least money, what risks to avoid, and how to prioritize projects if you want practical results. A gun safe is a locking container designed to resist unauthorized access and, in many models, provide some fire resistance. A modification is any owner-installed change, from adding motion lighting to replacing weak fasteners, bolting the safe to concrete, improving shelving, sealing cable pass-throughs, or installing a dehumidifier rod. These upgrades matter because a factory safe, especially an entry-level residential security container, is rarely optimized for your room layout, firearm collection, or threat profile. Good modifications close those gaps.
Most buyers discover the same thing after a few months: the safe itself may be acceptable, but the overall setup still has weaknesses. The door can swing too wide into a hallway, long guns bang together on thin barrel rests, humidity rises in basements, factory shelves waste space, and the safe may not be anchored as securely as it should be. Worse, many owners assume the lock alone is the security system, when in practice theft resistance depends on concealment, anchoring, room placement, pry resistance, monitoring, and how much time and noise a thief can tolerate. Security enhancements therefore need to be evaluated as a system, not as isolated add-ons. If you improve one area while neglecting another, you can spend money and still leave the easiest attack path unchanged.
This article serves as the central guide for the subtopic of custom and DIY gun safe modifications. It covers the core upgrades that deserve priority, explains where budget improvements provide real value, and identifies modifications that can accidentally reduce protection or void a warranty. It also answers the questions owners most often ask: Which DIY gun safe modifications improve security the most? What can you do with basic tools? Which upgrades are safe for electronic locks? How do you organize rifles and handguns without crowding? And how do you improve a budget safe without drilling into the wrong place? If you want a clear roadmap for strengthening a gun safe on a reasonable budget, start with anchoring, fitment, humidity control, monitoring, and access discipline, then build from there with purpose.
Start with threat assessment, placement, and anchoring
The best budget DIY gun safe modifications begin before you touch a drill. You first need to define what you are defending against. In most home incidents, the realistic threat is not a skilled safecracker with specialty tools. It is an unauthorized family member, a smash-and-grab burglar, or a thief using simple pry bars, body weight, and time. That matters because a budget modification should reduce the most likely risk first. If a safe is unanchored in a garage, bolting it down is more important than adding expensive interior accessories. If the safe sits in a damp basement, corrosion prevention may protect your firearms better than any decorative organizer. Security is always contextual.
Placement is the first practical upgrade. Put the safe where access can be controlled, where the door can open fully without advertising contents to every visitor, and where leverage attacks are constrained by surrounding walls or cabinetry. A closet corner on a slab floor often beats a visible garage wall because visibility, swing room, and pry-bar clearance all affect attack speed. I have repeatedly advised owners to leave less than a few inches of side clearance on the hinge or pry side where possible, because tight placement makes it harder to insert long tools. If you can place the safe against structural surfaces on two sides and still operate it safely, you reduce attack angles at no cost.
Anchoring is the highest-value DIY modification for most budget safes. Many residential security containers include anchor holes for a reason: once a thief tips a light safe onto its back, pry attacks become easier and the whole unit can be removed for later forced entry. Use manufacturer-approved holes whenever possible. On concrete, wedge anchors or concrete screw anchors from brands such as Simpson Strong-Tie or Tapcon provide a strong connection when installed to specified depth. On wood subfloors, lag screws into joists are better than fastening only to sheathing. Large washers or backing plates help spread load. Always verify safe location before drilling to avoid radiant heat tubing, plumbing, electrical lines, or post-tension slabs. A properly anchored safe is harder to pry, harder to move, and far less attractive to opportunistic thieves.
Low-cost lock, door, and access-control improvements
Many owners want to replace the lock first, but that is not always the smartest opening move. If your safe already has a functioning UL-listed electronic or mechanical lock, you may gain more practical security from access-control habits and low-cost supporting upgrades. Start by changing the default combination immediately, choosing a non-obvious code, and preventing shoulder-surfing when the door is opened. Keep override keys, if your model uses them, locked separately and never taped inside the safe room. For electronic locks, replace batteries on a schedule instead of waiting for low-voltage alarms. Use only reputable alkaline batteries recommended by the manufacturer, because cheap cells are a common source of lock complaints.
There are still worthwhile DIY access upgrades. One is improving the door frame environment so you can open the safe quickly without fumbling. Install task lighting near the keypad, add a discreet floor mark for nighttime standing position, and ensure the handle has full clearance from trim, shelving, or wall protrusions. Another is adding a contact sensor or tilt sensor tied to a home alarm platform such as Ring Alarm, Abode, or a Z-Wave hub. While a sensor does not physically strengthen the safe, it changes the thief’s timeline by creating immediate detection. In real-world security planning, detection is a force multiplier because burglars usually want speed and silence, not a prolonged fight with anchored steel under active alarm conditions.
A common budget mistake is drilling new holes in or near the door to mount pouches, hooks, or aftermarket panels without understanding relockers, boltwork, fire lining, and warranty limitations. Door structures vary widely. On many safes, the area behind the interior panel contains lock linkages, hard plates, relock devices, and active bolts. Penetrating the wrong area can disable the lock, compromise fire material, or reduce burglary resistance. Safer alternatives include adhesive-backed organizers rated for the load, over-panel organizers supplied by the manufacturer, or magnetic accessories used only on suitable steel surfaces and only when they do not interfere with door sealing. The rule is direct: modify around the lock system, not through it, unless you have factory diagrams and a clear procedure.
Interior organization that improves both security and safety
Organization is often treated as convenience, but it has real security value. A cluttered safe slows access, increases the chance of dropping a firearm, encourages unsafe stacking, and makes it harder to notice when something is missing. The most effective budget DIY gun safe modifications here are simple: better shelving, barrel separation, labeled bins, and door-mounted storage that does not stress hinges or block long-gun placement. High-density foam, corrugated plastic, hook-and-loop panels, and sealed plywood can all be used effectively if they are cut cleanly and installed so they do not trap moisture against metal surfaces.
For rifles and shotguns, adjustable barrel rests and buttstock shelves make an immediate difference. Factory racks often assume uniform optics height and stock shape, which is unrealistic once you own scoped rifles, slings, bipods, or AR-platform carbines. A DIY rack with wider spacing prevents optics from colliding and allows rapid visual inventory. For handguns, shallow shelves with lip retainers or angled pistol stands use vertical space far better than stacking soft cases. I also recommend dedicating one container inside the safe for documents, suppressor paperwork where lawful, and serialized accessory records. During insurance claims or police reporting, fast access to organized records matters more than most owners expect.
| Modification | Typical Cost | Security Benefit | Main Caution |
|---|---|---|---|
| Concrete anchoring kit | $20–$60 | Prevents removal and tip-over pry attacks | Check slab conditions before drilling |
| Door or tilt sensor | $25–$80 | Creates immediate intrusion detection | Needs reliable monitoring setup |
| Dehumidifier rod or desiccant system | $15–$60 | Reduces rust risk and protects finishes | Needs power or periodic recharge |
| Adjustable rifle rack | $20–$75 | Prevents damage and improves inventory control | Do not overcrowd long guns |
| Battery LED motion light | $10–$30 | Faster safe access in low light | Avoid blocking seal or boltwork |
The best organizational layouts reflect actual use patterns. Defensive firearms should not be buried behind seasonal hunting gear. Ammunition should be stored according to the safe’s weight limits and shelf strength, not simply wherever there is room. Heavier items belong low to stabilize the cabinet and reduce shelf sag. Small valuables should be grouped in lockable interior boxes if multiple adults need different access levels. The security benefit is straightforward: when every item has a stable place, you shorten door-open time, reduce handling mistakes, and create a consistent routine for checking that all firearms are present and secured.
Moisture control, power management, and environmental protection
Corrosion is a security issue because a rusted firearm, seized lock component, or swollen stock can compromise reliability when you need the firearm most. Many budget safes are placed in garages, basements, or exterior-wall closets where temperature swings and trapped humidity create condensation risk. The most effective low-cost modification in these environments is usually a dehumidifier rod or rechargeable desiccant unit combined with a basic digital hygrometer. The target is not absolute dryness; it is stable humidity that keeps steel, optics, and documents from degrading. In many climates, staying around 45 to 50 percent relative humidity inside the safe is a sensible benchmark.
If your safe includes or allows a power pass-through, protect it carefully. Cable routing should be tidy, sealed where feasible, and kept away from moving bolts or the door seal. Cheap extension cords crammed through gaps are a bad idea because they can compromise fire sealing and create pinch hazards. Use low-draw accessories only, such as LED lights, dehumidifier rods, or a small monitored sensor hub if the manufacturer permits it. Battery-powered lights are often the best budget choice because they avoid cable management entirely. I prefer warm or neutral-white LEDs with motion activation, mounted so they illuminate shelves and the lock area without shining directly into your eyes during nighttime access.
Interior materials matter more than many DIY guides admit. Bare MDF can off-gas and absorb moisture. Some foams retain humidity against blued steel if airflow is poor. Pressure-treated lumber is generally inappropriate inside a safe because chemical residues and moisture content can affect finishes. Better choices include sealed plywood, closed-cell foam where suitable, powder-coated brackets, and fabric wraps that are clean, dry, and non-abrasive. If you use adhesives, choose products with stable cure characteristics and allow full off-gassing before placing firearms back inside. A budget upgrade should never create a hidden corrosion source.
Monitoring, concealment, and layered home security around the safe
A gun safe should never be treated as a standalone security strategy. The strongest budget modifications often sit outside the safe itself. Concealment is one example. If contractors, guests, or delivery personnel can see the safe easily, they gain intelligence about location, size, and likely contents. Modest room changes such as a locking closet door, visual screening, or built-in cabinetry can reduce exposure without affecting safe function. I have seen ordinary safes become dramatically harder burglary targets simply because they were installed in less obvious positions with restricted approach angles and better surrounding structure.
Monitoring is another high-value layer. A camera covering the approach path, not the keypad itself, can document unauthorized access attempts while preserving code privacy. Door contacts on the room, glass-break sensors in adjacent spaces, and cellular-backed alarm communication make a burglary riskier for the intruder before the safe is even touched. For many homeowners, this layered setup costs less than replacing the safe and often yields a bigger practical gain. The underlying principle is delay plus detection. Even a basic residential security container becomes far more effective when it is anchored, partially concealed, and tied into an alarm that triggers quickly.
There are limits, and they should be stated clearly. DIY modifications cannot convert a light-gauge cabinet into a commercial TL-rated safe. Additional sheet steel, homemade relockers, or improvised hard plates may sound attractive online, but poor installation can interfere with door operation or create weak points. Likewise, adding excessive interior weight from ammunition, lead, or dense shelving can exceed floor loading or shelf ratings. The best budget security enhancements respect the safe’s design envelope. They strengthen the environment, improve retention and access discipline, and reduce preventable weaknesses rather than pretending every safe can be transformed beyond its class.
Budget modification priorities and mistakes to avoid
If you are deciding where to start, prioritize in this order: anchor the safe, optimize placement, add humidity control, improve lighting and organization, then integrate monitoring. That sequence reflects real risk reduction per dollar. Anchoring and placement directly affect theft resistance. Humidity control preserves the firearms and the lock environment. Lighting and organization improve safety, accountability, and rapid access. Monitoring adds detection and can shorten police response when professionally monitored. Decorative upgrades, custom wraps, and non-structural trim should come last because they rarely improve protection.
The most common mistakes are predictable. Owners drill before checking for boltwork or warranty restrictions. They overload door panels with magazines and handguns until the door becomes awkward or misaligned. They assume a biometric lock is automatically better than a mechanical dial, even though reliability depends on sensor quality, enrollment practices, battery health, and environmental conditions. They store firearms in socks or cases that trap moisture. They place the safe where a dolly can reach it easily and then skip anchoring because the safe seems heavy. In practice, weight alone is not a security plan.
For a sub-pillar hub on custom and DIY gun safe modifications, the central lesson is that the best budget upgrades are the ones that measurably reduce likely failure points. Start with the physical realities of theft and corrosion, then build a storage system that supports safe firearm handling every day. Use manufacturer guidance, trusted hardware, and conservative installation methods. As you expand this topic, explore specialized guides on safe interior lighting, rifle rack design, dehumidifier selection, alarm sensor integration, and anchoring methods for concrete versus wood floors. Make one improvement at a time, test it thoroughly, and keep your setup simple enough that every adult authorized user can operate it correctly under stress. That is how budget DIY gun safe modifications deliver real security enhancements.
Frequently Asked Questions
What are the most effective budget DIY gun safe modifications for improving security first?
If you want the best return on a small budget, start with modifications that directly improve theft resistance and controlled access rather than appearance. In practical terms, that usually means anchoring the safe to concrete or solid framing, reinforcing the area around mounting points if needed, improving interior organization so firearms are not damaged during access, and adding moisture control to protect what is inside. Anchoring is one of the most important upgrades because even a modest safe becomes significantly harder to steal when it cannot be tipped over, pried from the rear, or removed entirely for later attack. A thief who cannot carry the safe away has far fewer options and much less time.
Another smart, low-cost upgrade is evaluating the lock area and door fit without altering the lock mechanism itself. Many owners waste money on cosmetic add-ons but overlook simple improvements such as better lighting, quick-access interior layout changes, and safe placement that limits pry-bar leverage. Keeping the safe in a corner, against a wall, or in a confined closet can reduce attack angles. Inside the safe, inexpensive rifle rods, barrel supports, shelf dividers, handgun hangers, and soft liners can make access cleaner and safer while reducing accidental knocks and scratches. That may sound like organization rather than security, but good organization matters because owners are more likely to use the safe properly when access is efficient and predictable.
Moisture control also deserves a place near the top of the list. A low-cost desiccant system or rechargeable dehumidifier can prevent rust, stock swelling, optic damage, and long-term corrosion. In my experience, practical upgrades like anchoring, layout improvements, and humidity control consistently outperform flashy accessories. The most effective budget approach is to harden the safe against removal, reduce opportunities for misuse, and preserve the condition of the firearms and valuables inside.
How can I anchor a gun safe securely without spending a lot of money?
Anchoring a gun safe is one of the highest-value DIY upgrades you can make, and it usually costs far less than people expect. If the safe is going on concrete, quality concrete wedge anchors or sleeve anchors are often the best budget-friendly choice. If it is going on a wood subfloor, through-bolting into strong joists or using heavy lag bolts into solid framing can work well, though concrete is generally preferred for maximum resistance. The key is to avoid weak mounting into thin flooring, particle board, or unsupported material that can tear out under force.
Before drilling, verify exactly where the factory anchor holes are located and inspect the safe interior so you do not damage fire lining, electrical accessories, or stored items. Use the manufacturer’s approved mounting locations whenever possible. Positioning also matters. Installing the safe tightly in a corner or closet can reduce the ability of a thief to access side seams and pry points. Even a smaller safe becomes much more secure when it is bolted down and boxed in by surrounding walls or shelving. If you are placing the safe over carpet, compress or cut away enough material to ensure the safe sits flat and the anchor hardware is tightened against a stable surface.
For a budget-conscious setup, you do not need exotic hardware, but you do need correct hardware. Use washers where appropriate, tighten all fasteners properly, and recheck them after initial installation. If the floor seems questionable, reinforce from below when possible. Also be realistic about your skill level. Poor anchoring can create a false sense of security, so if the substrate is unusual or the safe is especially heavy, a professional install may be worth the money. The goal is simple: make removal loud, slow, and difficult enough that the safe is no longer an easy target.
Are DIY lock upgrades a good idea for a gun safe, or should I leave the locking system alone?
In most cases, major DIY lock modifications are not the best place to experiment, especially on a budget. The lock and relocking system are the heart of the safe’s security, and improper changes can reduce reliability, void warranties, compromise fire protection, or even lock you out. That does not mean every lock-related improvement is off limits, but it does mean owners should be very cautious. If the safe has a functioning mechanical or electronic lock from a reputable manufacturer, your money is often better spent on anchoring, placement, organization, and environmental protection than on trying to out-engineer the original locking system.
There are still sensible things you can do around the lock system. You can maintain the keypad area, replace batteries on schedule for electronic locks, keep backup override procedures documented if the manufacturer provides them, and inspect the door seal and bolt operation for smooth movement. If the lock is low quality, failing, or outdated, a professional lock replacement can be worthwhile, but that is different from a casual DIY modification. A proper retrofit should preserve door integrity, relockers, and fire barriers, not bypass them.
A good rule is this: avoid drilling near the lock body, relocker, boltwork, or hardplate unless you are following manufacturer guidance or using a qualified safe technician. Small mistakes in those areas can have expensive consequences. If you want a “security upgrade” on a limited budget, improve the conditions around the lock instead. Limit visibility of the safe, install motion lighting nearby, place the safe where tampering is difficult, and make sure unauthorized users cannot observe your code entry habits. Those practical steps often strengthen real-world security more than risky internal lock alterations.
What inexpensive DIY modifications help protect firearms inside the safe from damage, rust, and daily wear?
Some of the best budget modifications focus on preserving the contents rather than changing the exterior. Moisture control is at the top of that list. A rechargeable desiccant unit, silica packs, or a compact dehumidifying device can make a major difference in preventing rust and corrosion, especially in humid climates or garages, basements, and outbuildings. Pair that with a small hygrometer so you can actually monitor conditions instead of guessing. Firearms, optics, ammunition, documents, and wood stocks all benefit from stable humidity management.
Interior protection and organization are also high-value upgrades. Adhesive-backed felt, foam liners, shelf mats, handgun racks, magazine bins, and barrel support systems can reduce metal-on-metal contact and help prevent scratches, dents, and scope collisions. Better layout also lowers the chance of unsafe handling when retrieving one firearm from a crowded safe. When long guns are packed too tightly, owners often have to shift several items around just to access one. That increases the risk of dropped firearms, bumped optics, and general frustration. A few inexpensive accessories can transform the interior into a safer, more functional storage system.
Lighting is another simple improvement that pays off quickly. Low-heat LED strip lighting or motion-activated puck lights make it easier to identify firearms and accessories without fumbling. Just be careful with adhesive choices and routing if your safe has fire lining or a door seal you do not want to disturb. I also recommend keeping oils, solvents, and cleaning chemicals stored thoughtfully. Some products can create odors or residue in enclosed spaces, and sloppy storage can damage finishes over time. The best low-cost interior mods are the ones that reduce clutter, control moisture, and make every retrieval smoother and safer.
Which DIY gun safe modifications should I avoid because they can reduce security or fire protection?
The biggest mistakes usually happen when owners confuse customization with improvement. Any modification that weakens the safe body, door structure, fire lining, seal, lock area, or boltwork can create serious problems. Drilling unnecessary holes is a common example. Every hole through the safe body has the potential to reduce fire resistance, create a new pry or tamper point, introduce moisture pathways, or interfere with internal components. If you need to route power for lights or dehumidifiers, use existing manufacturer provisions whenever possible rather than making your own openings.
You should also avoid altering the locking mechanism, relockers, hardplate, or bolt linkage unless you are trained and fully understand the design. Seemingly minor DIY changes in those areas can cause lockouts or leave the safe easier to defeat. Cheap adhesive accessories can also be a hidden problem if they interfere with the door seal, peel under heat, trap moisture, or damage interior surfaces. Likewise, overloading door panels or interior shelves with unsupported weight can warp components or make access awkward and unsafe over time.
Another mistake is prioritizing convenience over controlled access. For example, hiding spare keys poorly, using weak external lockboxes as a workaround, or disabling safety features for faster entry can all undermine the purpose of the safe. Be especially cautious about modifications that are popular online but poorly tested in real use. In the field, I have seen expensive-looking add-ons provide almost no practical benefit, while simple, well-executed upgrades delivered measurable results. If a modification does not improve resistance to theft, preserve firearm condition, enhance organization, or maintain safe operation, it may not be worth doing. The best budget strategy is disciplined restraint: upgrade what matters, leave critical protective systems intact, and avoid any shortcut that compromises security or fire performance.