A gun safe can be modified for dual-purpose storage when you treat it as a security enclosure first and a flexible organization system second. In practical terms, dual-purpose storage means the safe still protects firearms from theft, unauthorized access, moisture, and impact, while also making room for related valuables such as documents, optics, ammunition kept within local legal limits, emergency cash, cameras, jewelry, and electronics. I have helped owners reorganize factory interiors, retrofit shelving, add dehumidification, and correct dangerous DIY mistakes, and the pattern is consistent: the best custom gun safe modifications improve access and capacity without compromising fire rating, locking reliability, or safe handling. This matters because most safes are bought for one use, then asked to serve many. A family may need quick access to defensive firearms, separated storage for passports and titles, protected space for irreplaceable media, and a layout that evolves as collections change. Done correctly, a modified gun safe becomes a controlled environment with clearly zoned storage, stronger accountability, and fewer accidents caused by clutter or poor placement.
Start with constraints: security, fire protection, and law
Before adding shelves, lights, or holsters, identify the limits set by the safe itself. The steel body, door structure, lock type, relocker, boltwork, fireboard, and door seal determine what can be altered safely. If you drill through a fire-lined body without understanding the construction, you may reduce fire resistance and create a path for moisture or pry attack. If you mount weight to thin interior panels without backing support, shelves can fail and damage firearms or optics. The first rule is simple: modify removable interior components before modifying the shell.
Legal and policy constraints come next. State and local laws may regulate loaded firearm storage, child access prevention, and ammunition placement. Insurance policies often distinguish between burglary-rated safes, residential security containers, and standard lockboxes; a modification that defeats the manufacturer’s tested design can complicate claims. For important records, note that “fire resistant” does not automatically mean safe for paper, digital media, or lithium battery devices at the same temperatures. Paper chars at temperatures that can destroy hard drives and melt optical media. Dual-purpose storage only works when each item type is matched to the right protection profile.
Plan zones before you buy materials
The most effective custom and DIY gun safe modifications begin with zoning. I recommend dividing the interior into four categories: firearms, high-value non-firearm items, documents/media, and support gear. This lets you answer practical questions quickly. Which firearms need fastest access? Which valuables require soft surfaces? Which items should never be stacked? Which items must remain dry but not warm? A compact defensive pistol, for example, should not be buried behind tax records, and suppressor paperwork should not be loose under a rifle buttstock.
Measure the interior with the door closed, including hinge-side clearance and shelf depth lost to boltwork. Many owners plan from the advertised exterior dimensions and discover that interior depth is reduced by paneling, fireboard, door organizers, or protruding lock mechanisms. Sketch the layout on paper or in a basic app and assign heights to long guns, scoped rifles, upper receivers, document boxes, and bins. Factory “gun count” numbers are famously optimistic; a 24-gun safe may hold fewer than half that number once optics, slings, and modern chassis rifles are involved. Planning realistic occupancy prevents unstable stacking and damaged finishes.
Choose modification categories that preserve the safe’s structure
Most useful modifications fall into five categories: interior organization, door utilization, moisture control, lighting and power, and item-specific protection. Interior organization includes adjustable shelving, rifle rods, pistol racks, magazine bins, and tray systems. Door utilization covers panel organizers, document pockets, and holsters designed not to interfere with the handle or locking bolts. Moisture control uses desiccants, electric dehumidifiers, and monitored humidity management. Lighting and power add visibility while minimizing heat and wiring risk. Item-specific protection includes padded drawers, silica-lined boxes for optics, and lockable interior containers for medications or sensitive papers.
The safest path is modular hardware attached to existing shelving tracks, carpeted panels, or removable boards. Products from SecureIt, Liberty, Browning, Hornady, and GoldenRod exist because they solve common problems without forcing owners to drill structural steel. DIY solutions can work just as well when built from sealed plywood, closed-cell foam, HDPE panels, aluminum angle, and low-VOC adhesives suited for enclosed spaces. Avoid untreated wood that off-gasses heavily or attracts moisture, and avoid loose foam that sheds particles onto firearm actions. Good modification work looks intentional, carries load evenly, and can be reversed.
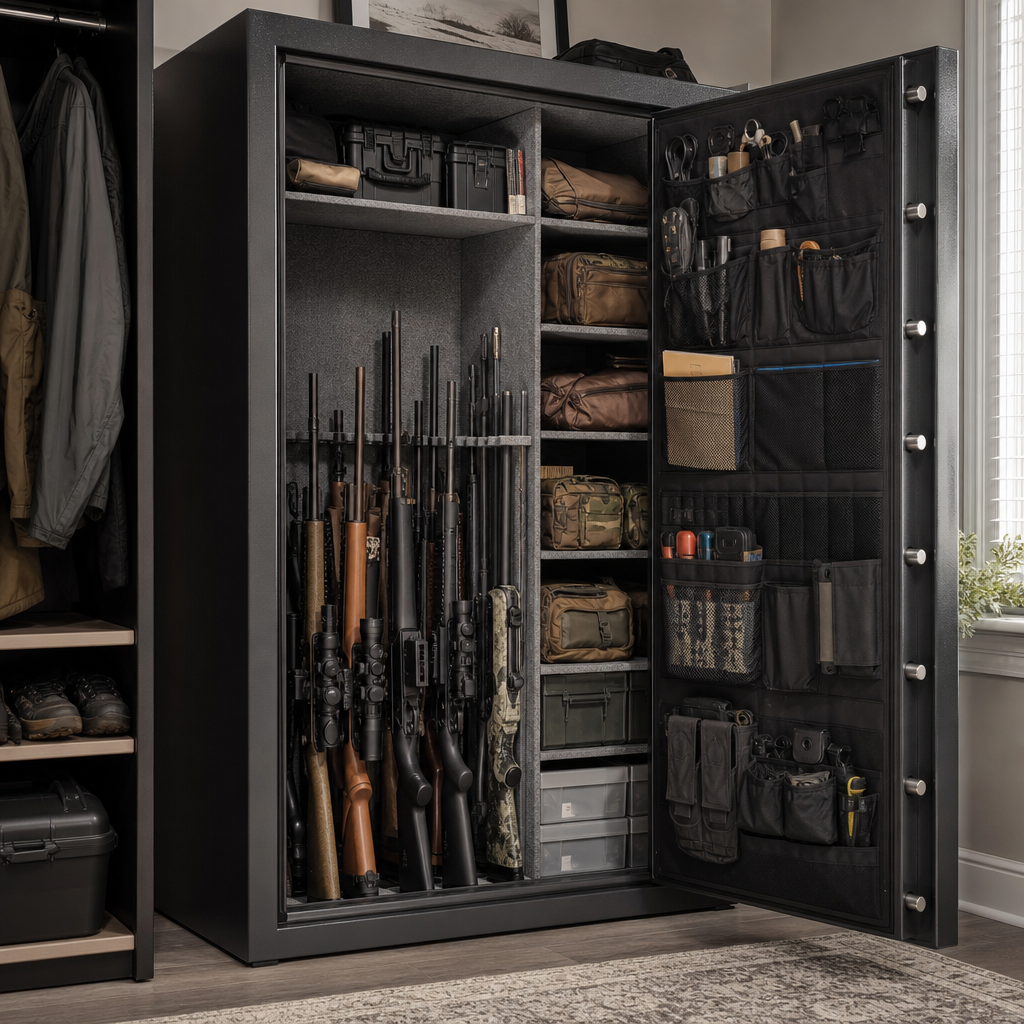
Interior layout ideas for firearms and valuables
The heart of dual-purpose storage is using vertical and horizontal space intelligently. Long guns usually belong along one side or the back wall, with spacing increased for optics and bipods. Rifle rods or barrel supports can reclaim space by stabilizing firearms upright on upper shelves, allowing lower shelves to store cases or bins. Handguns fit well in angled racks or pull-out trays lined with felt or neoprene. Valuables such as watches, heirloom jewelry, hard drives, and camera lenses should go in shallow drawers or labeled bins where they are visible immediately and not crushed by heavier gear.
Documents deserve their own compartment. A small fire-rated document chest placed inside the safe is often the best answer because it provides a second layer against heat and keeps papers organized. Passports, deeds, trust documents, and NFA paperwork should be in labeled folders or waterproof sleeves, not slid behind ammunition cans. If you store emergency cash, separate it from lubricants and solvents. If you store batteries or electronics, remember that sealed spaces can trap heat; use protective cases and inspect them regularly for swelling or corrosion. Dual-purpose does not mean mixing everything together. It means controlled separation within one secure footprint.
Best modifications by goal
| Goal | Recommended modification | Why it works | Main caution |
|---|---|---|---|
| Increase rifle capacity | Rifle rods, staggered rests, scoped-gun spacing | Uses upper airspace and prevents leaning | Do not crowd muzzles or optics |
| Add document storage | Interior fire document box and labeled sleeves | Protects paper and improves retrieval | Check true media versus paper ratings |
| Organize handguns | Pistol rack or drawer tray | Prevents contact damage and saves shelf space | Maintain trigger protection and clear labeling |
| Control humidity | GoldenRod plus desiccant with hygrometer | Reduces condensation and rust risk | Recharge or replace desiccants on schedule |
| Improve visibility | Low-heat LED strip lighting with door switch | Speeds access and inventory checks | Avoid pinched wires near boltwork |
| Protect delicate valuables | Padded trays, watch boxes, lens cases | Stops scratches and impact damage | Do not overload unsupported shelves |
Moisture control is non-negotiable
If there is one modification category that consistently delivers more value than owners expect, it is humidity management. Safes create microclimates. In garages, basements, and exterior-wall locations, temperature swings cause condensation, especially on steel and blued surfaces. Rust starts quietly under slings, beneath foam contact points, and inside bores if moisture persists. The standard approach is combining an electric convection-style dehumidifier such as a GoldenRod with rechargeable desiccant packs and a digital hygrometer. The rod slightly warms the air, reducing relative humidity and preventing moisture from settling on metal.
Target relative humidity is generally around 45 to 50 percent for mixed firearm and document storage, though conditions vary by region and safe location. Too high invites corrosion and mildew; too low can affect some wood stocks over long periods. I advise checking humidity at different shelf levels for two weeks after any modification because added bins, sealed cases, and document boxes can change airflow. Never rely on a dehumidifier without measurement. Also avoid storing firearms in soft cases inside the safe for long periods, because many fabrics retain moisture and can accelerate finish damage.
Lighting, power, and access upgrades
Lighting seems cosmetic until you try to retrieve a specific item in low light without knocking over three others. Battery LED kits are easy to install, but hardwired or plug-in low-voltage systems are usually better for long-term reliability if your safe includes a power pass-through. Use warm or neutral LEDs with adhesive clips or magnetic mounts on removable panels, not on sensitive fire lining. Motion activation or door-pin switches are useful, but confirm that the sensor placement does not interfere with door organizers or create accidental battery drain.
Power inside a safe should be limited and deliberate. Owners often want to charge optics, maintain rechargeable flashlights, or power Wi-Fi humidity sensors. That can be reasonable, but charging lithium batteries in a tightly enclosed steel box is a risk decision, not a convenience decision. If you do it, use quality chargers, schedule inspections, and avoid charging unattended for long periods. Quick-access enhancements also deserve caution. Pistol holsters on the door can speed retrieval, but they must retain the firearm securely when the door swings and must not point in an unsafe direction during handling. Fast is only valuable when it remains controlled.
Common DIY mistakes and how to avoid them
The most common mistake is drilling first and asking questions later. Safe walls may contain fireboard, hardplate, wiring channels, or anti-tamper components that are not obvious from the interior. Another frequent problem is overloading a shelf with ammunition cans or bullion without calculating weight distribution. Shelves sag, brackets pull out, and door gaps can change if the safe body is stressed unevenly. Ammunition is dense; a single .50 caliber can loaded with cartridges can weigh more than many improvised shelves are built to handle.
I also see poor material choices: open-cell foam that traps moisture, carpet adhesive with strong solvents, bare MDF that swells, and magnetic accessories placed where they interfere with electronic locks or scratch finishes. Door organizers are often overstuffed until they press against long guns and prevent proper door closure. Finally, owners neglect inventory discipline. A modified safe should make serial number records, maintenance intervals, and document retrieval easier, not harder. Label bins, maintain a simple content list, and test whether each item can be removed safely with one hand supporting it and the other clearing surrounding gear.
Building a hub-worthy modification plan for future upgrades
Because this page serves as a hub for custom and DIY gun safe modifications, it is useful to think in stages rather than one large project. Stage one is assessment: measure the safe, verify anchoring, inspect seals, identify climate risks, and list what must be stored. Stage two is organization: add shelves, racks, bins, and document containers. Stage three is environmental control: install dehumidification, hygrometers, and lighting. Stage four is refinement: upgrade door storage, add padded trays, improve labeling, and revisit spacing as your collection changes. This phased approach keeps the safe usable throughout the process and exposes problems early.
Future subtopics naturally branch from this hub: how to install gun safe lighting, how to add shelving without damaging fire lining, how to control humidity in basement safes, how to organize handguns and magazines, how to store documents inside a gun safe, and when not to use foam or fabric organizers. Treat each modification as part of a system. Security, climate, access, and preservation are linked. When one is ignored, the others suffer. When they are designed together, a gun safe stops being a crowded box and becomes a reliable storage platform built around how you actually live and what you need to protect.
Modifying a gun safe for dual-purpose storage is ultimately an exercise in disciplined customization. The right approach starts with the safe’s limits, respects legal and insurance realities, and then improves the interior through modular, reversible changes that preserve security and fire performance. Zoning the interior, using realistic capacity estimates, protecting documents in secondary containers, managing humidity with measured targets, and adding lighting carefully will solve most real-world storage problems without risky alterations. The best custom and DIY gun safe modifications are not the most dramatic ones; they are the changes that make retrieval safer, preservation stronger, and organization repeatable month after month.
The main benefit is simple: one secure enclosure can protect firearms and other critical valuables without turning into a cluttered compromise. If you are planning upgrades, start with a written layout, buy humidity monitoring first, and prioritize removable interior accessories before touching the safe’s structure. Then build outward in stages, testing each change for access, clearance, and load. A thoughtful modification plan will give you more capacity, better protection, and fewer mistakes. Review your current safe today, identify one weak point, and make the first improvement with security and preservation in mind.
Frequently Asked Questions
What does dual-purpose storage in a gun safe actually mean?
Dual-purpose storage means using a gun safe to protect more than firearms without compromising the safe’s primary role as a secure, controlled environment. In practice, that means the safe still needs to provide strong theft resistance, restricted access, protection from unauthorized handling, and a stable interior for items that are vulnerable to humidity, dust, and impact. Once those priorities are preserved, the interior can be adapted to hold additional valuables such as important documents, spare optics, jewelry, emergency cash, cameras, hard drives, heirlooms, and other compact high-value items.
The key is to think of the safe in two layers. First is the security layer: lock integrity, door seal performance, anchoring, internal visibility, and safe handling of firearms. Second is the organization layer: shelves, bins, door panels, handgun racks, document pouches, lighting, and compartment dividers. A good dual-purpose setup never treats the safe like a generic closet. Firearms should still be stored in a way that prevents contact damage, preserves quick inventory checks, and avoids interference with locks, hinges, relockers, or door closure. Non-firearm valuables should be placed where they remain protected but do not create clutter, pressure points, or access problems.
Done correctly, dual-purpose storage improves efficiency. Instead of scattering valuables across multiple weak storage locations, owners consolidate them in one hardened enclosure with a controlled layout. That makes routine access easier, helps with accountability, and reduces the chance of damaging sensitive gear. The goal is not to stuff more into the safe. The goal is to redesign the interior so every item has a secure, logical place while the safe continues to function first and foremost as a gun safe.
What are the safest modifications to make when converting a gun safe for dual-purpose storage?
The safest modifications are usually reversible, non-structural, and focused on interior organization. That includes adding adjustable shelving, door-mounted organizers, labeled bins, handgun hangers, pistol racks, magazine storage trays, document sleeves, LED lighting, dehumidifiers, and protective liners. These upgrades improve capacity and usability without weakening the safe body, disturbing the lockwork, or changing the fire and burglary characteristics in unpredictable ways. In most cases, interior reconfiguration gives you far more usable space than people expect, especially if the original factory layout was designed around a simple long-gun count rather than mixed-value storage.
It is generally wise to avoid modifications that require drilling through the body, altering the door, cutting interior fireboard, or fastening hardware into unknown areas of the safe shell. Many safes have lock components, relock devices, hardplates, insulation layers, and electrical pathways positioned where an owner cannot see them. Drilling in the wrong location can damage critical security features, void a warranty, create corrosion points, or reduce fire protection. If power access is needed for lighting, dehumidification, or charging small electronics, use factory pass-through ports whenever possible. If no pass-through exists, consult the manufacturer before doing anything permanent.
From a practical standpoint, the best conversion starts with an inventory. Measure what you intend to store, group items by size and frequency of access, then assign zones inside the safe. Long guns may stay on one side, with upper shelves for documents and sensitive valuables, door storage for handguns and small accessories, and lower sections for legal ammunition quantities or dense items that benefit from a lower center of gravity. Add moisture control and soft-touch surfaces wherever delicate finishes or paper records are involved. This approach preserves security while creating a layout that actually works day to day.
How should firearms, documents, ammunition, and valuables be arranged inside the same safe?
The best arrangement is one that separates categories by function, fragility, and access frequency. Firearms should remain stable, visible, and easy to retrieve without dragging other items out of the way. Long guns usually belong in the main vertical section with enough spacing to prevent stocks, scopes, and barrels from knocking together. Handguns often fit best in door holsters, pistol racks, or dedicated shelves with padded supports. Important documents should be placed in sealed document pouches, file boxes, or upper shelving areas where they stay flat, dry, and protected from abrasion. Jewelry, cash, and small electronics should go into labeled containers, soft cases, or modular bins so they do not disappear into dead space or become tangled with firearm accessories.
Ammunition deserves special planning. It should be stored in accordance with local laws and any manufacturer guidance, and it should be kept organized by caliber in clearly labeled containers that do not overload weak shelves. Ammunition is dense, so lower shelves or the floor area of the safe are often better choices than high storage points. That keeps the load stable and reduces the chance of shelf sagging. If optics, suppressor accessories where lawful, camera gear, or hard drives are being stored, keep them in padded containers and away from areas where long-gun movement could cause impact damage.
One useful rule is to build the interior around access tiers. Frequently used defensive or range items go in the easiest-to-reach positions. Rarely accessed documents, family records, estate papers, and backup media can go on upper shelves or in secondary compartments. Another important rule is visibility. If you cannot see what is inside, you will gradually create clutter, and clutter is what causes scratches, snagging, and inefficient use of space. A clean, labeled, zone-based layout is what turns a standard gun safe into effective dual-purpose storage rather than a crowded box of valuables.
Will modifying the interior of a gun safe affect security, fire protection, or moisture control?
It can, depending on what is modified. Interior organization changes such as shelves, racks, bins, liners, lighting, and door panels usually have little to no negative effect when installed properly. Problems begin when owners make structural changes without understanding how the safe is built. Drilling, cutting, removing insulation panels, modifying the door liner, or altering the lock area can interfere with burglary resistance features and compromise fire protection. Some safes rely on layered materials and precise internal clearances, so even a simple-looking change can have unintended consequences.
Moisture control is especially important in a dual-purpose setup because you are no longer protecting just metal firearms. Paper, leather, electronics, jewelry, optics, and cash all respond differently to humidity. A safe that contains mixed valuables should have active or passive humidity management, such as a dehumidifier rod, rechargeable desiccants, or both. Interior airflow also matters. If the safe becomes too densely packed, moisture can become trapped in corners or behind stacked items, which increases the risk of rust, mildew, adhesive failure, and musty odors. Good organization is not just about storage efficiency; it directly affects preservation.
The smartest approach is to preserve the safe’s original protective systems and upgrade only around them. Use manufacturer-approved accessories where available, monitor humidity with a small hygrometer, inspect contents regularly, and avoid any modification that changes the shell, door structure, or lock environment unless it is performed by a qualified professional. A dual-purpose interior should enhance the usefulness of the safe while leaving its core security and protective performance intact.
What common mistakes should owners avoid when setting up a gun safe for dual-purpose storage?
The most common mistake is overpacking the safe. People see unused vertical space or shelf depth and assume every inch should be filled, but overcrowding leads to damaged finishes, blocked access, poor visibility, and reduced airflow. A dual-purpose safe works best when there is enough room to remove one category of item without disturbing everything around it. Another frequent mistake is storing valuables in loose piles instead of dedicated organizers. Small items like watches, passports, backup drives, optics tools, and spare keys disappear quickly in an unstructured interior, and that defeats the whole point of secure storage.
Another issue is ignoring load distribution. Ammunition, camera bodies, coin collections, and document boxes can be surprisingly heavy. If all of that weight is placed on one upper shelf or one side of the safe, it can stress interior supports and make the layout less stable. Owners also make the mistake of prioritizing convenience over firearm safety by leaning rifles against shelves, stacking handguns without separators, or placing delicate valuables where they can be struck during retrieval. The interior should be built around stable contact points, clear withdrawal paths, and category separation.
Finally, many people forget the environmental side of the equation. They focus on fitting more items inside and neglect humidity control, lighting, inventory records, and periodic maintenance. In a dual-purpose setup, those details matter. Use labels, photograph the contents for insurance documentation, keep an updated inventory, check batteries or power accessories regularly, and inspect for moisture or wear. The best gun safe modifications are not flashy. They are deliberate, organized, and designed to protect firearms and valuables together without sacrificing security, condition, or ease of use.