
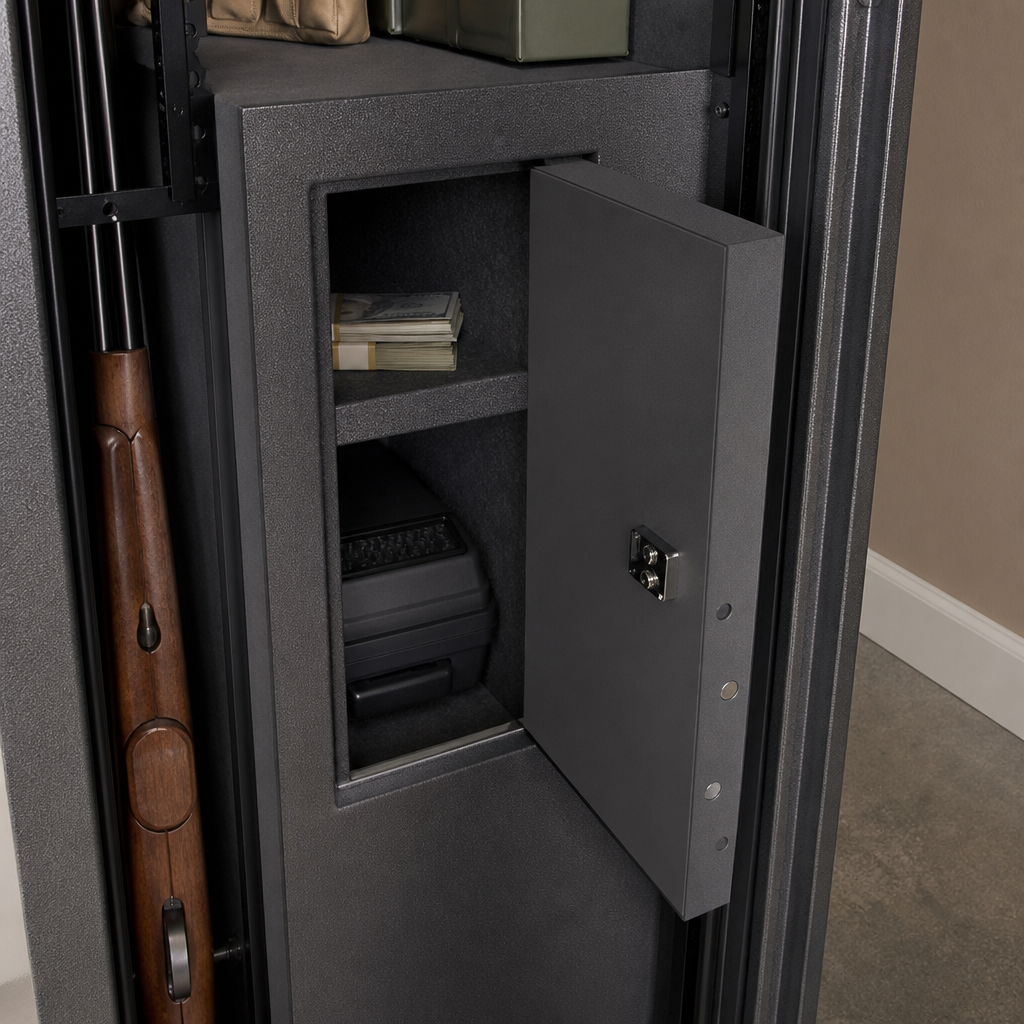
Adding a hidden compartment to your gun safe is one of the most practical custom gun safe modifications you can make when you need layered storage, discreet access, and better organization without changing the safe’s primary security function. In the gun safes and safety category, a hidden compartment is a concealed storage space integrated inside an existing safe to hold small valuables, backup documents, spare keys, cash, jewelry, or defensive tools that you do not want visible when the main door opens. I have helped plan and install these upgrades in both residential and workshop settings, and the difference between a useful compartment and a risky one always comes down to design discipline: preserve the safe’s fire lining, avoid weakening steel structure, prevent interference with locking hardware, and build concealment that looks intentional rather than improvised. This matters because many factory safes offer large open cavities but limited segmentation. A well-designed hidden compartment gives you discretion, faster retrieval of priority items, and a cleaner storage system while keeping your main firearm layout intact.
What a Hidden Compartment Should and Should Not Do
A hidden compartment inside a gun safe should add concealment and organization, not replace the safe’s core security. That distinction is essential. The safe’s door, body steel, lock, relockers, hard plate, boltwork, and fire insulation are the systems that resist theft and fire. Your modification should work around those systems, never through them. In practice, that means no drilling near lock bodies or relockers, no cutting reinforced door panels, and no removing gypsum or ceramic fire board unless you know exactly how to restore equivalent protection. The best hidden compartments are usually secondary enclosures mounted to unused interior voids, false backs, raised floor cavities, shelf undersides, or side-panel pockets created with nonstructural inserts.
It also helps to define the goal before you start. If your priority is rapid access, use a compartment integrated behind a magnetic panel or shallow false shelf near the door organizer. If your priority is concealment from a casual observer, a false bottom under ammo trays or document bins works better. If your priority is separation, such as keeping passports and cash away from firearms and optics, a lockable interior box hidden behind fabric-covered paneling may be the right solution. Each approach can be valid, but each carries tradeoffs in usable volume, accessibility, and installation complexity.
For most owners, the safest route is a reversible modification. Adhesive-backed hook-and-loop panels, rare-earth magnet retention, hidden screws into existing wooden interior frames, and custom drawer boxes built within shelving systems all preserve resale value and reduce the chance of damaging the safe. Permanent metal cutting should be the last option, not the first. I have seen excellent DIY projects built entirely from Baltic birch, thin steel sheet, closed-cell foam, and automotive trunk liner that looked factory-installed and created significant concealed storage without touching the safe shell.
Planning the Modification: Space, Materials, and Safety Checks
Before you build anything, empty the safe and inspect its internal architecture. Most gun safes have a steel shell covered by interior fabric over composite board, fire board, or plywood framing. You need to identify which areas are decorative and which conceal critical hardware. Measure interior height, width, and depth, then look for dead space behind side carpeting, beneath adjustable shelves, under barrel rests, and behind door organizer panels. Use a bright inspection light and a small mirror. If you have the manufacturer’s manual, review any diagrams showing boltwork paths and anchor-hole placement.
Your material choices should match the compartment’s purpose. For small concealed enclosures, 1/2-inch Baltic birch is strong, dimensionally stable, and easy to finish. Thin-gauge steel can improve pry resistance, but it adds weight and requires careful edge treatment. Neodymium magnets provide clean hidden retention for removable panels, though they must be sized correctly so a loaded shelf does not shift when the door closes. Closed-cell foam reduces rattle, while automotive felt or marine carpet helps the new component blend with the safe’s existing liner. For fasteners, short wood screws into interior framing, construction adhesive rated for wood and metal, and threaded inserts in custom shelf assemblies are usually enough.
Safety checks come first. Unload all firearms and remove ammunition during the project. If the safe is anchored, confirm that tilting shelves or pulling interior panels will not put torque on anchor points. If the safe includes dehumidifier wiring, LED lighting, or a power outlet kit, trace those cables before attaching anything. Keep every modification away from lock cables, spindle holes, and door hinge clearances. A hidden compartment that rubs against boltwork can jam the door. One that blocks air circulation can trap moisture around blued steel. Build with millimeters of clearance in mind, not rough estimates.
| Compartment Style | Best Use | Main Materials | Risk Level | Difficulty |
|---|---|---|---|---|
| False Bottom | Cash, documents, jewelry | Baltic birch, felt, spacers | Low | Easy |
| False Back Panel | Flat valuables, backup handgun | Panel board, magnets, fabric | Medium | Moderate |
| Shelf Underside Drawer | Keys, passports, small tools | Wood drawer box, slides, liner | Low | Moderate |
| Sidewall Pocket | Documents, suppressor accessories | Thin wood frame, panel, fabric | Medium | Moderate |
| Hidden Lockbox Insert | High-value items needing separation | Steel box, bolts, false cover | High | Advanced |
Step-by-Step Build: The Easiest Hidden Compartment for Most Safes
The most reliable first project is a false-bottom compartment built beneath an existing shelf module or floor organizer. It is discreet, structurally simple, and reversible. Start by measuring the floor area or shelf footprint you want to modify. Subtract enough clearance so the insert slides in and out without scraping the side walls; I typically leave 1/8 inch on each side. Determine the hidden cavity depth. Even a 1.5-inch cavity can hold passports, stacks of cash, hard drives, spare keys, and compact valuables. Cut a base frame from 1×2 stock or plywood strips, then top it with a thin panel cut to match the visible floor.
Next, create the concealment layer. Wrap the top panel with fabric or felt that matches the safe interior as closely as possible. Many owners use automotive trunk liner because it blends well and resists fraying. If the safe floor already has a carpeted mat, reuse that mat on top of the new false floor. The cleaner the visual match, the better the concealment. Attach finger-pull tabs only if they can be hidden under a removable accessory tray; otherwise, use two shallow finger holes near the back edge where they are blocked from view by stored gear. Another option is a magnetic lift point using a steel washer recessed underneath and a separate magnet key.
Build the cavity supports so weight stays evenly distributed. If rifles or ammo cans rest above the compartment, use cross braces rather than just perimeter strips. Dry-fit the structure inside the safe and cycle the door several times. Check that long gun stocks, barrel rests, and door organizers do not snag on the insert. Once fit is confirmed, line the hidden cavity with foam or felt and add dividers for the items you plan to store. A hidden space becomes much more useful when contents do not slide together. The final step is discipline: record what is stored there, but keep that inventory outside the safe in a secure digital record or off-site file. Hidden storage only helps if you can find and manage what you put inside it.
Advanced Options: False Panels, Door Cavities, and Lockbox Inserts
Once you understand the internal layout, you can move to more sophisticated custom and DIY gun safe modifications. A false back panel is one of the best options for taller safes with open rear space behind long-gun stocks or shelf towers. Build a lightweight frame, cover it with matching fabric, and mount it with concealed magnets or hidden screws into wooden interior supports. The compartment behind it can store document sleeves, emergency cash, or a compact handgun in a holster mount. The panel must sit flush and should not bow when pressed. Any visible flex tells an observer that something is behind it.
Door cavities are more complicated because the safe door often houses fire board, boltwork channels, and organizer panels. In most cases, you should not cut into the actual door structure. Instead, build a secondary organizer layer over the existing panel and incorporate a hidden zippered pouch, rigid pocket, or shallow magnetic box behind visible storage. This works particularly well in safes that already use MOLLE-style door panels. The concealment is not absolute against a determined search, but it is excellent against casual viewing when the door opens.
A hidden lockbox insert is the strongest internal upgrade for owners who want separation as well as concealment. The concept is simple: mount a small steel lockbox inside the safe, then disguise it behind a removable panel or shelf face. The advantage is that even if someone gains access to the main safe, they still face a second barrier. The downside is complexity. You need secure attachment points, clearance for opening the inner box, and enough interior room that the added bulk does not compromise your firearm arrangement. I recommend this approach for document protection, heirloom jewelry, or controlled-access household valuables, not as a substitute for dedicated child-resistant firearm storage practices.
Mistakes That Damage Security, Fire Protection, or Usability
The most common mistake is drilling or cutting before fully mapping the safe. I have seen owners punch through interior panels and strike fire lining, wiring, and even hardware channels. Another frequent error is overbuilding. A heavy steel compartment sounds impressive, but if it overloads adjustable shelves or shifts the safe’s internal balance, it can cause sagging, interference, or reduced usable capacity. Hidden compartments should disappear visually, not dominate the layout.
Moisture control is another overlooked issue. Dense liners, sealed cavities, and tightly packed valuables can reduce airflow inside the safe. If you already run a GoldenRod or rechargeable desiccant, confirm that the modification does not isolate humid air pockets. For paper items and precious metals, that matters. For firearms, optics, and suppressor mounts, it matters even more. Leave small breathing gaps where possible, and monitor humidity with a digital hygrometer after installation.
Finally, do not confuse concealment with legal compliance or best-practice firearm storage. A hidden compartment is useful for discretion, but it does not replace proper locking procedures, child access prevention, or separate ammunition policies where required. If local law, insurance terms, or household risk factors call for additional controls, follow those standards first. The best modification is the one that improves function while preserving every safety margin the safe already provides.
How This Hub Connects to Broader Gun Safe Customization
Hidden compartments sit at the center of custom and DIY gun safe modifications because they force you to think about the entire system: shelf layout, door storage, lighting, humidity control, anchoring, access speed, and inventory management. Once you build one well, related upgrades become easier to plan. Adjustable shelving can create dead space worth concealing. LED lighting makes hidden areas easier to inspect without advertising them. Door panel organizers can double as cover layers for shallow storage. Dehumidifier placement may need to move when you add enclosed inserts. In other words, a hidden compartment is not an isolated trick; it is part of a complete safe-optimization strategy.
As a hub topic, this subject also helps owners prioritize future projects. Start with low-risk reversible changes such as false bottoms and shelf drawers. Move next to tailored organizers, labeled bins, and better lighting. Only after you understand your safe’s geometry should you attempt advanced false panels or integrated lockboxes. That progression saves money, avoids permanent mistakes, and produces a safer result. The strongest custom gun safe modifications are not the flashiest ones. They are the ones that respect the original engineering while making the interior more discreet, organized, and practical for daily use.
If you want to add a hidden compartment to your gun safe, begin with careful measurements, preserve all structural and fire-protective elements, and choose a reversible design that fits how you actually use the safe. Done correctly, this upgrade creates discreet storage without sacrificing access or security. Use this page as your starting point for the wider world of custom and DIY gun safe modifications, then map your next improvement one step at a time.
Frequently Asked Questions
1. Why would someone add a hidden compartment to a gun safe instead of just using the main shelves or door pockets?
A hidden compartment adds a second layer of discretion inside a space that is already designed for security. While the main shelves, racks, and door organizers in a gun safe are useful for visible storage, they do not provide separation for items you may want kept out of plain sight even when the safe is open. A concealed compartment can be used to store backup documents, cash, jewelry, spare keys, hard drives, small heirlooms, or a defensive tool that you want organized and quickly accessible without being immediately noticeable to anyone viewing the interior.
This kind of modification is especially practical when you want better compartmentalization without reducing the safe’s primary purpose. Firearms, magazines, and standard accessories can remain in their usual locations, while sensitive or high-priority items are stored in a location that blends into the safe’s interior. That can be beneficial in households where more than one authorized person accesses the safe, or in situations where you want a private storage area without installing a separate lockbox.
Another advantage is organization. A thoughtfully designed hidden compartment helps reduce clutter and keeps critical small items from being misplaced on shelves or buried under larger gear. When done correctly, it does not interfere with the locking system, door seal, fire lining, or structural integrity of the safe. The goal is not to turn the safe into something it is not, but to make better use of unused interior space in a controlled, discreet, and reversible way whenever possible.
2. What should you consider before building a hidden compartment inside a gun safe?
Before making any modification, start by evaluating the safe’s interior layout, construction, and warranty terms. Not every gun safe should be drilled, cut, or permanently altered. Many models include fireboard, fabric panels, door organizers, shelving systems, and steel reinforcement in specific locations, and damaging those components can reduce fire resistance, compromise internal function, or void the manufacturer’s warranty. For that reason, the safest approach is usually to design a compartment that attaches to existing shelving, sits behind a false panel, mounts to preexisting hardware points, or uses removable inserts rather than modifying the safe body itself.
You should also decide exactly what the hidden compartment is meant to store. The intended contents will determine the compartment’s size, depth, placement, and access method. Documents and cash may need a flat, moisture-conscious storage area, while jewelry or backup electronics may benefit from padded lining. If the compartment is intended for a defensive tool or emergency access item, placement becomes even more important, because it should remain secure while still being practical for lawful, authorized use. Avoid building a compartment so large that it disrupts rifle spacing, shelf support, or door clearance.
Environmental conditions matter as well. Gun safes often contain dehumidifiers, desiccants, lighting systems, and soft interior materials. A hidden compartment should not block airflow, trap moisture, press against wiring, or interfere with internal accessories. It is also wise to think through how the compartment will be accessed under low light and whether it can be opened quietly and reliably without snagging on nearby contents.
Finally, prioritize safety and compliance. Any modification should preserve secure firearm storage practices and follow applicable laws, especially if the safe contains firearms or defensive tools. If you are unsure where internal structural or fire-protective materials are located, consult the manufacturer or an experienced safe technician before proceeding. Good planning is what makes this type of project useful rather than risky.
3. What is the best way to add a hidden compartment step by step without damaging the safe?
The best approach is to treat the project like an interior storage upgrade, not a structural alteration. Begin by emptying the section of the safe where you plan to work and measuring all usable space carefully. Look for low-visibility areas such as behind a false back panel, beneath a shelf riser, inside a disguised side insert, or under a removable floor platform. Choose a location that does not interfere with door movement, shelf adjustment, long-gun storage, hinges, locking bolts, electrical pass-throughs, or dehumidifier placement.
Next, create a design that is simple, secure, and consistent with the safe’s interior. Many owners build a shallow box or tray from lightweight but rigid material such as thin plywood, composite board, or metal sheet, then wrap or line it with felt or fabric that matches the safe interior. Others use a false panel secured with hidden magnets, friction fit supports, concealed tabs, or existing shelf brackets. The key is to make the compartment appear like a natural part of the interior while keeping it easy for an authorized user to identify and access.
Before final installation, test fit everything outside the safe if possible. Confirm that the compartment opens and closes smoothly, remains concealed from normal viewing angles, and does not shift when the door is opened or closed. If you need attachment points, favor non-destructive methods such as industrial hook-and-loop fasteners, removable adhesive systems rated for the material, magnetic mounts where appropriate, or integration with existing shelving hardware. Avoid drilling into the safe walls, floor, ceiling, or door unless you have manufacturer confirmation that doing so is safe and will not affect security or fire protection.
Once installed, load the compartment with only the items it was designed to hold. Do not overfill it or allow loose contents to rattle, bind, or create obvious bulges. Then perform a full function check: open and close the safe door, verify shelf stability, inspect clearance around firearms and accessories, and ensure nothing obstructs locks, relockers, boltwork, or electronic components. A well-executed hidden compartment should feel intentional, remain discreet, and leave the safe’s main protective function unchanged.
4. Can adding a hidden compartment weaken a gun safe or affect fire protection?
Yes, it can if the modification is done improperly. A gun safe is more than a steel box with shelves. Many safes rely on layered construction that may include steel plating, fire insulation, paneling, door organizers, internal reinforcements, and carefully placed hardware. Cutting into the body, drilling through unknown areas, or compressing internal materials can potentially reduce structural strength, damage the interior liner, interfere with locking components, or lessen fire resistance. That is why permanent modifications to the safe shell itself should be approached with extreme caution.
The good news is that a hidden compartment does not have to weaken the safe at all when it is designed as a non-invasive interior addition. False bottoms, concealed side panels, hidden trays under shelves, and matching accessory inserts can all provide discreet storage without altering the steel body or fire-lined sections. In many cases, the safest method is to build around unused interior space rather than into the safe structure. If the compartment is removable, that is even better from a maintenance and warranty standpoint.
Fire protection is another important factor. Internal airflow, fireboard placement, and heat expansion characteristics should not be ignored. A compartment that seals moisture inside, presses against insulation, or blocks dehumidification can create long-term storage problems even if it does not immediately affect fire rating. For valuables like paper documents, cash, digital media, or jewelry, consider lining materials that are non-abrasive and moisture-conscious, and continue using desiccants or electrical dehumidifiers as recommended for the safe.
If preserving warranty coverage and rated performance is important, review the manufacturer’s guidance before making any change. When in doubt, choose a reversible design and avoid any modification that requires penetrating the safe body. In practical terms, the safest hidden compartment is one that enhances storage and concealment while leaving the safe’s structure, fire barrier, and locking system untouched.
5. What items are best suited for a hidden compartment in a gun safe, and what should not be stored there?
A hidden compartment is best used for compact, high-value, or high-priority items that benefit from discretion and organization. Common choices include spare house or vehicle keys, backup safe keys, passports, insurance documents, emergency cash, jewelry, digital backups, family records, small keepsakes, and select personal defense items where lawful and appropriate. The compartment can also serve as a dedicated location for items you need to locate quickly during an emergency rather than sorting through shelves, pouches, and bins.
That said, the contents should match the compartment’s design. Important documents should be stored flat and protected from moisture. Jewelry and electronics should be cushioned to prevent scratching or impact damage. If the compartment is intended for a defensive tool or ammunition-related item, it must still be stored in a way that aligns with household safety practices, local regulations, and the overall secure-storage purpose of the safe. Concealed does not mean careless. The hidden area should be stable, predictable, and accessible only to authorized users.
There are also items you should avoid storing in a makeshift hidden compartment. Do not pack it with anything too heavy for the support method, anything corrosive or chemically unstable, or anything that could leak, expand, or damage the interior materials. Avoid storing items in a way that obstructs firearm access, blocks a dehumidifier, tangles with wiring, or compromises shelf balance. If a compartment must be forced open because it binds or jams, the design needs to be improved.
In general, the best hidden compartment contents are small, deliberate, and important