Adding LED lighting inside a gun safe is one of the most useful upgrades you can make because it improves visibility, speeds up access, and helps you inspect firearms, optics, and documents without juggling a flashlight. In the context of custom and DIY gun safe modifications, interior lighting is a foundational project: it is affordable, low risk when planned correctly, and often the first improvement owners make before adding dehumidifiers, handgun racks, door organizers, or power passthroughs. LED stands for light-emitting diode, a lighting technology that produces bright illumination with very low power draw, minimal heat, and long service life. For gun safes, that combination matters. You want enough light to see serial numbers, identify the correct long gun, and check for rust or moisture issues, but you do not want a hot bulb, frequent battery changes, or wiring that interferes with shelves and barrel rests. I have installed lighting in compact handgun safes, tall residential security containers, and full-size fire-lined gun safes, and the same principles apply in each case: choose the right power source, route wires cleanly, avoid compromising the fire seal or steel body, and place light where shadows disappear. When people search how to install LED lighting inside your gun safe, they usually want three answers: what parts to buy, how to mount them safely, and how to make the system reliable over time. This guide covers all three while also serving as a hub for custom and DIY gun safe modifications, so you can plan lighting as part of a broader interior upgrade rather than as a one-off accessory.
Why LED lighting is the best first gun safe modification
LED lighting is the best first gun safe modification because it solves a daily usability problem without permanently changing the safe’s structure. Many factory safes have dark interiors, especially models with deep shelves, black carpet, and door panels that cast shadows over the lower half of the cabinet. A basic light kit changes how the safe functions immediately. You can identify the right firearm faster, verify that a chamber flag or cable lock is where you expect it, and inspect corners where condensation or dust accumulates. Good lighting also supports safe handling. If you store defensive firearms, seeing grips, slings, and mounted accessories clearly reduces fumbling in low light.
Compared with other custom and DIY gun safe modifications, LEDs offer a strong return for modest cost. A quality plug-in kit or rechargeable motion-sensing setup typically costs far less than adding custom shelving or replacing the interior. At the same time, lighting complements nearly every later upgrade. Door organizers block ambient room light, so internal lighting becomes more important after you install one. Pistol racks and magazine bins create more layers inside the safe, which increases shadowing. A powered dehumidifier rod often means you already have access to electricity, making a hardwired LED kit even easier to add. In practice, I advise owners to think in systems: visibility, moisture control, storage density, and access speed should work together.
Another reason LEDs dominate this category is efficiency. Most LED strip kits used in safes operate on 12V DC and draw only a few watts. That low consumption means a small power supply can run several feet of lighting, and battery-powered bars can last months if triggered only by a motion sensor or door switch. LEDs also generate far less heat than incandescent bulbs, which matters inside a confined, fabric-lined compartment. Heat is not just uncomfortable; over time it can affect adhesives, batteries, and some stored materials. If your safe includes documents, suppressor accessories, optics, or leather gear, lower heat is a practical benefit.
Choose the right LED system for your safe and use case
The best LED system depends on your safe size, access pattern, and whether you already have power inside the safe. In general, you have four common options: adhesive LED strip kits, magnetic LED light bars, puck lights, and integrated hardwired systems with door switches. Strip kits are the most versatile for long-gun safes because they can run vertically along the front door frame, across the top interior, or under shelves. Light bars are simple and clean, especially in steel-bodied interiors where magnets hold well, though many fire-lined safes have fabric over composite panels that reduce magnetic mounting options. Puck lights work for small compartments but often create bright spots and dark corners, which makes them less effective in tall safes. Hardwired systems with a pin switch or magnetic reed switch feel the most factory-like and are the most dependable for frequent access.
Color temperature matters more than many buyers realize. Warm white in the 2700K to 3000K range can make blued steel and walnut stocks look pleasant, but it is not the best for identifying details quickly. Neutral to cool white, roughly 4000K to 5000K, provides more accurate contrast for black polymer pistols, matte optics, serial plates, and stored documents. Brightness matters too, but more lumens are not always better. A small 10- to 20-gun safe may need only 300 to 700 lumens distributed well, while a larger 30- to 50-gun safe may benefit from 800 to 1500 lumens spread across multiple strips. Even lighting beats harsh hotspots every time.
Power choice is the next decision. Plug-in 12V systems are ideal when your safe has a factory power outlet kit, a passthrough hole, or an existing dehumidifier cord route. Rechargeable USB bars are excellent when you do not want to route wiring, though they require periodic charging. Battery-powered AA or AAA units are easy to install but become expensive and less reliable over time, especially in colder garages where battery performance drops. If you open the safe often, a wired system with a door-activated switch is usually the best long-term answer.
| LED option | Best use | Main advantage | Main limitation |
|---|---|---|---|
| Adhesive strip kit | Long-gun safes and shelf interiors | Even light distribution and flexible routing | Adhesive quality varies by liner material |
| Magnetic light bar | Steel interiors or temporary setups | Fast installation and easy repositioning | Weak hold on fabric-lined or composite surfaces |
| Puck light | Small lockers and document compartments | Simple installation | Creates shadows in larger safes |
| Hardwired with door switch | Frequently accessed safes | Automatic operation and polished finish | Takes more planning and wire routing |
Tools, materials, and placement planning before installation
Before you stick anything inside the safe, plan the layout with the door open and the interior fully loaded. The tools are simple: a tape measure, isopropyl alcohol, microfiber cloth, cable clips or adhesive wire mounts, scissors or flush cutters, and possibly a plastic trim tool for pressing wires into corners. If you are using a powered kit, add a drill-free cord routing plan, a 12V adapter if not included, and a switch type. For battery or rechargeable units, confirm charging port access so you do not mount the light where removal becomes frustrating.
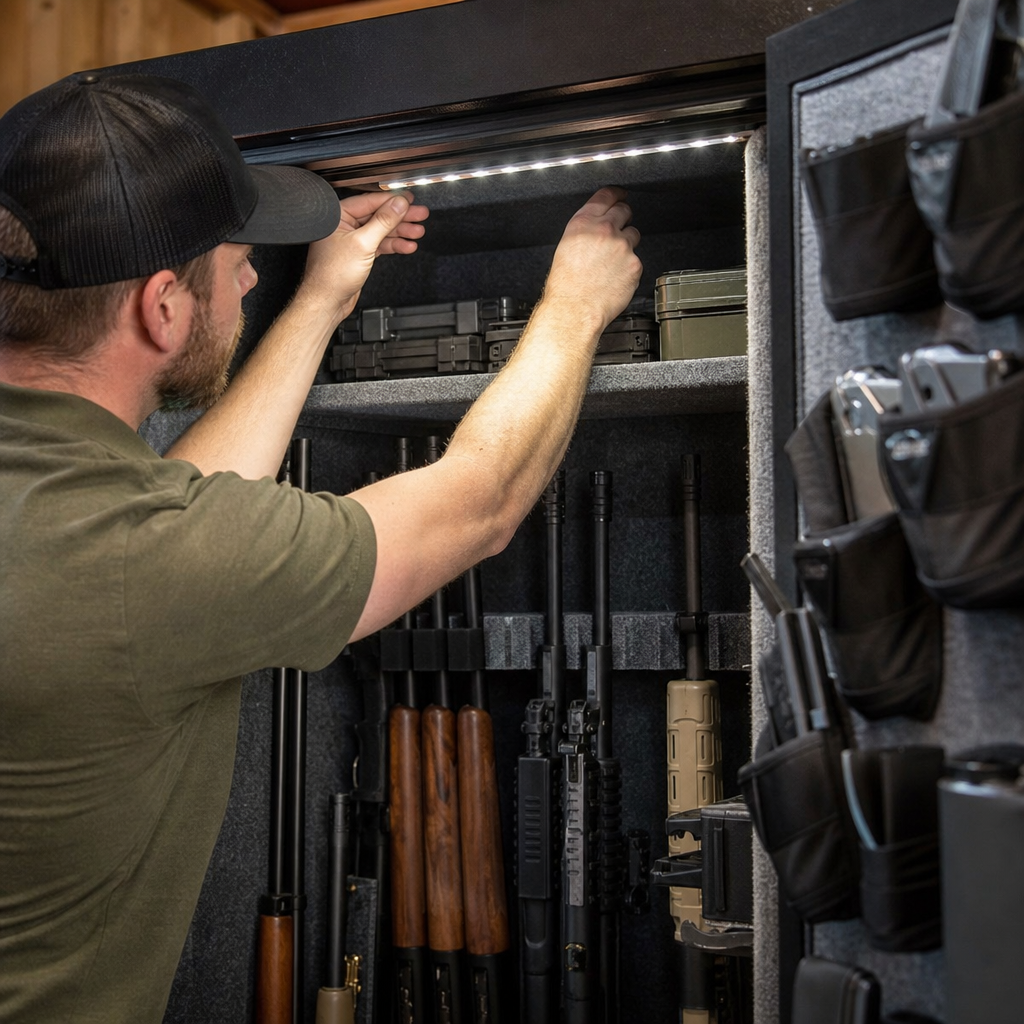
Placement determines whether the upgrade feels professional or improvised. The most effective arrangement in a vertical gun safe is usually a pair of strips running down the hinge side and latch side front edges, aimed inward, plus a short strip or bar across the top. That front-edge method reduces shadowing from the door organizer and illuminates both the rifle stocks below and optics near eye level. Under-shelf strips are excellent for ammo shelves, document cubbies, and handgun racks. Avoid placing the only light source at the back wall; guns stored closely together will block it. Also avoid mounting lights where long-gun muzzles, soft cases, or hanging organizers can snag the wiring.
Adhesion prep is often the difference between a clean install and a failure a month later. Safe interiors collect lint, oil film, and dust. Wipe mounting surfaces with isopropyl alcohol and let them dry completely before applying adhesive strips or clips. If the safe has plush fabric, use accessory clips or hook-and-loop-backed channels rather than relying on the factory strip adhesive alone. On some carpeted liners, 3M VHB-backed clips hold better than generic foam tape. I have also had excellent results routing wires along existing seams in the liner because the cable disappears visually and experiences less direct pull.
Step-by-step installation without damaging the safe
Start by unloading the safe enough to work comfortably. You do not always need to remove every firearm, but you should clear the surfaces where you will measure, clean, and mount components. Measure the vertical height and shelf spans, then dry-fit the strips or bars before peeling any adhesive backing. If the kit allows cutting, trim only at the marked cut points; cutting elsewhere can ruin the circuit. Position the switch before the lights. For manual systems, place the switch where your support hand can reach it naturally. For automatic systems, mount the magnetic reed switch or plunger switch near the door frame where it closes consistently without interfering with the seal.
Next, clean all mounting points. Apply the LED strips with steady pressure, working a few inches at a time to keep them straight. Do not stretch strip lighting while installing it; tension causes lifting later. Secure corners with adhesive cable clips rather than forcing tight bends. Route wires along frame edges, shelf undersides, or liner seams so they are protected from rifle stocks and stored cases. If your safe has a factory electrical outlet hole, use it. If it has a dehumidifier passthrough, confirm the cable can pass without pinching. Drilling a safe body is rarely advisable because it can affect fire lining, corrosion resistance, and in some cases warranty coverage.
Once the lights are mounted, connect the power supply and test the system with the door open and closed. Look for dark zones around the lower buttstock area, behind door pockets, and under the top shelf. Reposition if needed before loading the safe again. This is also the moment to verify cable slack. The wire should not pull when the door swings and should not droop into the firearm path. If you use rechargeable bars, practice removing and reinstalling them. A setup that seems fine empty can become awkward once rifles and shelves are back in place. Finalize the installation by bundling excess wire neatly and labeling the charger or adapter if you run more than one accessory inside the safe.
Safety, moisture control, and common mistakes to avoid
The biggest installation mistakes are avoidable. First, do not block the door seal, relocker area, boltwork cover, or factory wiring channels if your safe includes an outlet or light kit. Second, do not overload a cheap power adapter with too many added strips. Match the adapter output to the total wattage of the LED system. Third, avoid bargain adhesives in humid garages or unconditioned basements. A strip that falls onto firearms or stored ammunition is more nuisance than hazard, but it signals poor preparation. Fourth, do not assume lighting solves moisture problems. LEDs help you inspect for corrosion, yet they do not lower humidity. If the safe is in a damp environment, pair lighting with a desiccant pack or an electric dehumidifier rod.
Moisture control matters because many custom and DIY gun safe modifications change airflow and interior density. Door panels, ammo cans, liners, and added shelving can reduce circulation. In my own installations, the best results come from treating the safe as a managed storage environment. Use a hygrometer to track relative humidity. For most firearm storage, keeping humidity around 45% to 50% is a practical target, though local climate and stock materials may shift the ideal slightly. Lighting makes these inspections easier because you can see condensation, rust bloom, or mold on slings and cases earlier.
There are also legal and practical considerations. Modifying the interior is generally straightforward, but avoid any change that interferes with lock operation, emergency access, or the safe’s listed fire protection claims. If the manufacturer specifies approved accessory channels or power kits, use them. Liberty Safe, Browning, Rhino Metals, and other major brands often provide outlet kits, door organizers, and interior accessories designed around their liners and dimensions. Using brand-matched accessories can simplify fitment, although universal LED kits from reputable suppliers work well when installed carefully.
How lighting fits into a complete gun safe customization plan
As the hub for custom and DIY gun safe modifications, this topic goes beyond light strips. The smartest approach is to sequence upgrades so each one improves the next. Start with lighting and moisture control, because both affect every item stored inside the safe. Then address organization: handgun hangers, rifle rods, door organizers, magazine bins, and document shelves. After that, consider access and power features such as charging stations for optics batteries, internal outlets, or monitored sensors. Lighting supports all of these. A well-lit safe reveals wasted space, shows whether your handgun rack is crowding door pockets, and makes inventory checks faster.
One practical example is a 24-gun fire-lined safe with a top shelf and a door panel organizer. Without internal light, the lower rifle section is dim and the shelf hides stored suppressor accessories and paperwork. Adding two vertical 5000K LED strips and an under-shelf strip transforms that interior. Once visibility improves, it becomes obvious that a pistol rack under the shelf and labeled magazine bins on the door would use space better. That is why lighting belongs at the center of this subtopic: it is both a standalone upgrade and an enabling modification that improves the value of every later change.
Install LED lighting inside your gun safe with the same mindset you would use for any serious storage upgrade: plan the layout, choose reliable parts, protect the safe’s structure, and test the system under real use. The core benefits are immediate. You see contents clearly, access firearms faster, inspect for rust sooner, and make every other interior modification easier to manage. The right setup is usually simple: front-mounted LED strips or bars, a dependable power source, clean wire routing, and either a manual switch you can reach instantly or an automatic door trigger. From there, build out the rest of your custom and DIY gun safe modifications in a logical order, starting with humidity control and organization. If you are upgrading your safe this year, begin with lighting, document the layout, and use that clearer view to plan the next improvement with confidence.
Frequently Asked Questions
What type of LED lighting works best inside a gun safe?
The best choice for most gun safes is a low-voltage LED strip light kit designed for enclosed spaces. LED strips are popular because they are slim, flexible, easy to mount along door frames or interior edges, and bright enough to illuminate long guns, shelves, and document pockets without taking up usable storage space. Many safe owners prefer 12V systems with adhesive-backed strips because they are simple to install and can often be routed neatly around the interior using clips or cable channels. In smaller safes, puck lights or compact LED bars can also work well, especially if you only need targeted illumination on a shelf or in a handgun compartment.
When choosing a lighting kit, pay attention to brightness, color temperature, power source, and switching options. A neutral or cool white color temperature usually provides the best visibility for identifying firearms, optics, serial numbers, and stored paperwork. Warm white lighting can look softer, but it may reduce clarity in darker safe interiors. You should also look for a kit with reliable adhesive or mounting hardware that performs well on carpeted or fabric-lined safe walls. If your safe interior is heavily lined, magnetic mounts, screw-in clips, or specialty fasteners may hold better than adhesive alone.
Just as important, choose lights that produce minimal heat and are rated for continuous indoor use. LEDs are ideal for gun safes because they are energy efficient, long lasting, and far safer in enclosed spaces than older incandescent options. If you want the most convenience, motion-activated or door-activated LED systems are especially useful because they turn on automatically when you open the safe, giving you immediate visibility without fumbling for a switch.
Do I need to drill into my gun safe to install interior LED lighting?
In most cases, no. Many of the best gun safe lighting setups can be installed without drilling into the safe body at all. This is one reason LED lighting is often considered a foundational DIY safe upgrade: it is affordable, low risk, and usually non-invasive when planned properly. Adhesive-backed LED strips, magnetic light bars, and clip-mounted wire guides allow you to add effective illumination while preserving the safe’s structure and finish. For many owners, avoiding drilling is the safest approach because it reduces the chance of damaging interior fire lining, door seals, wiring, or the safe’s protective barrier layers.
If your safe already has a factory-installed power port or passthrough, installation becomes even easier. You can route the power cable through that opening and keep everything clean and professional looking without modifying the safe. Even if no passthrough exists, some battery-powered LED systems eliminate the need for wire routing altogether, although they may require more frequent maintenance and battery replacement than plug-in systems.
Drilling should only be considered if you fully understand your safe’s construction and the manufacturer confirms that doing so will not compromise fire protection, security, or warranty coverage. Safe walls often contain more than simple sheet metal, and drilling blindly can create problems that are expensive or impossible to reverse. For that reason, most people are better off using a no-drill solution unless they are performing a larger custom modification and know exactly what they are doing.
How do I power LED lights inside a gun safe safely and neatly?
The safest and cleanest method is usually to use a low-voltage LED kit connected to an external power adapter, with the cable routed through an existing outlet hole or factory power passthrough. This keeps higher-voltage components outside the safe while allowing the interior lights to run on safer low-voltage current. If your safe includes an electrical access port, use it. That feature is specifically intended to support accessories like lighting, dehumidifiers, and charging devices with minimal hassle and reduced risk.
If your safe does not have a passthrough, you still have good options. Battery-powered LED systems are easy to install and require no external cable routing, making them attractive for renters or anyone who does not want to alter the safe in any way. The tradeoff is that batteries eventually need replacement, and in larger safes, battery-powered lights may not deliver the same consistency or runtime as a wired setup. Rechargeable light systems can be a middle ground, but they still require periodic upkeep.
For a neat installation, plan your cable path before mounting anything. Run wiring along corners, behind shelving, or around the door frame where it is least visible and least likely to snag on rifles, slings, or door organizers. Use adhesive cable clips, raceways, or low-profile channels to secure wires in place. Keep wiring away from moving door bolts, hinges, and any sharp edges. The goal is to create a setup that looks intentional, stays protected during daily use, and does not interfere with access to your firearms or accessories.
Where should LED lights be placed inside a gun safe for the best visibility?
Placement matters just as much as the lighting product itself. The most effective installations usually place LED strips along the inside of the door frame, vertically along the front corners, or around the upper perimeter of the safe interior. These positions help spread light evenly across long guns, shelves, and storage pockets while reducing deep shadows. Mounting the lights near the front edge is often better than placing them at the back, because front-mounted lighting projects inward across the contents instead of getting blocked by rifles, ammo cans, or shelf supports.
For tall rifle safes, vertical strips on both sides can dramatically improve visibility from top to bottom. In safes with multiple shelves, a combination approach often works best: one main strip around the perimeter and smaller supplemental lights under shelves or above document compartments. If you use a door organizer, lighting around the frame can also help illuminate pouches, holsters, and pockets that otherwise stay dark even when the main compartment is lit.
Before permanently mounting anything, test your proposed placement in a dark room. Hold the lights in place temporarily and open and close the safe to see how shadows fall across your firearms and accessories. Make sure the lights do not shine directly into your eyes when the door opens, and confirm they will not be crushed or peeled loose by stored items. Good placement creates balanced, usable illumination that helps you inspect equipment quickly and safely, not just a bright spot in one section of the safe.
Are motion-activated or door-activated LED lights worth installing in a gun safe?
Yes, for many gun safe owners they are absolutely worth it. Motion-activated and door-activated systems add convenience, speed, and hands-free operation, which is exactly what makes interior lighting such a valuable upgrade in the first place. Instead of reaching into a dark safe or juggling a flashlight while handling firearms, you open the door and the lights come on automatically. That immediate visibility can make a real difference when you need to identify a specific rifle, inspect an optic, check a serial number, or retrieve documents stored in a lower compartment.
Door-activated systems are often the most predictable because they respond directly to the safe opening. Depending on the kit, this may be done through a contact switch, magnetic sensor, or plunger-style trigger. Motion-activated lights are easier to install in some setups because they do not always require precise alignment with the door, but performance can vary based on sensor placement, interior layout, and how much of the safe is blocked by shelves or stored gear. In larger or densely packed safes, a sensor that works perfectly in an open compartment may be less responsive in a crowded one.
That said, the best option depends on how you use your safe. If you want maximum simplicity and dependable activation every time the door opens, door-activated lighting is usually the better choice. If you want a quick retrofit with minimal wiring and fewer components, motion-activated lighting can be an excellent solution. Either way, automatic lighting is a practical upgrade that complements other common safe improvements like dehumidifiers, handgun racks, and door storage systems by making the entire interior easier to use every single day.