Concealing a gun safe inside a wall or cabinet is one of the most effective ways to combine firearm security, fast access, and low visual profile in a home, but it only works when the installation is planned around structure, safe design, code considerations, and responsible storage practices. In practical terms, a concealed gun safe is a locking container that is built into or hidden behind finished surfaces such as drywall, millwork, wardrobes, kitchen-style cabinetry, or furniture panels so that it is not obvious to a casual observer. The goal is not merely to hide valuables; it is to create layered protection by reducing discovery, delaying forced access, and preserving the room’s appearance. I have worked on wall-safe and cabinet-safe projects where the concealment itself was impressive, yet the real difference came from mundane details like stud spacing, hinge swing, anchoring method, humidity control, and whether the homeowner could actually reach the firearm under stress.
This topic matters because hidden storage sits at the intersection of burglary prevention, child safety, defensive readiness, and home remodeling. A large freestanding safe may offer better fire ratings and storage volume, but it is not always compatible with smaller homes, apartments, or rooms where a visible safe attracts attention. A recessed wall safe can disappear behind framed artwork, a mirror, a shallow bookshelf, or a panel door. A cabinet-integrated safe can sit behind false backs, lift-up shelves, or matching doors that blend into built-ins. At the same time, concealment is not a substitute for true security. Steel thickness, lock quality, anchoring, and the surrounding structure determine whether the safe resists attack. This hub article explains how to evaluate wall and cabinet concealment, how to plan custom and DIY gun safe modifications, what tradeoffs to expect, and where each approach fits within a broader firearm storage strategy.
Choosing Between a Wall Installation and a Cabinet Installation
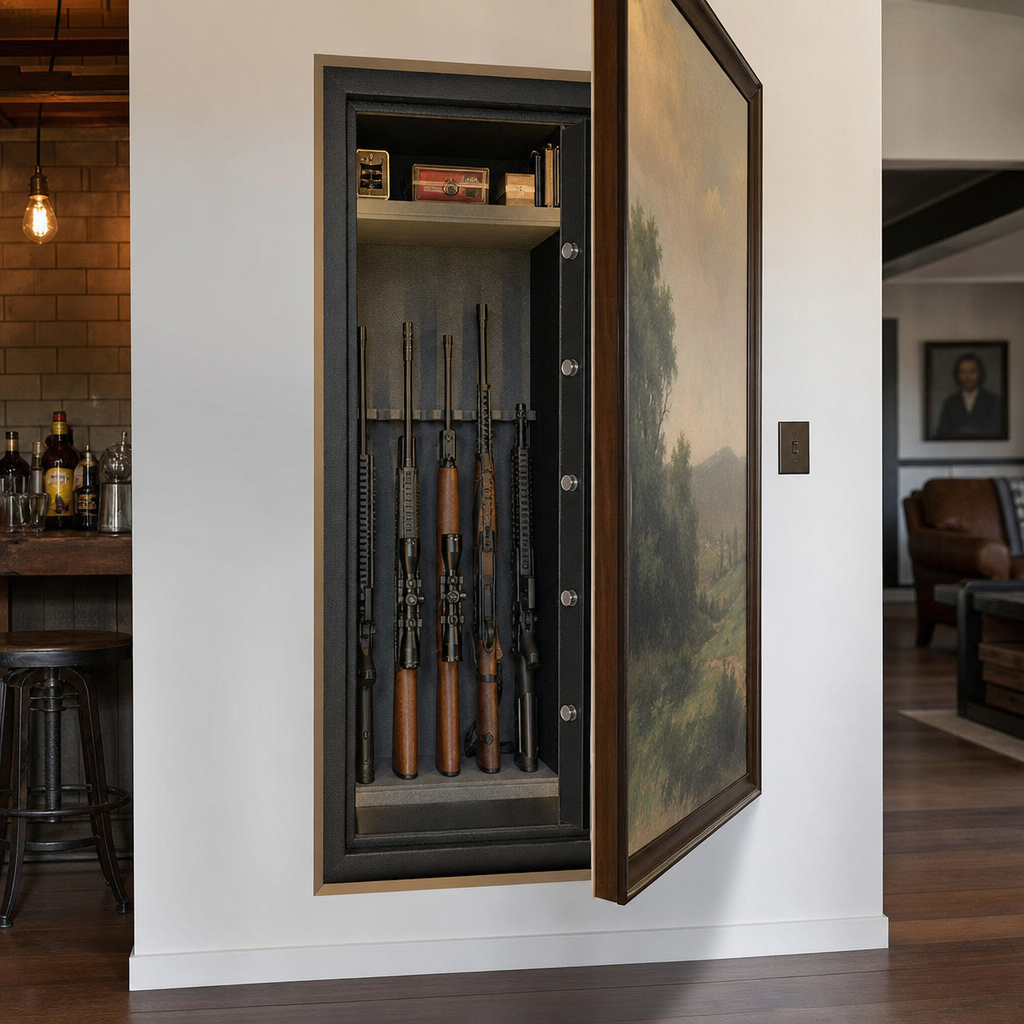
The first decision is whether to conceal the gun safe inside a wall cavity or inside a cabinet or piece of built-in furniture. Wall installations work best when you need discretion and compact access for one to three firearms, documents, or defensive handguns. Standard residential wall framing usually places studs 16 inches on center, leaving a cavity that is too shallow and narrow for many long guns unless the safe is specifically designed for vertical rifle storage between studs. Because interior walls commonly use 2×4 framing, finished depth is limited. That means wall safes are usually ideal for pistols, spare magazines, jewelry, passports, and compact valuables rather than full collections. When I scope these projects, I always verify stud spacing, plumbing runs, electrical lines, HVAC ducts, and whether the wall is load-bearing before discussing concealment finishes.
Cabinet installations are more flexible. A gun safe hidden inside a pantry-style cabinet, closet built-in, mudroom locker, office credenza, or bedroom wardrobe can accommodate larger dimensions, heavier steel, and better door swing. Cabinet-based concealment also allows more creative access systems, including magnetic touch latches, hidden hinges, removable face frames, and drawer-stack disguises. The main limitation is that cabinetry must support the safe’s weight and anchoring loads. A cabinet can hide a stronger safe than a wall can, but the cabinet itself should never be treated as the security layer. The safe still needs to be bolted into wall studs, concrete, subfloor framing, or a reinforced platform. If a thief can pry loose the entire box or tip the cabinet forward, the concealment has failed even if the safe itself remains locked.
The right option depends on intended use. For quick-access home-defense storage in a bedroom, a recessed wall safe behind a framed mirror can be practical. For mixed storage of handguns, one defensive rifle, ammunition, and accessories, a built-in cabinet around a compact long-gun safe often makes more sense. For collectors, neither may replace a traditional large safe; hidden installations are usually supplemental, not universal solutions.
Structural Planning, Measurements, and Site Selection
Successful concealed installations begin with exact measurements rather than product photos. Measure the safe’s exterior height, width, depth, door thickness, hinge projection, handle projection, required clearance for keypad or biometric scanner, and full door swing. Then compare those dimensions to the real opening, not the assumed one. Drywall, baseboard returns, face frames, crown details, and adjacent trim often reduce usable space. I have seen homeowners buy a wall safe that technically fit between studs but could not open fully because the decorative frame around the mirror cover blocked the handle arc.
Site selection should prioritize concealment, structural support, and practical access. Bedrooms, home offices, closets, dressing rooms, and finished basements are common locations. Avoid walls with high moisture exposure, obvious traffic patterns, or vibration from slamming doors if the lock uses sensitive electronics. Exterior walls can be problematic because insulation, vapor control layers, and temperature swings increase condensation risk. Bathrooms and laundry spaces are poor choices unless the safe is specifically protected against humidity and corrosion. For cabinet projects, locate the installation where users can stand comfortably, open the disguised door fully, and retrieve the firearm without sweeping their own body or bystanders.
Wall cavity checks should be done with a stud finder, borescope, and, when needed, a small exploratory opening. Electrical wiring in the target bay is common, especially near switches and outlets. Relocating wiring may require a licensed electrician. If the wall is load-bearing, cutting studs for a larger recess requires proper framing changes with headers and jack studs, the same logic used for windows or niches. Cabinet projects need similar rigor. Confirm floor load capacity, especially for upper-story rooms, and verify that the cabinet base is level. Even a moderate safe can weigh several hundred pounds once loaded. Small alignment errors create door bind, latch misalignment, and wear on hidden panels.
Custom and DIY Gun Safe Modifications That Improve Concealment
Custom and DIY gun safe modifications usually focus on concealment, fit, access, or interior organization. The safest modifications are external to the lock body and main steel shell. Examples include adding a false cabinet back, installing a hinged artwork panel, building a shallow bookshelf door, changing shelving around a compact safe, or creating a toe-kick release on a built-in. These adjustments improve disguise without compromising the safe’s tested structure. Modifications that involve drilling the safe body, relocating the lock, welding on new hardware, or cutting additional openings are much riskier. They can void warranties, weaken anti-pry geometry, and interfere with relockers or hard plates designed to resist drilling attacks.
For wall installations, the most common custom treatment is a flush cover element. A mirror, canvas, framed map, or recessed panel door mounted on concealed hinges can hide the safe opening. The concealment piece should look natural in the room. Oversized art centered suspiciously on an empty wall often draws attention. Better results come from integrating the safe into a gallery arrangement or a built-in millwork pattern. Cabinet installations often rely on matching door fronts, false drawer heads, or hidden compartments behind adjustable shelves. Soft-close hinges and touch latches reduce noise, while rare-earth magnetic catches can secure a false panel without visible hardware.
Interior modifications matter too. Foam racks, barrel rests, magazine bins, dehumidifier rods, and LED lighting improve usability inside compact spaces. In small hidden safes, every inch counts. I recommend using low-profile handgun hangers, labeled storage pouches, and door organizers only if they do not interfere with lock bolts or door seal surfaces. Any adhesive-backed accessory should be rated for the expected temperature range inside the enclosure. Poorly chosen lighting kits and cheap stick-on organizers are common failure points in DIY builds.
| Modification | Best For | Main Benefit | Main Risk |
|---|---|---|---|
| Hinged artwork cover | Wall safe | Excellent visual concealment | Obvious if placement looks unnatural |
| False cabinet back | Built-in cabinet | Low-cost hidden compartment effect | Weak if not reinforced and anchored |
| LED interior lighting | Wall or cabinet safe | Faster access in low light | Battery or wiring maintenance |
| Dehumidifier rod or desiccant | Any enclosed installation | Reduces rust risk | Needs periodic monitoring |
| Custom shelving and pistol racks | Compact hidden safes | Better capacity and organization | Can obstruct retrieval if overpacked |
Security Performance: Hiding the Safe Without Weakening It
A concealed gun safe is more secure when concealment is layered on top of strong physical security, not used instead of it. In burglary scenarios, most residential attacks are fast, noisy, and tool-limited. Criminals look for obvious targets first, which is why hidden placement helps. But if the safe is discovered, steel quality and anchoring become decisive. Entry-level lockboxes made from thin sheet metal can be defeated quickly with pry tools even when hidden behind cabinetry. A better concealed installation uses a safe with a formed door, internal hinges or protected external hinges, substantial locking bolts, reinforced lock area, and anchoring points that tie into framing or masonry.
Anchoring deserves special emphasis. Wall safes are often bolted through side flanges or rear panels into studs or blocking. Cabinet safes may be anchored to floor joists, concrete slabs, wall studs, or steel backer plates integrated into the millwork. Use the manufacturer’s approved anchor sizes and hole locations whenever possible. If the installation sits inside decorative cabinetry, leave service access so you can periodically inspect anchors, power cords, and dehumidification devices. I also recommend thinking about attack angles. A cabinet should not create pry gaps around the safe door, and surrounding trim should not interfere with a full lock engagement. Sometimes a beautiful finish carpenter detail accidentally gives a pry bar a perfect starting point.
Lock selection affects both security and use. Mechanical dial locks remain durable and independent of batteries, but they are slower in urgent access situations. Electronic keypads provide fast entry and easy code changes, while biometric locks offer convenience if the fingerprint reader is high quality and properly maintained. No matter the system, hidden safes should have an override and a battery replacement plan. A dead keypad concealed behind a stuck panel is more than inconvenient; it can render the firearm inaccessible when needed.
Moisture Control, Fire Limits, and Day-to-Day Access
Concealed storage changes the environment around the safe. A wall cavity or tight cabinet enclosure can trap humidity, dust, and heat more than an exposed safe in an open room. Firearms stored in these spaces need corrosion management. In practice, that means using rechargeable desiccant packs, electric dehumidifier rods where power is available, silicone-treated gun socks for non-ready firearms, and a regular inspection schedule. Basements and exterior-adjacent walls deserve extra caution because seasonal temperature shifts create condensation. I have opened hidden cabinet installations that looked pristine from the outside but had rust beginning on optic mounts and magazine bodies because no one checked humidity.
Fire protection is another area where homeowners often overestimate what hidden safes can do. Many compact wall safes have minimal fire insulation compared with full-size residential security containers. Building the safe into a cabinet does not automatically add meaningful fire resistance unless the assembly is intentionally designed with rated materials, protected penetrations, and realistic expectations. Drywall layers around a cabinet may modestly delay heat transfer, but they do not transform a basic steel box into a high-fire-rated enclosure. If documents, heirlooms, or large ammunition quantities are part of the storage plan, evaluate dedicated fire-rated containers separately from the concealment concept.
Access should remain simple under normal conditions and under stress. Test the entire sequence: approach, open the concealment panel, unlock the safe, retrieve the firearm, and close or leave the system as needed. Do this in daylight and darkness. If the panel catches on rug edges, the shelf blocks your elbow, or the keypad cannot be seen from standing position, redesign before relying on it. Good concealed storage feels effortless after repetition. Complicated hidden mechanisms may look clever on video but become liabilities in real homes.
Design Ideas, Common Mistakes, and When to Call a Pro
The best concealment ideas are the ones that match the architecture of the room. In traditional interiors, a framed mirror above a dresser, a shallow medicine-cabinet-style panel in a closet, or a book-spine door integrated into built-ins can look natural. In modern homes, flush wall panels with touch-latch openings or minimalist cabinetry with hidden reveals are more convincing. I have also seen effective installations behind headboard panels, inside window-seat bases, and within office storage walls where the safe was nested behind file drawers. What made these projects work was consistency: materials, hardware, proportions, and room layout all supported the disguise.
Common mistakes repeat across DIY builds. The first is choosing concealment before choosing the safe. Homeowners design a beautiful false panel, then discover the safe door needs more clearance. The second is ignoring ergonomics. A hidden safe mounted too low, too high, or too deep inside cabinetry becomes awkward and unsafe to access. The third is relying on weak decorative components. Thin MDF panels, cabinet catches meant for dishes, and picture hinges not rated for repeated use fail quickly. Another frequent error is neglecting cable routing and power backup for electronic locks, lights, or dehumidifiers.
Know when professional help is worth the cost. Call a carpenter or cabinetmaker when you need millwork that truly disappears into existing finishes. Call a contractor or structural professional when modifying load-bearing walls or adding heavy reinforcement. Use an electrician for wiring changes, outlet relocation, or hardwired lighting. If the safe manufacturer offers installation guidance, follow it. Concealed storage rewards precision. A project that looks simple in photos may involve framing, electrical work, finish carpentry, and careful coordination between trades.
Concealing a gun safe inside a wall or cabinet works best when the project is treated as a security installation first and a design feature second. The strongest results come from matching the safe type to the use case, verifying structure and clearances, and using custom or DIY modifications that improve concealment without weakening the shell, lock, or anchoring. Wall safes offer excellent discretion for compact storage, while cabinet installations provide greater flexibility for larger firearms and accessories. In both cases, the hidden element should blend naturally into the room, open reliably, and support safe firearm handling.
The key lesson is that concealment adds protection by reducing visibility, but it cannot compensate for weak steel, poor lock quality, bad placement, or sloppy installation. Moisture control, realistic fire expectations, and repeated access testing are part of the build, not afterthoughts. If you are planning a broader set of custom and DIY gun safe modifications, use this page as your starting point and map each decision back to four priorities: security, concealment, access, and durability. Review your room, measure the space carefully, choose the right safe, and then build the disguise around it with the same discipline you would apply to any critical home safety upgrade.
Frequently Asked Questions
What should you check before concealing a gun safe inside a wall or cabinet?
Before hiding a gun safe inside a wall or cabinet, the most important step is confirming that the location can safely support both the safe and the way it will be used. Start with the structure. For an in-wall installation, verify stud spacing, wall depth, plumbing, electrical lines, HVAC runs, blocking, and any fire-rated assemblies that cannot be altered casually. Many wall safes are designed to fit between standard studs, but that does not automatically mean every wall is suitable. Load-bearing walls, exterior walls with insulation or moisture concerns, and walls containing utilities often require extra planning. For cabinet installations, pay attention to the cabinet box, floor support, anchor points, and whether the surrounding millwork can handle the safe’s weight without sagging or loosening over time.
You should also evaluate the safe itself, not just the hiding place. Dimensions, door swing, lock type, interior capacity, pry resistance, and anchoring options all matter. A concealed safe that is too small, too shallow, or difficult to open under stress defeats its purpose. Think through access in real conditions: standing, kneeling, in low light, and under time pressure. Make sure the door can open fully without hitting trim, drawers, shelves, or nearby furniture. If the safe will hold handguns for defensive access, speed may be a higher priority than maximum storage volume. If it will store multiple firearms or valuables, internal layout and reinforcement become more important.
It is also wise to consider legal, code, and household safety issues from the beginning. Depending on where you live, there may be safe storage laws, child access prevention requirements, rules affecting renovations, or building code issues tied to modifying walls and cabinetry. Concealment should never replace responsible storage. The safe still needs a reliable lock, secure anchoring, and controlled access. If children, guests, contractors, or other household members are present, the concealed location should be part of a broader security plan, not the only layer of protection. Planning carefully up front almost always leads to a safer, cleaner, and more effective installation.
Is it better to install a gun safe inside a wall or inside a cabinet?
That depends on your priorities, your home’s construction, and the type of safe you need. An in-wall safe offers an especially low visual profile because it can sit flush with the finished wall and be hidden behind artwork, mirrors, paneling, or a purpose-built cover. This approach can work very well when you want discreet storage in a bedroom, closet, office, or hallway and only need the capacity that a wall-depth safe can provide. It can also preserve floor space, which is a major advantage in smaller rooms. However, wall installations are limited by stud spacing and cavity depth, and they may not be ideal if you want to store larger firearms, optics-heavy setups, or a large amount of ammunition and gear.
A cabinet-based concealment approach is often more flexible. Cabinetry can hide a wider range of safe sizes, including heavier and deeper units that would never fit inside a standard framed wall. Built-ins, wardrobes, closets, mudroom storage, office credenzas, and kitchen-style millwork can all be adapted to conceal a safe while still maintaining a clean appearance. Cabinet concealment also makes it easier to integrate shelving, false backs, decorative panels, or doors that blend in with surrounding finishes. In many cases, this route simplifies installation because you are working with furniture or millwork rather than cutting into the building envelope.
The tradeoff is that cabinet concealment must still be truly secure, not merely hidden. A safe placed loosely inside a cabinet without proper anchoring can be vulnerable to removal, and a poorly designed access door can advertise that something valuable is being hidden. In general, wall concealment is excellent for minimal visual impact and compact storage, while cabinet concealment is usually better for capacity, design flexibility, and easier integration into custom interiors. The best option is the one that fits your structure, supports solid anchoring, allows quick and reliable access, and does not compromise safe storage standards.
How do you conceal a gun safe without making it hard to access quickly?
The key is to balance discretion with a practical opening method. A concealed safe should not require a long sequence of steps, moving heavy objects, or operating complicated latches before you even reach the lock. Good concealment looks natural but remains intuitive for the authorized user. For example, a picture frame on a hinge, a flush cabinet panel with concealed touch-latch hardware, a mirrored door, or a section of millwork designed as a hidden access point can all work well if they open smoothly and predictably. The cover should never bind, drag, or require excessive force, especially in low light or under stress.
The lock choice matters just as much as the concealment method. If quick access is a priority, many homeowners prefer biometric, mechanical push-button, or electronic keypad locks designed for rapid entry. Each option has strengths and weaknesses. Biometric locks can be fast, but quality varies and they should be tested repeatedly under realistic conditions. Electronic keypads are common and convenient, but they depend on battery maintenance. Mechanical simplex-style locks avoid battery concerns and can be very reliable, though they may require more practice. Whatever you choose, rehearse access enough that opening the safe becomes second nature. Speed comes from consistency, not guesswork.
Placement also affects access more than many people realize. The safe should be at a height and in a room that supports your intended use. A defensive handgun safe hidden behind a low cabinet panel may be too slow to reach if it forces awkward movement. Likewise, a concealed wall safe hidden behind a large framed object may be discreet but inconvenient if you need two hands to move the cover. Aim for a setup where the concealment layer opens in one simple motion and the safe door has full, unobstructed swing. The best concealed installation is not just hidden well; it is usable every single time.
Do concealed gun safes need to be anchored if they are built into a wall or cabinet?
Yes, in most cases proper anchoring is essential, even when the safe is recessed into a wall or hidden inside cabinetry. Concealment helps reduce visibility, but it is not the same as physical security. A thief who discovers an unanchored or poorly secured safe may be able to pry it loose, carry it away, or exploit weakness in the surrounding framing or cabinet materials. Built-in appearance can create a false sense of protection, but the actual security comes from the safe’s construction, its lock, and the quality of its attachment to the structure.
For wall safes, anchoring usually means fastening the unit to framing members according to the manufacturer’s instructions, often through pre-drilled mounting points into studs or blocking. The surrounding opening should be properly sized so the safe is supported and the trim-out does not bear loads it was never meant to carry. For cabinet installations, the anchoring strategy may involve securing the safe to floor framing, wall studs behind the cabinet, or a reinforced platform within custom millwork. Simply attaching a heavy safe to thin cabinet panels or particleboard is rarely sufficient. If the safe is large or especially heavy, additional reinforcement may be necessary to prevent long-term movement and to improve resistance to forced removal.
Anchor design should also account for the realities of maintenance and emergency use. You do not want fasteners in places that interfere with the safe door, lock service, or interior storage. At the same time, you want attachment points that are difficult to access from outside the locked safe. Following the manufacturer’s installation guidance is the baseline, and for more complex built-ins, a qualified installer, carpenter, or contractor can help ensure the safe is tied into the structure properly. In short, if you are going to go through the effort of concealing a gun safe, anchoring it correctly is one of the most important parts of doing the job right.
What safety, moisture, and code issues should homeowners keep in mind with a hidden wall or cabinet safe?
Hidden gun safe installations should always be approached as both a security project and a building project. One major concern is interfering with utilities or protected assemblies. Cutting into a wall without checking for wiring, plumbing, gas lines, data cabling, ductwork, or insulation can create expensive and dangerous problems. Exterior walls deserve special caution because changes can affect thermal performance, condensation risk, and weather resistance. Some walls may also be part of a fire-rated system, and altering them improperly can reduce code compliance and safety. Cabinet locations can have similar issues if they are near appliances, sinks, humid spaces, or heat sources.
Moisture control is another big factor, especially if the safe will hold firearms long term. Enclosed spaces behind wall finishes and inside cabinetry can trap humidity, which increases the risk of corrosion, mold, and damage to wood finishes or stored items. Basements, garages, exterior-facing walls, and rooms with fluctuating temperature are particularly challenging. To protect the contents, many owners use desiccants, dehumidifier rods where appropriate, humidity indicators, and routine inspections. It is also smart to choose a location with a stable indoor climate instead of relying on concealment alone. A beautifully hidden safe is not a good installation if it slowly exposes firearms to moisture damage.
Finally, code and safe-storage compliance should never be treated as an afterthought