DIY gun safe enhancements can improve access speed without sacrificing security when they are planned around safe handling, reliable hardware, and realistic home-defense use. In this context, access speed means the time it takes to identify the correct firearm, open the safe, acquire a firing grip, and bring the gun into a ready position under stress. Custom and DIY gun safe modifications include organizer panels, lighting, shelf changes, humidity control, holster mounts, biometric tuning, and labeling systems that make the safe faster and more predictable to use. I have worked on fast-access handgun safes, full-size rifle cabinets, and modular interiors for family homes, and the main lesson is consistent: speed comes from reducing confusion, not from bypassing safeguards. That matters because a poorly organized safe can add several seconds, create dangerous muzzle movement, and increase the chance of fumbling keys, magazines, or medical gear when adrenaline is high.
Most gun owners start modifying a safe for convenience, but the deeper goal is repeatable access. A safe that opens quickly one time and becomes cluttered again in a month is not truly optimized. Good enhancements support three priorities at once: security against unauthorized access, safe storage that separates firearms from curious hands, and efficient retrieval in low light or at night. This hub article covers the core categories of custom and DIY gun safe modifications, explains what each change does, and shows where each approach fits. If you are building a handgun bedside setup, a closet-mounted rapid-access safe, or a long-gun interior with better retrieval flow, these principles will help you make smarter choices before drilling, mounting, or rewiring anything.
Start with a speed audit before you modify anything
The fastest safe setup is usually the one designed around a measured routine, not guesswork. Before buying foam, magnetic mounts, or battery lights, run a simple access audit. Time how long it takes to reach the safe, enter the code or use the biometric reader, open the door fully, identify the correct firearm, and pick up any supporting equipment such as a flashlight or spare magazine. Repeat this in daylight and darkness. I recommend at least ten repetitions over several days, because one clean run proves little. You are looking for friction points: keypad placement, stiff hinges, shelves that block your wrist, pouches that snag sights, or ammunition stored in a way that forces you to use both hands.
Document the current layout with photos and note the exact causes of delay. In many residential safes, the biggest slowdown is not the lock but poor interior organization. A handgun placed flat behind paperwork, a carbine leaning against cleaning rods, or a door pocket that swings into the grip area can easily add three to five seconds. Those are meaningful delays in an emergency. This audit also tells you which modifications deserve priority. If the lock already opens in under one second but you lose time searching for a flashlight, lighting and accessory placement matter more than replacing the lock. If your shotgun catches on a top shelf lip, a shelf trim or muzzle guide may deliver a better result than any electronic upgrade.
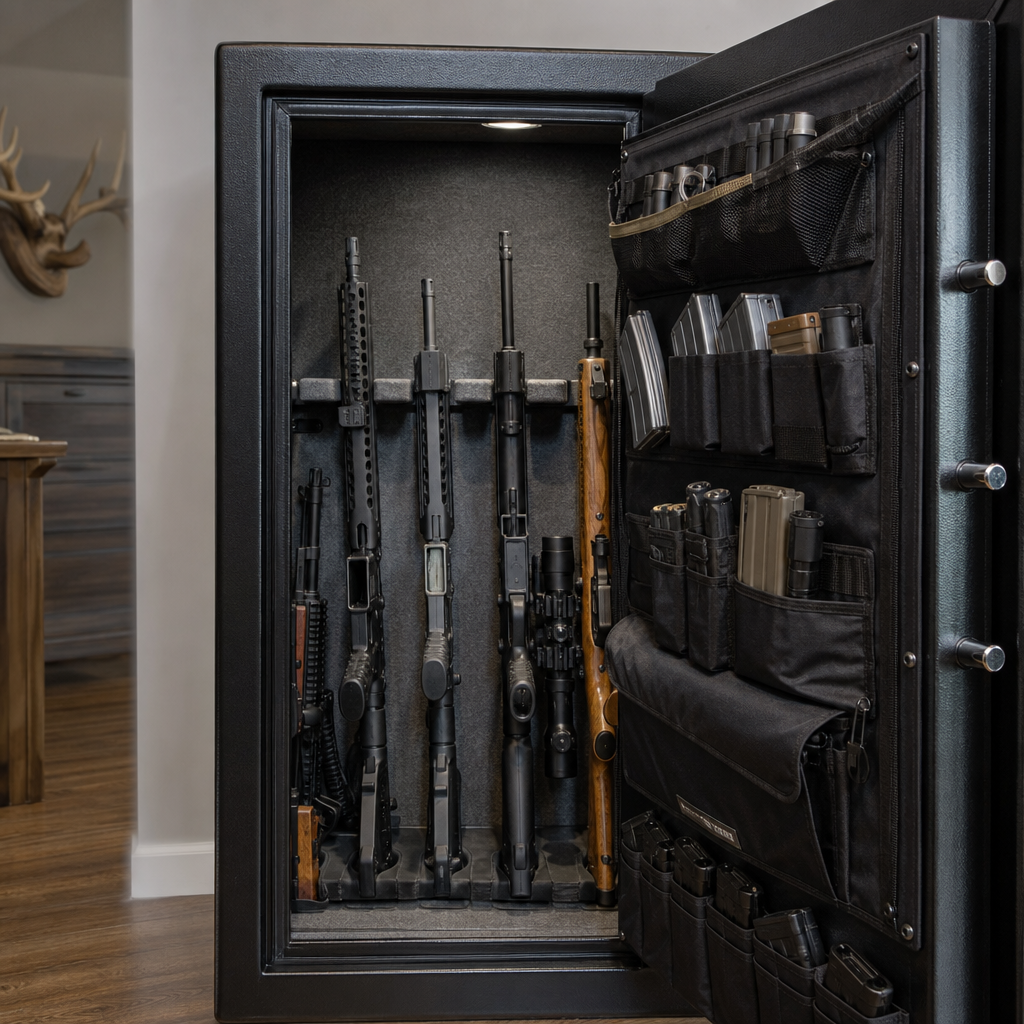
Upgrade interior organization for one-motion retrieval
Interior organization is the highest-value DIY category because it directly affects how many movements are required after the safe opens. The goal is one-motion retrieval: the firearm should be visible immediately, reachable without moving other items, and oriented so your hand naturally establishes a full firing grip. For handguns, that often means vertical door-mounted holsters, angled shelf stands, or rigid handgun racks that separate pistols by enough space to prevent slide and optic contact. For long guns, rifle rods, barrel guides, and buttstock spacers can create cleaner lanes so each firearm lifts straight out instead of dragging against a neighbor.
Material choice matters. Hook-and-loop panels are flexible and useful for temporary layouts, but heavy steel-framed pistols and loaded magazines can sag cheaper adhesive-backed products over time. Bolted organizer boards, steel door panels, and quality nylon pouches with reinforced stitching hold shape better under repeated use. If you modify shelving, avoid arrangements that place loaded defensive firearms behind valuables, paper records, or range bags. The defensive gun should live in the fastest-access zone, typically between chest and waist height for an upright safe and near the opening edge of the door or front shelf area for a compact bedside unit. This is also the right place to standardize accessories. If the light is always on the upper-right panel and the spare magazine is always below it, your hand will find them under stress without visual search.
| Modification | Best Use | Access Speed Benefit | Main Caution |
|---|---|---|---|
| Door-mounted handgun holster panel | Quick-access pistol storage | Keeps grip visible and clear | Verify door weight and hinge clearance |
| Angled pistol rack | Shelf organization | Prevents overlap and fumbling | Cheap foam models compress over time |
| Rifle rods or barrel guides | Long-gun safes | Creates straight pull-out lanes | Needs proper spacing for optics |
| Magazine and light pouch system | Accessory management | Reduces search time in darkness | Avoid blocking the primary firearm grip |
| Labeling by role and sequence | Multi-gun households | Improves identification speed | Do not expose labels visible outside the safe |
Use lighting that supports identification without ruining reliability
Lighting is one of the simplest gun safe enhancements for improving access speed, yet it is often installed poorly. A safe interior should be illuminated the instant the door opens, with enough output to identify the firearm, verify condition indicators, and locate support gear. Motion-activated LED strips are common because they are inexpensive and easy to install, but quality varies sharply. I have seen budget strips fail because adhesive releases in heat, battery compartments crack, or sensors trigger inconsistently when mounted behind shelves. Better results come from aluminum-channel LED strips, secured wire routing, and reliable magnetic or pin-switch activation tied to the door opening angle.
Color temperature also affects usability. Neutral white light in the 4000K to 5000K range usually gives the best contrast for black sights, polymer frames, brass cartridges, and medical supplies. Very cool blue-white lighting can create glare on stainless parts and optics windows, while warm light can make it harder to distinguish dark objects. Keep lights off the direct line of sight so they illuminate contents without blinding you. In larger safes, use vertical strips near the door frame or upper corners rather than a single top puck light, which leaves deep shadows below shelves. Redundant power is smart. If your main lighting is rechargeable, keep a fixed handheld light in a known pocket location. Speed improvements only count if they still work after months of real use.
Improve lock access and opening mechanics safely
Lock speed is a major factor, but the right enhancement depends on the safe type. On keypad safes, the most effective change is usually not replacing the lock body but improving tactile orientation. Small adhesive reference markers near the first button, textured pads that do not interfere with button travel, and consistent finger placement can reduce code-entry hesitation. On biometric safes, speed improves when the reader is clean, enrollment is done correctly, and multiple prints from the same finger are stored at slightly different angles. Most manufacturers advise enrolling the finger as it is naturally presented to the scanner, not in a forced straight position. In practice, that advice matters.
Mechanical opening should feel clean and predictable. If a door binds, drags on carpeting, or opens only partway because of furniture placement, retrieval slows immediately. Reposition the safe if the swing path is compromised. Lubricate hinges only with products approved by the manufacturer, because some lubricants attract dust or degrade nearby materials. Never modify locking bolts, relockers, or fire seals in the name of speed. Those are security and fire-protection components, not convenience parts. For some owners, the best improvement is adding a secondary rapid-access handgun safe near the bed while leaving the main safe optimized for storage depth rather than instant retrieval. That division of roles often produces better results than trying to make a heavy, multi-purpose safe behave like a dedicated quick-access unit.
Build a retrieval path around ergonomics and stress performance
Fast access is physical, not just mechanical. The interior should match the way your body actually moves when half-awake, under pressure, or reaching from an awkward angle. Handgun grips should face the dominant hand whenever possible, with enough clearance for knuckles and mounted optics. Long guns need vertical and horizontal space so the muzzle clears cleanly without snagging slings, bipods, or neighboring barrels. I prefer to mock up positions with unloaded firearms and inert training magazines before fixing anything permanently. This reveals interference that looks minor on paper but becomes obvious in motion.
Stress performance also depends on consistency. If you alternate where you store the home-defense gun, change shelves often, or rotate accessories without retraining, your access speed will never stabilize. Build a fixed sequence: open, grip, retrieve, close or leave, then move. Households with more than one authorized user should standardize the layout and rehearse it. There is no benefit in one person liking a door holster while another stores the same pistol on a shelf if both may need the safe. Use inert blue guns or cleared firearms during dry runs, and include low-light practice. The safe setup should support safe muzzle direction from the first inch of movement. If your current layout forces the firearm to sweep your support hand or the door edge, redesign it before worrying about shaving another second from the timer.
Control moisture, power, and maintenance so upgrades stay fast
Many DIY modifications fail because owners focus on installation day and ignore long-term conditions inside the safe. Humidity, dust, adhesive fatigue, and dead batteries all degrade access speed over time. A dehumidifier rod or desiccant system helps prevent corrosion, but it also protects electronic accessories, adhesive mounts, and foam from moisture damage. In damp basements, I have seen hook-and-loop backers peel, LED strips detach, and cheap magnetic organizers rust at contact points. Those failures create clutter and snag hazards exactly where you need a clean draw path.
Power management deserves a schedule. Replace batteries in electronic locks, lights, and biometric readers on a set interval rather than waiting for low-battery warnings. Many manufacturers recommend annual replacement at minimum, and heavy-use quick-access units may justify more frequent changes. Test all enhancements monthly: lock opening, light activation, organizer retention, and draw clearance. If you add charging cables, avoid loose loops that can catch a front sight or charging handle. Use cable clips and leave only the slack necessary for the door swing. Maintenance is not separate from speed. A system that worked when it was installed but degrades silently over six months is slower than a simpler setup that remains dependable. Reliable access is always faster than complicated access.
Know the limits of DIY work and when to stop
Custom and DIY gun safe modifications should improve function without undermining security ratings, fire protection, warranty coverage, or legal compliance. Drilling new holes, altering door liners, cutting fireboard, or replacing lock components can void warranties and compromise tested performance. That is especially important with safes built to specific burglary or fire standards, where internal materials and boltwork are engineered as a system. If a modification touches the lock body, relocker, hard plate, door seal, or structural steel, consult the manufacturer or a qualified safe technician first.
There are also legal and household considerations. Fast access must not mean easier access for children, prohibited persons, or untrained adults. In some jurisdictions, negligent storage can carry civil or criminal consequences if a firearm is accessed improperly. The practical answer is layered design: maintain a secure lock, improve internal organization, and train regularly. For many homes, the best hub strategy is to think in subtopics: lock optimization, interior storage systems, lighting and electronics, moisture control, bedside access, and long-gun retrieval. Each can be improved independently, but they work best as one deliberate system. Review your current safe tonight, identify the single biggest point of delay, and make one measured upgrade that improves access speed while preserving safe storage.
Frequently Asked Questions
1. What DIY gun safe enhancements actually improve access speed the most?
The most effective DIY gun safe upgrades are the ones that reduce hesitation, simplify movement, and make the gun’s position immediately obvious in low-light, high-stress conditions. In practical terms, that usually means improving interior organization, visibility, and repeatability rather than making dramatic mechanical changes. A well-placed door organizer panel can store magazines, flashlights, medical gear, and small defensive tools where they are visible and reachable without blocking the primary firearm. Interior lighting is another major improvement because it cuts down the time spent identifying the correct handgun or long gun, especially at night when home-defense access matters most. Motion-activated LED lighting is often preferred because it turns on automatically when the safe opens and does not require an extra step.
Shelf and rack changes also have a big impact. If long guns lean into each other or handguns are buried behind ammunition and documents, access speed drops immediately. DIY shelf spacing, handgun stands, labeled bins, and vertical rifle supports can create a layout where each item has a dedicated position and can be grabbed consistently. Holster mounts or fixed retention brackets can help position a defensive handgun at a natural grip angle so the user can establish a full firing grip before the firearm leaves the safe. That matters because the goal is not just opening the door quickly, but moving from closed safe to ready position with minimal fumbling.
The best enhancements are also the safest ones. Anything that improves speed should still protect the trigger, prevent snag hazards, and avoid loose storage that could shift over time. A fast setup is not one that sacrifices retention or safe handling; it is one that allows the firearm to be accessed in the same way every time. In most cases, the highest-value DIY improvements are lighting, layout refinement, dedicated mounting, and reducing clutter. Those upgrades consistently improve speed while preserving security and reliability.
2. How can I make my gun safe faster to access without making it less secure?
The key is to distinguish between access speed and reduced security. Faster access does not mean bypassing lock quality, leaving the safe partially unlatched, or disabling features meant to prevent unauthorized entry. Instead, it means optimizing what happens before, during, and immediately after the safe is opened. For example, upgrading to better interior lighting, reorganizing the most important defensive firearm to a consistent location, and reducing interference from loose gear all improve speed without weakening the safe itself. These are workflow improvements, not security compromises.
You can also improve the locking system’s usability without lowering protection. If your safe uses a biometric lock, proper fingerprint enrollment, regular sensor cleaning, and battery maintenance can reduce failed reads and wasted time. If it uses an electronic keypad, placing tactile indexing marks near the code area can help you orient your hand in darkness. For mechanical locks, some users improve consistency by practicing opening technique and ensuring the dial or handle mechanism is properly maintained. None of these changes remove security; they simply make the system more reliable under stress.
Inside the safe, secure mounting matters. Firearms should be positioned so they are protected from accidental contact and can be drawn cleanly. Trigger coverage, stable storage, and snag-free placement are essential. Avoid shortcuts such as storing a firearm loosely wedged between items, using weak magnets for primary retention, or mounting accessories in ways that interfere with the draw path. Security also includes environmental protection, so humidity control should not be overlooked. Rust, swollen materials, degraded optics batteries, and corroded contacts can all slow access or affect function. A truly secure and fast safe setup is one that remains dependable over time, not just one that feels quick during a casual test.
3. Are lighting and interior organization really that important for emergency gun safe access?
Yes, they are extremely important, and they are often more valuable than people expect. In a home-defense scenario, access happens under stress, often in darkness, when fine motor skills and decision-making are both affected. If the inside of the safe is dim, cluttered, or inconsistent from day to day, the user has to spend extra time visually searching, moving items, and mentally confirming what they are grabbing. That delay is exactly what good interior lighting and organization are designed to eliminate. A properly lit safe allows immediate identification of the intended firearm, spare magazine, and any support gear without unnecessary hand movement.
Organization is just as critical because speed depends on predictability. The defensive firearm should be in the same location every time, with a clear path to the grip and no loose items hanging into the draw space. If documents, ammunition boxes, hearing protection, and unrelated valuables are crowding that area, your hand has to work around them. That creates delay and increases the chance of a poor grip or accidental bumping of nearby items. DIY dividers, labeled storage zones, handgun racks, and door-mounted organizers can turn a general-purpose safe into a layout that supports defensive access while still storing other valuables securely.
Lighting should be chosen with reliability in mind. Motion-activated LEDs, pressure-switch lighting, or door-trigger lights are common solutions because they reduce the need for extra actions. Brightness should be enough to distinguish equipment clearly without producing harsh glare on optics, stainless surfaces, or polished hardware. The ideal setup illuminates grip areas, shelves, and door-mounted storage evenly. Combined with a disciplined organizational plan, lighting creates a safer and faster access sequence: open the safe, immediately see the correct firearm, establish the proper grip, and move to a ready position without uncertainty.
4. What should I know before adding holster mounts, shelf changes, or door organizers to a gun safe?
Before making physical modifications, focus on weight distribution, draw path, mounting strength, and interference. Not every interior panel or shelf surface is meant to hold the same load, and adding too much weight to a door can affect door swing, hinge stress, or interior clearance. Door organizers are useful, but they should carry appropriately sized items and should not protrude so far that they press against long guns, optics, or shelf contents when the safe closes. Check clearances with the door fully shut and reopen the safe several times to confirm nothing shifts, binds, or contacts the firearm you need most.
Holster mounts can be excellent for access speed if they are installed correctly. The biggest priorities are trigger protection, retention, and natural hand positioning. The firearm should be held securely but should also allow a consistent grip angle that does not require wrist contortion or extra repositioning. Avoid setups where the grip is blocked by shelf lips, adjacent firearms, hanging pouches, or lighting wires. If you are mounting a holster inside the safe, verify that screws, adhesives, magnets, or brackets are strong enough for repeated use and temperature changes. A mount that loosens over time can create both safety issues and slower access.
Shelf changes should support the way you actually use the safe. Adjustable shelving, cut-to-fit panels, vertical separators, and dedicated handgun platforms can transform a cramped interior into a purpose-driven storage system. Just be careful not to create unstable surfaces or overcomplicate the layout. Every modification should answer a simple question: does this reduce confusion and support safe, repeatable firearm retrieval? If not, it may be adding complexity without benefit. Test all modifications with the safe closed, in low light, and from realistic standing positions. A good DIY enhancement is one that works smoothly in real conditions, not just when the door is open and you are looking directly at the interior in daylight.
5. How do I test whether my DIY gun safe upgrades are truly improving access speed?
The best way to evaluate your upgrades is through consistent, safe, unloaded dry testing that measures the full access sequence, not just lock opening. In this context, access speed includes identifying the correct firearm, opening the safe, acquiring a proper firing grip, removing the firearm cleanly, and bringing it to a ready position. That means a useful test should reflect all of those steps. Start with the firearm unloaded, verify its condition carefully, and remove live ammunition from the testing area. Then run timed repetitions from realistic conditions, including low light and common nighttime clothing, to see whether the setup works when you are not perfectly prepared.
Focus on repeatability as much as raw speed. One fast run does not prove the system is good. What matters is whether you can access the firearm consistently without missed biometric reads, bumped accessories, snagged sleeves, poor grip acquisition, or confusion between similar storage positions. If your times vary widely from one run to the next, that usually points to an organizational or ergonomic problem. Watch for unnecessary movements: reaching twice for the handle, shifting items out of the way, adjusting your hand after removing the firearm, or searching visually for magazines or lights. Those are the delays that smart DIY enhancements should remove.
It also helps to test each modification separately before judging the final setup. For example, measure your baseline time, then add lighting and test again. Next, add a holster mount or shelf reconfiguration and compare results. This step-by-step approach shows which changes are actually helping and which ones may be neutral or even harmful. Re-test periodically because batteries weaken, adhesives fail, hardware loosens, and storage habits drift over time. A gun safe setup is only fast if it remains reliable month after month. The goal is a system that performs safely, predictably, and efficiently under realistic stress, not just one that looks organized on installation day.</