
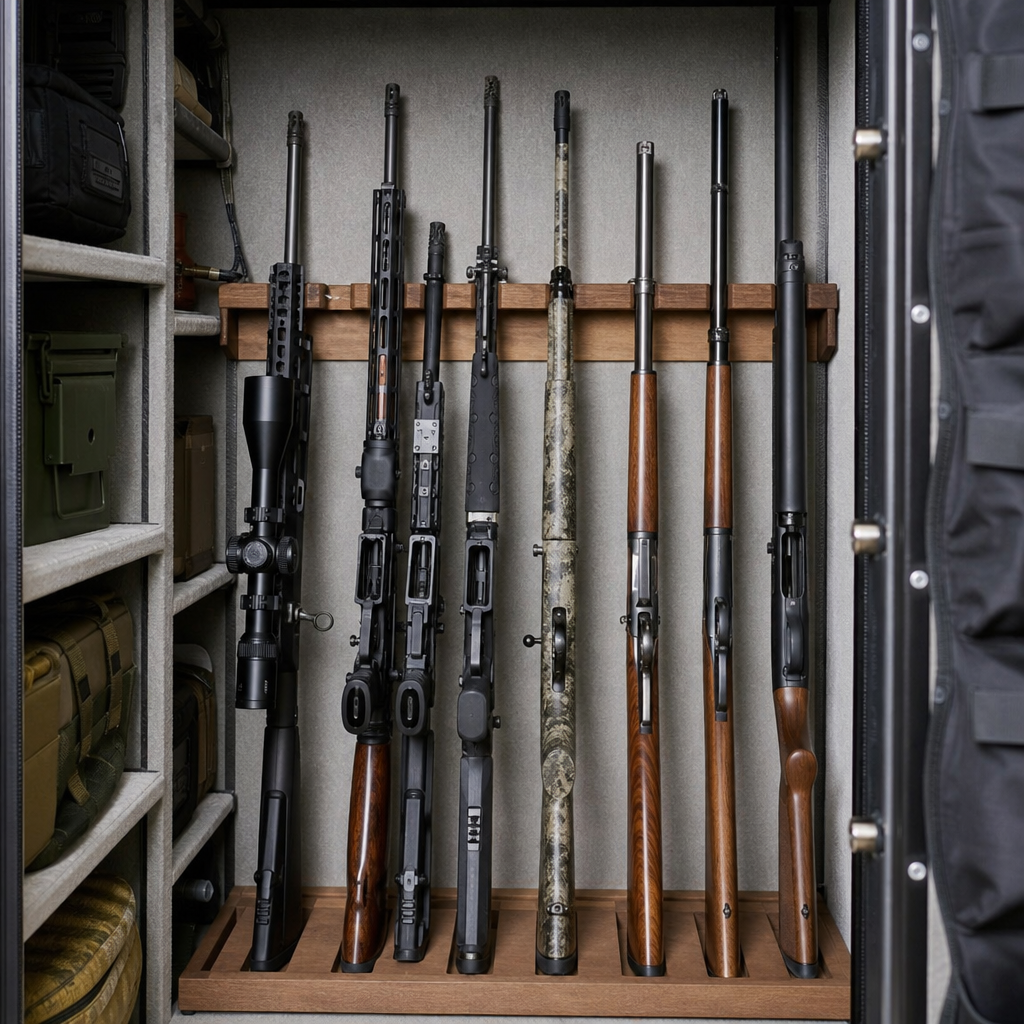
A custom gun rack inside your gun safe turns unused interior space into organized, secure storage while protecting firearms from scratches, pressure points, and moisture-related damage. In practical terms, a custom rack is any interior support system you build or adapt to fit your safe, your firearms, and your access habits better than the factory layout. That can mean vertical rifle slots, angled shelves for scoped carbines, barrel rests, handgun door panels, modular dividers, or removable trays that maximize capacity without compromising safety. I have built and reworked enough safe interiors to know that most factory gun racks are generic by design: they assume similar stock shapes, average optics height, and a narrow range of rifle lengths. Real collections rarely match that pattern, especially once suppressor-ready rifles, chassis guns, slings, bipods, and tall turrets enter the picture.
This topic matters because poor storage causes preventable problems. Crowded rifles knock against each other, optics lose zero from repeated impacts, wood stocks pick up finish wear, and awkward stacking makes it harder to inspect or retrieve a firearm safely. A well-planned custom gun rack solves those issues by creating consistent spacing, stable contact points, and clear indexing so every firearm has a dedicated home. It also supports the broader goals of gun safe organization, humidity control, and responsible firearm handling. As the hub for custom and DIY gun safe modifications, this guide covers the core decisions, measurements, materials, construction methods, and maintenance practices that make an interior upgrade work long term. If you want more capacity, faster access, and better protection from the same safe footprint, building a tailored rack is one of the highest-value modifications you can make.
Plan the layout before cutting material
The most important step in building a custom gun rack inside your gun safe is not cutting foam, plywood, or Starboard. It is measuring the interior accurately and planning around the firearms you actually own. Start with the clear interior dimensions of the safe, not the exterior dimensions on the product page. Measure width, depth, rear wall height, shelf overhangs, door panel thickness, and any obstructions such as dehumidifier rods, electrical outlets, interior hinges, or factory shelving brackets. Then measure each firearm’s overall length, optic height, widest point, and the shape of the forend or magazine well where it will rest. In my experience, optic bell diameter and bolt handle clearance are the dimensions most often missed, and they are exactly what cause rifles to lean or bind.
Next, decide how you want the safe to function. A hunting-focused safe may prioritize traditional vertical storage with wider spacing for wood stocks and slings. A mixed collection may need alternating muzzle heights, offset rows, and side clearance for AR-pattern charging handles, LPVOs, and mounted lights. If your safe stores both long guns and handguns, reserve easy-reach zones for the firearms used most often and place lower-priority pieces higher or farther back. Sketch the interior on paper or in a simple grid. Assign a slot to every firearm. If one rifle only fits when another is removed, the plan is not finished. Good safe organization should allow a gun to be removed and replaced without bumping three others on the way out.
Think carefully about weight distribution. Although interior racks do not usually add extreme load, heavy plywood shelves, handgun racks, and loaded magazines concentrated on one side can strain adjustable shelf clips or bow thin panels over time. Keep support points close to the safe’s structural interior rails when possible. Also avoid obstructing passive airflow. Moisture control works better when air can circulate around stocks and receivers instead of dead-ending behind solid partitions.
Choose materials that protect firearms and survive the safe environment
The best material for a custom gun rack balances rigidity, dimensional stability, and surface softness. For structural elements, 1/2-inch or 3/4-inch plywood is often the most practical choice because it is easy to cut accurately, holds fasteners well, and resists sagging better than many composite boards. Baltic birch is especially good for shelf components and slot panels because its plies are uniform and strong. HDPE sheet, often sold as marine board or Starboard, is another excellent option for moisture resistance and easy cleaning, though it is heavier and more expensive. Solid lumber can work, but it moves with humidity and is less consistent for precision spacing.
Any contact surface touching a firearm should be non-abrasive and non-reactive. Closed-cell foam, felt, marine carpet, and quality automotive headliner fabric are common choices. I prefer thin closed-cell foam under fabric on buttstock supports because it cushions without holding much moisture. Avoid cheap rubber materials with strong odors or unknown plasticizers; some can discolor finishes over time. Also avoid pressure-treated wood inside a safe because of chemical treatment residues. Adhesive selection matters too. Solvent-heavy glues can off-gas in a sealed environment. Water-based contact cements, hot glue for light-duty fabric positioning, or mechanical fastening combined with low-odor adhesive are safer choices.
Fasteners should be rust-resistant. Zinc-coated screws are acceptable, but stainless hardware is better if the safe sits in a basement, garage, or any space with variable humidity. For adjustable elements, T-tracks, threaded inserts, and hook-and-loop-backed panels allow later reconfiguration without rebuilding the entire interior. That flexibility is useful because collections change. The rack that fits six bolt guns today may need room for two ARs and a chassis rifle next season.
Build a long-gun rack that controls spacing and contact points
A functional rifle rack does two jobs at once: it spaces firearms laterally so they do not collide, and it supports them at predictable points so they stand upright without twisting. The simplest method uses a lower buttstock tray and an upper barrel or fore-end support panel with cut slots. Cut the lower tray to match the safe width, then add shallow notches or dividers that index each buttstock. The upper support should align directly above those positions. For most safes, placing the upper panel where barrels or fore-ends naturally contact while standing gives the best stability. A common mistake is setting the upper support too high, which makes shorter rifles wobble and causes scoped rifles to lean.
Slot width should match the broadest contact area, not just the barrel diameter. Scoped rifles often sit more predictably when the fore-end or upper stock shoulder rests in a padded yoke. For AR-pattern rifles, a magazine well area support can be more stable than a barrel slot, especially with free-float handguards and mounted accessories. Keep enough clearance between slots for optic turrets, bolt handles, and sling swivels. In tight safes, alternating the depth of adjacent guns by a few inches can dramatically increase capacity because scopes no longer collide at the same plane.
| Rack element | Recommended approach | Why it works |
|---|---|---|
| Lower support | Padded buttstock tray with indexed dividers | Prevents stocks from sliding and keeps spacing consistent |
| Upper support | Foam-lined slot panel or yoke board | Stabilizes rifles without finish damage |
| Scoped rifles | Alternate slot depth and widen optic clearance | Reduces scope-to-scope contact |
| AR-style rifles | Support at magazine well or forend, not just barrel | Improves balance with accessories attached |
| Adjustability | Use removable dividers or hook-and-loop panels | Allows reconfiguration as the collection changes |
When I build these systems, I dry-fit everything with the actual firearms before final fabric wrapping. A half inch of spacing error on paper becomes a collision once slings, oversized bolt knobs, and turret caps are involved. Test insertion and removal in the dark as well. If a slot only works when you can see perfectly, it is too tight for real use.
Add shelves, door storage, and handgun modules without reducing safe access
Custom and DIY gun safe modifications go beyond the rifle rack itself. The best interior builds treat the safe as a complete storage system. Adjustable shelves above or beside the long-gun section can reclaim dead space for ammunition, documents, suppressor accessories, magazines, and maintenance supplies, but they should not overhang so far that they interfere with rifle muzzles or optics. A shelf that gains one extra box of gear but forces every rifle to tilt is a bad trade.
Door panels are often the most efficient upgrade. Many factory safes leave the back of the door underused, yet that area can hold handguns, choke tubes, lights, documents, and small tools. Use purpose-built fabric organizers, molle-compatible systems, or a DIY panel made from rigid backing with stitched or riveted pouches. Keep weight modest and distributed evenly so the door does not feel unbalanced when opened. For handguns, angled pockets or individual sleeves prevent metal-to-metal contact and speed identification.
If you store pistols inside the main body instead of on the door, build low-profile handgun racks that fit on shelves and keep muzzles oriented consistently. Wire-coated handgun racks work well for range pistols, while padded slot trays are better for blued collectibles. Separate loaded magazines, loose ammunition, and solvents into distinct containers. That is not only better organization; it reduces clutter during retrieval and lowers the chance of knocking over items while handling a firearm. In many safe builds I have corrected, the biggest access problem was not the rifle rack but unrelated gear spilling into the long-gun footprint.
Control moisture, preserve finishes, and maintain safety standards
Every custom gun rack should support the environmental conditions a safe needs. Firearms stored in padded slots are still vulnerable if the interior humidity stays too high. Most owners aim for roughly 40 to 50 percent relative humidity, enough to limit corrosion without overdrying wood stocks. GoldenRod-style dehumidifiers, rechargeable desiccants, and hygrometers are standard tools, and they work best when the interior layout allows airflow. Leave gaps behind rack panels when possible, and avoid sealing every cavity with thick foam. Soft materials should cushion firearms, not create moisture traps.
Finish preservation depends on both material choice and cleaning habits. Before placing firearms into a new rack, vacuum the interior thoroughly, wipe away sawdust, and let adhesives cure fully. Dust mixed with oil becomes an abrasive paste over time. For blued steel and case-colored finishes, use silicone-free protective cloths or manufacturer-recommended corrosion inhibitors rather than over-oiling. Wood stocks should not be pressed tightly into foam for months on end. Slightly firm support is enough. Leather slings are another overlooked issue because leather can retain moisture against metal surfaces in humid conditions.
Safety remains non-negotiable during and after the build. Verify every firearm is unloaded before measuring fit. Do not store loaded firearms in a way that requires manipulating other guns to reach them. Trigger guards, optics controls, and bolt handles should never snag on fabric or pocket edges during removal. If children or unauthorized adults may access the room where the safe is located, maintain the same disciplined lock practices after modification as before. A custom rack improves storage, but it does not replace secure access control, inventory management, or periodic inspection.
Common mistakes, upgrade paths, and when to buy instead of build
The most common DIY gun safe modification mistakes are easy to avoid once you know where projects fail. First, builders copy generic online dimensions instead of measuring their own safe and firearms. Second, they optimize for maximum count rather than usable capacity, producing slots so tight that rifles scrape each other during removal. Third, they use materials that look soft but off-gas, shed fibers, or absorb moisture. Fourth, they create permanent layouts for collections that are still changing. And fifth, they ignore serviceability, making it difficult to remove a panel for cleaning, wiring, or dehumidifier replacement.
Start with a modular mindset. Build one section, test it for a few weeks, then expand. Many owners benefit from phased upgrades: first a better long-gun rack, then door storage, then shelf optimization, then specialty holders for suppressors or precision rifle accessories. If your safe has a premium interior, unusual fire lining, or warranty conditions that discourage drilling or fastening into factory panels, consider drop-in products from brands such as SecureIt, Liberty Safe accessories, or molle door organizers before fabricating everything from scratch. Buying components can also make sense when time matters more than material cost.
The right custom gun rack inside your gun safe should make storage safer, cleaner, and easier every day. Measure carefully, choose stable materials, pad every contact point, and build for the firearms you actually own rather than an abstract capacity number. If you approach this project as part of a complete gun safe organization plan, your safe will hold more, protect finishes better, and give you quicker, more controlled access. Review your current interior, identify the wasted space, and sketch a rack design that solves those exact problems before you make the first cut.
Frequently Asked Questions
What are the main benefits of building a custom gun rack inside a gun safe?
A custom gun rack helps you use the inside of your safe far more efficiently than most factory layouts allow. Standard interiors are often designed as one-size-fits-most solutions, which means they may waste vertical space, crowd scoped rifles, or force firearms to lean against each other. By building a rack around your actual collection, you can create dedicated storage for long guns, handguns, optics, magazines, and accessories in a way that keeps everything stable, separated, and easier to reach.
Protection is another major advantage. When firearms are packed too tightly or stored at awkward angles, they can develop scratches, finish wear, pressure points on optics, or damage to stocks and grips over time. A custom rack lets you add properly spaced rifle slots, padded barrel rests, lined dividers, and shelves sized for your specific firearms. That means each gun has a controlled resting position instead of shifting around whenever the door opens or another item is removed.
Security and access also improve. A well-planned interior makes it easier to see what you have, retrieve a firearm without disturbing the others, and maintain order as your collection changes. In practical terms, that can mean vertical slots for hunting rifles, angled shelves for scoped carbines, handgun organizers on the door, removable trays for small items, or modular sections that can be adjusted later. The end result is a safer, cleaner, and more functional setup that turns unused interior space into organized storage without compromising the protective role of the safe itself.
What materials are best for a DIY gun rack inside a safe?
The best materials are strong, dimensionally stable, easy to work with, and non-abrasive where they contact firearms. Plywood is one of the most popular choices because it is durable, resists warping better than many solid boards, and can be cut into shelves, vertical dividers, and base platforms. Medium-density fiberboard can also work for some components, especially templates or lightweight dividers, but it is heavier and more vulnerable to moisture if the safe’s humidity is not carefully controlled. Solid wood can look excellent, but it may expand and contract more than plywood depending on the environment.
For contact surfaces, soft lining materials matter just as much as the structural materials. Closed-cell foam, automotive headliner material, felt, marine carpet, or other soft synthetic fabrics are commonly used to cushion stocks, barrels, and forends. These help prevent scratches and reduce shifting. The key is to choose clean, low-shedding, low-odor materials that will not trap excessive moisture against metal surfaces. Many builders also use hook-and-loop fabric, adhesive-backed padding, or removable sleeves to make adjustments easier over time.
Fasteners and adhesives should be selected carefully. In many cases, it is smart to build freestanding modules that sit inside the safe rather than drilling into the safe walls, which could interfere with fire lining, factory panels, or warranty terms. Wood screws, brad nails, construction adhesive, and modular brackets can all be useful depending on the design. If you use metal hardware, keep it recessed or covered so firearms never rest directly against exposed edges. The best overall approach is a rigid frame combined with soft, padded contact points and a layout designed specifically around the dimensions of your firearms and optics.
How do I design a custom rack that fits rifles with scopes, shotguns, and handguns?
Start by measuring everything before you cut anything. That includes the interior width, depth, and height of the safe, but also the actual length, scope height, stock width, and overall profile of each firearm you plan to store. Many people make the mistake of designing around barrel length alone, then discover that optics, bipods, oversized bolt handles, slings, or pistol grips cause interference. If your collection includes a mix of rifles, shotguns, and handguns, the most effective layout usually separates storage into zones rather than trying to force every item into one row.
For long guns, think in terms of both spacing and angle. Traditional vertical slots work well for slimmer rifles and shotguns, but scoped rifles often benefit from staggered or angled positioning so optics do not bump into each other. A bottom support tray with cutouts for buttstocks paired with an upper barrel rest or forend support creates stability. If you have carbines with large optics or accessories, increasing slot width or alternating muzzle direction can make the arrangement much more practical. Be sure to leave enough clearance to remove one firearm without having to move three others first.
Handguns are often best stored separately from long guns to maximize usable space. Door-mounted handgun panels, shallow shelves, removable trays, or vertical dividers for pistol cases can free up the safe floor and reduce clutter. Accessories such as magazines, suppressor-ready pistons where legal, documents, and maintenance gear should also have dedicated places so they do not end up piled around the firearms. The strongest custom designs are modular: shelves that can be repositioned, dividers that can be widened, and tray systems that can be removed as your collection changes. Planning for future additions is just as important as accommodating what you own today.
How can I protect firearms from scratches, pressure points, and moisture inside a custom safe rack?
Protection starts with proper contact design. Firearms should rest on broad, padded surfaces rather than hard edges or narrow pinch points. Stocks should sit securely in cutouts or cradles, and barrels or forends should be supported in lined rests that hold the firearm upright without compressing optics, sling hardware, or protruding controls. If a rifle has a large scope, avoid forcing it into a narrow slot where the optic bears weight or presses into a neighboring firearm. Every support point should stabilize the gun while minimizing direct stress on delicate components.
Padding is essential, but it should be used intelligently. Felt, fleece-like lining, foam, or carpet-style fabric can reduce scuffs and vibration, especially on wood stocks and blued finishes. However, the goal is not overly tight cushioning; it is controlled separation. Firearms should not wobble, but they also should not be wedged into place. Check every divider, rest, and shelf edge for rough corners, exposed screws, staples, or adhesive buildup that could mar a finish over time. If you are lining shelves or racks, make sure the material is firmly attached so it does not bunch up and create uneven pressure.
Moisture control is equally important because a beautifully organized safe can still allow rust if humidity is ignored. Use a dehumidifier rod, rechargeable desiccants, or both, depending on your climate and the size of the safe. Keep airflow in mind when building interior components; do not pack every void so tightly that air cannot circulate. Avoid storing damp cases, cloths, or untreated foam directly against firearms for long periods. It is also wise to inspect your collection regularly, wipe down metal surfaces with appropriate protectant, and confirm that your rack materials remain dry and stable. A good custom rack should improve protection, not just appearance, so finish safety and moisture management should be part of the design from day one.
Is it better to build a permanent gun rack or a modular, removable system inside a gun safe?
For most people, a modular or removable system is the better long-term choice. Firearm collections tend to change over time, and access habits change too. You may add scoped rifles, sell a shotgun, start storing more handguns, or decide you want faster access to certain long guns and less emphasis on bulk storage. A modular rack gives you the flexibility to reconfigure shelves, widen slots, replace tray sections, or remove parts for cleaning without having to rebuild the entire interior.
There are also practical reasons to avoid overly permanent modifications. Many safe owners prefer not to drill into the safe body or permanently alter the factory interior because of concerns about warranties, fire insulation, interior panels, or resale value. Freestanding rack inserts, stackable shelf units, barrel rests mounted to interior panels, and removable base trays can often deliver the same organizational benefits with less risk. If you ever move the safe, deep-clean it, or change your storage priorities, removable components are much easier to manage.
That said, permanent or semi-permanent sections can still make sense when they solve a very specific problem, such as a fixed rifle row sized for a dedicated hunting setup or a custom door panel organizer you know you will always use. The best compromise is often a hybrid design: a stable core structure with adjustable dividers, removable trays, and repositionable shelves. That approach gives you the strength and polish of a purpose-built rack while preserving the flexibility to adapt as your collection, accessories, and storage needs evolve.