
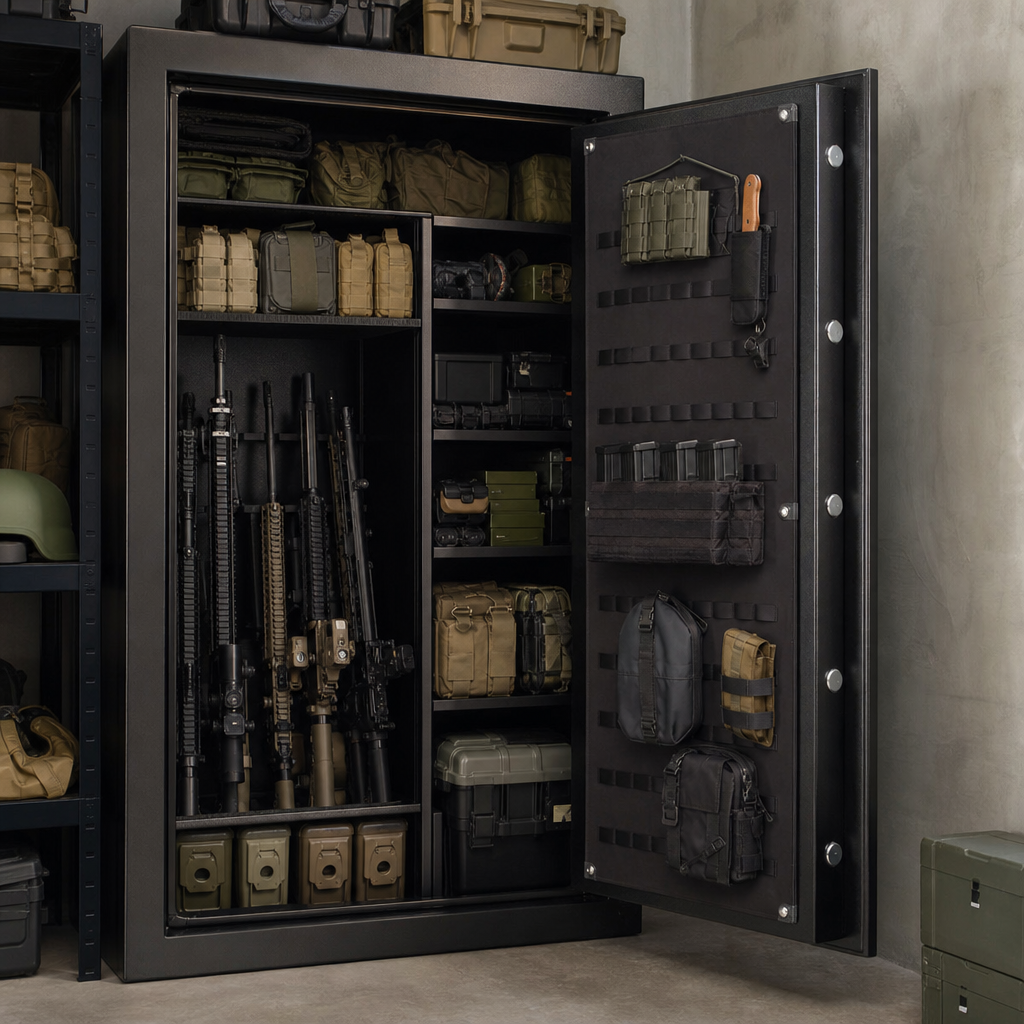
A gun safe can become a highly efficient tactical storage cabinet when you redesign it around access, organization, and protection instead of treating it as a simple steel box for long guns. In practical terms, converting a gun safe into a tactical storage cabinet means adapting the interior and access points so firearms, magazines, armor, lights, medical gear, suppressors, and maintenance tools are stored securely, separated logically, and retrieved quickly without sacrificing safety. This matters because many owners buy a safe sized for basic rifle storage, then gradually accumulate optics, slings, plate carriers, handguns, and ammunition that overwhelm the factory layout. I have worked through this problem in my own shop and with clients who wanted one cabinet to handle defensive equipment, range gear, and household security storage. The right modifications can turn wasted vertical space, shallow door panels, and awkward shelves into a system that supports real use. The key is to balance speed and order with fire protection, humidity control, load capacity, and legal responsibilities for firearm storage in your state.
Before making changes, define the terms. A gun safe is typically a locking steel enclosure built for theft deterrence and sometimes fire resistance. A tactical storage cabinet, by contrast, emphasizes modular organization for mission-specific equipment, often using door organizers, rifle racks, labeled bins, and quick-access handgun placement. Custom and DIY gun safe modifications include any owner-installed upgrades such as replacing carpeted shelves, adding MOLLE panels, installing LED lighting, upgrading dehumidification, changing rack geometry, or reinforcing anchor points. Some modifications are reversible and low risk, while others can affect warranty coverage, compromise fire lining, or reduce usable insulation. That is why this sub-pillar topic deserves a hub article. If you are planning accessory panels, shelving redesigns, moisture management, power routing, or security upgrades, you need a framework that helps you choose modifications in the right order and avoid expensive mistakes.
Start with the Safe’s Structure, Limits, and Intended Role
The first step in any gun safe conversion is evaluating the safe itself. Not every safe is a good candidate for becoming a tactical storage cabinet. Look at body steel thickness, door construction, shelf support method, fireboard placement, anchor hole locations, hinge clearance, and actual interior depth. Many residential security containers advertise capacity based on bare rifles with no optics, which means a “24-gun” safe may realistically hold half that number once AR-style rifles, scoped bolt guns, and door storage are added. Measure the true interior height, width, and depth with the door closed, then note obstructions such as relockers, door bolts, and internal power boxes. These dimensions determine whether you can store rifles muzzle-up with optics attached, stack ammo cans low without overloading shelves, and mount armor or medical kits on the door without crushing stored firearms.
Role definition is equally important. A tactical cabinet can serve several different jobs: defensive staging, training and range support, long-term secure storage, or mixed household use. If the safe is primarily for defensive access, the highest-priority items should sit between waist and shoulder level, with pistols, carbines, handheld lights, and trauma kits immediately visible. If it is mainly a range support cabinet, you may prioritize labeled bins, suppressor storage, spare batteries, and cleaning gear. If it must also protect heirloom firearms, humidity stability and non-marring contact surfaces matter more. I usually advise owners to write a simple loadout map before buying a single accessory. Decide how many rifles, handguns, magazines, armor pieces, and support items the cabinet must hold. That one page prevents the common mistake of purchasing organizers that look tactical but consume precious interior volume.
Plan the Interior Layout Around Retrieval Speed and Weight Distribution
Once the safe’s limits are clear, map the interior by zones. Heavy items belong low and toward the back or side walls. Frequently accessed items belong in the center band of the safe. Delicate optics, night vision devices, and documents should avoid pressure points created by crowded racks. In practice, the most efficient setups use a layered layout: rifles along one side or back, handguns on the door or upper shelves, magazines grouped by platform, armor hanging or folded in a dedicated bay, and tools or cleaning supplies isolated from firearm contact surfaces. Avoid mixing oily maintenance supplies with soft goods such as slings or plate carrier pads, because off-gassing and residue can transfer over time.
Weight distribution is not a cosmetic issue. A shelf loaded with ammunition, lead shot, or dense tools can fail if the original shelf pins were designed only for a few pistols and paper boxes. The same applies to door organizers. Overloading the door with steel magazines, handguns, and packed pouches increases stress on hinges and can affect door alignment on cheaper units. Use manufacturer shelf load ratings where available, and when unavailable, assume conservatively. Plywood-backed shelves, steel angle reinforcement, and properly anchored vertical dividers can dramatically increase strength. Also maintain clearance for lock operation and door-bolt travel. I have seen more than one DIY build where a great-looking organizer blocked the handle rotation or caused magazines to scrape and fall whenever the door opened.
| Modification Area | Main Benefit | Best Use Case | Common Risk |
|---|---|---|---|
| Door panel organizer | Uses shallow space for pistols, mags, documents | Fast access to compact gear | Door becomes heavy or interferes with shelves |
| Adjustable rifle rack | Fits optics, lights, and varied stock shapes | AR platforms and scoped rifles | Too-tight spacing causes optic contact |
| Modular shelving and bins | Separates gear by function and caliber | Mixed firearm and accessory storage | Wasted height if bins are poorly sized |
| LED lighting and power kit | Improves visibility and charging access | Deep safes or low-light rooms | Improper routing can damage fire lining |
| Dehumidifier and hygrometer | Controls moisture and tracks conditions | Basements, garages, humid climates | False security if seal leaks are ignored |
Choose Modular Storage That Fits Tactical Gear, Not Just Firearms
Factory gun safe interiors are usually built around long-gun count marketing, not real tactical storage. To fix that, replace single-purpose racks with modular systems. Door-mounted handgun holsters, magazine loops, document pockets, and zippered pouches can convert dead space into prime storage, provided they do not reduce rifle clearance. Inside the body, adjustable shelves with bins work better than open stacking. Use labeled containers for pistol magazines, rifle magazines, batteries, hearing protection, weapon lights, spare optics mounts, and small tools. Closed or semi-closed bins prevent parts migration, which is especially helpful if you keep AR bolts, suppressor accessories, choke tubes, or sight adjustment tools in the same cabinet.
For rifles, spacing matters more than advertised capacity. Tactical rifles with variable-power optics, offset dots, bipods, and weapon lights need wider slot spacing than hunting rifles. Rifle rods, barrel loops, and offset buttstock trays can increase capacity while keeping carbines upright and separated. If you own short-barreled rifles or braced firearms where lawful, test storage orientation carefully because short firearms often waste vertical space in standard racks. Handguns deserve a dedicated strategy too. Pistol racks on shelves work for collections, but door holsters or angled display racks often produce faster identification and better use of depth. For armor and load-bearing equipment, many owners install hooks or soft panels, but make sure stored plate carriers do not trap moisture against steel. A breathable hanger or shelf bay with airflow is safer for long-term storage.
Install Lighting, Power, and Environmental Controls the Right Way
Lighting is one of the highest-value gun safe modifications because it improves access immediately. Battery puck lights are simple, but hardwired or integrated LED strips are usually better for a tactical cabinet because they illuminate corners and shelves evenly. Warm white or neutral white LEDs reveal black accessories better than dim blue lighting. Motion-activated systems are useful, but magnetic reed-switch lights are more reliable in larger safes because they trigger consistently when the door opens. If your safe includes a factory power port, use it rather than drilling through steel or fireboard. Drilling unauthorized holes can damage fire insulation, create corrosion points, and in some cases weaken anti-pry structure.
Environmental control is just as important as access. Firearms rust from sustained humidity, condensation swings, and neglected soft cases. In most climates, the goal is not zero humidity but stable relative humidity generally around 45 to 50 percent, measured with a digital hygrometer you can actually read. GoldenRod-style convection dehumidifiers work well in enclosed safes when there is a proper outlet path, while rechargeable desiccants help in smaller cabinets or as supplemental control. In garages and basements, insulate your expectations as well as the safe. A quality dehumidifier inside a safe cannot fully overcome a damp room, concrete floor moisture, or repeated wet gear being stored after range days. I tell owners to treat the room and the safe as one system. If your cabinet sits in a humid environment, add a room dehumidifier, elevate the safe slightly off concrete where practical, and inspect seals, hinge sides, and anchor penetrations twice a year.
Protect Security, Fire Performance, and Warranty Coverage During DIY Work
The biggest mistake in custom gun safe modifications is focusing on organization while ignoring what made the container valuable in the first place: security. Any change that affects lock operation, boltwork travel, door seal contact, or anchor integrity can reduce theft resistance. Keep all modifications clear of the lock body, relocker, hard plate, and linkage path. Never run screws into unknown door cavities. On many safes, the door panel can be removed for organizer installation without touching critical parts, but always verify with manufacturer diagrams first. If diagrams are unavailable, stay on surface-mounted systems that use factory panel anchors, adhesive-backed hook-and-loop rated for the load, or freestanding interior inserts.
Fire performance deserves the same caution. Many residential gun safes use gypsum-based fireboard and expanding door seals. Cutting into liners, drilling through walls, or compressing seals with oversized organizers can reduce performance during a fire. No DIY modification improves fire rating unless it is specifically engineered and tested as part of the original design. Be skeptical of internet advice suggesting you can “upgrade” a fire lining with random insulation board. In real projects, the smarter approach is preservation: avoid unnecessary penetrations, keep electrical routing within factory channels, and maintain door closure alignment. Also review warranty language before starting. Some manufacturers allow accessory installation through existing mounting points but deny claims for drilled holes, modified interiors, or aftermarket electrical work. If your safe is expensive or still under strong warranty coverage, ask the manufacturer in writing what changes are permitted. That documentation can save money later.
Build a Hub-Worthy Upgrade Path for Ongoing Customization
Because this page serves as a hub for custom and DIY gun safe modifications, the most useful way to end is with an upgrade path you can follow over time. Start with assessment and measurement. Next, improve visibility with lighting and add a hygrometer so you know environmental conditions before storing more gear. Third, redesign storage zones using modular shelves, bins, and rifle spacing that match your actual collection. Fourth, add door storage cautiously, checking clearance and door weight. Fifth, strengthen support points if you plan to store ammunition, armor, or dense tools inside the safe. Finally, review security, anchoring, and maintenance so the cabinet stays dependable for years.
The best tactical storage cabinet is not the one with the most accessories; it is the one that lets you find, secure, and protect every item without clutter or compromise. A thoughtful gun safe conversion creates faster retrieval, better inventory control, improved moisture protection, and more efficient use of expensive space. It also sets up every related project in this subtopic, from door panels and LED retrofits to shelving upgrades, dehumidification, handgun organization, and safe-room integration. If you are ready to move beyond a factory layout, begin with measurements, define your loadout, and make one high-value modification at a time. Done correctly, your gun safe becomes a true tactical storage cabinet that supports safety, readiness, and long-term firearm care.
Frequently Asked Questions
1. What does it really mean to convert a gun safe into a tactical storage cabinet?
Converting a gun safe into a tactical storage cabinet means rethinking the safe’s purpose from basic firearm containment to organized, rapid-access gear management. A traditional gun safe is often set up to hold long guns upright with minimal consideration for supporting equipment, modular storage, or retrieval speed. A tactical storage cabinet, by contrast, is arranged so firearms, loaded or unloaded magazines, body armor, medical kits, optics, suppressors, lights, batteries, slings, and cleaning tools all have clearly defined places based on use, safety, and frequency of access.
In practical terms, the conversion usually involves redesigning the interior with shelves, door organizers, peg panels, magnetic or Velcro-backed accessory mounts, labeled bins, handgun racks, magazine storage, and dedicated zones for mission-critical equipment. The goal is to make the interior work like a system rather than a pile of gear behind a steel door. That means separating sensitive items, protecting optics and finishes, preventing gear from knocking into each other, and making sure the most important items can be reached quickly in low-light or high-stress situations.
Just as important, this kind of conversion does not eliminate the original purpose of the safe. Security, environmental protection, and responsible storage still matter. The best tactical cabinet setup preserves secure locking, stable firearm positioning, humidity control, and child-resistant access while improving layout, visibility, and efficiency. In other words, you are not simply decorating the inside of a safe. You are turning it into a structured storage platform built around access, accountability, and protection.
2. What upgrades should I make first when converting a gun safe for tactical storage?
The best place to start is with access and internal organization. Before adding specialty accessories, evaluate how the door opens, what you need to reach first, and which items are used most often. Most successful conversions begin by removing inefficient factory racks or shelving that waste space and then rebuilding the interior around your actual loadout. If you own carbines, handguns, armor, magazines, ear protection, medical supplies, and tools, the layout should reflect those categories rather than forcing everything into long-gun slots and open shelves.
A strong first upgrade is a door panel organizer. The inside of the safe door is often underused, yet it is one of the easiest places to mount pouches, handgun holsters, document sleeves, and small-gear compartments. This immediately clears shelf space and puts frequently used items at eye level. After that, adjustable shelving is usually the next priority. Modular shelves allow you to create dedicated spaces for ammunition, optics, helmet accessories, range equipment, batteries, and maintenance supplies without stacking everything on top of each other.
From there, magazine storage is one of the most practical additions. Loose magazines can quickly create clutter, slow access, and increase the chance of disorganization. Dedicated mag racks, labeled bins, or elastic retention panels help maintain order and make inventory easier. Handgun stands or pistol racks also provide major gains in efficiency because they allow you to store multiple pistols upright without wasting shelf depth. For long guns, replacing narrow factory slots with wider barrel spacing or a more customized rack can make room for optics, lights, slings, and other attachments that modern tactical firearms often carry.
Finally, improve visibility and environmental control early in the process. Motion-activated LED lighting makes the entire system more useful, especially when retrieving gear in low light. A dehumidifier rod or desiccant system should also be installed to protect firearms, armor hardware, optics, and metal accessories from moisture damage. These foundational upgrades make the safe easier to use every day and set the stage for more advanced customization later.
3. How should I organize firearms, magazines, armor, and medical gear inside the safe?
The most effective way to organize a converted tactical storage cabinet is by role, urgency, and safety. Start by dividing the interior into logical zones. Firearms should have a stable, protected section where they can be accessed without tangling slings or bumping optics. Handguns should be grouped in a dedicated rack or shelf area, while rifles and shotguns should be positioned so the most frequently used platforms are easiest to retrieve. If possible, leave enough spacing between long guns to accommodate mounted accessories instead of compressing them tightly together.
Magazines should be stored in a separate, clearly defined area rather than scattered across shelves. Group them by platform and, if helpful, by purpose. For example, training magazines, defensive magazines, and hunting or specialty-use magazines can each be labeled and separated. This reduces confusion and helps maintain a reliable inventory. If you keep loaded magazines, make sure they are stored in stable retention systems that prevent unnecessary shifting or impact damage. The key is consistency. When every magazine type has one home, your storage system becomes faster and more dependable.
Armor and load-bearing gear should usually be placed where they can be reached quickly and removed in one motion if needed. Many people dedicate an upper shelf, side wall, or open center section for a plate carrier, chest rig, battle belt, or soft armor package. Avoid cramming armor underneath heavy bins or behind stacked equipment, because that defeats the purpose of tactical readiness. Medical gear should also be treated as a priority item. A clearly labeled trauma kit or individual first aid kit should be visible and accessible, not buried behind cleaning supplies or ammunition cans.
Maintenance tools, batteries, optics, suppressors, and smaller accessories belong in categorized containers or padded compartments. Sensitive items should be protected from scratches, impact, and moisture. Labeling is especially valuable in a tactical cabinet because it turns storage into a repeatable system. Instead of searching, you identify. Instead of guessing, you verify. The best organization method is one that lets you open the safe and immediately understand where everything is, what is ready, and what needs to be replenished.
4. Can I improve quick access without reducing safety or security?
Yes, and that balance is one of the main reasons people convert a gun safe into a tactical storage cabinet in the first place. Quick access does not have to mean careless storage. In fact, a well-designed interior often improves safety because it reduces clutter, prevents gear entanglement, and makes retrieval more deliberate. The first step is making sure the safe’s locking system is appropriate for your needs. A reliable electronic lock, mechanical lock, or upgraded access control system can help you get into the safe more efficiently while preserving unauthorized access protection.
Inside the safe, access improves when priority items are positioned intentionally. Defensive firearms, medical gear, and essential support equipment should be placed in the easiest-to-reach zones, typically between waist and chest height. Lesser-used items can be moved to upper shelves, lower compartments, or rear storage areas. This approach reduces unnecessary movement and helps prevent accidents caused by shifting gear around in a hurry. Lighting is another major safety upgrade. Good interior lighting allows you to positively identify equipment before handling it, which is especially important when multiple firearms and accessories are stored together.
Trigger discipline, storage condition, and household considerations still matter. A tactical layout should never override your legal responsibilities or safe handling standards. If children, guests, or unauthorized individuals are present in the home, the safe must remain secured at all times. Likewise, if you choose to store firearms in a ready condition, that choice should be made deliberately and in accordance with your training, local laws, and risk profile. The cabinet should support safe, repeatable handling rather than relying on memory or improvisation.
One often overlooked benefit of tactical organization is reduced stress during retrieval. When firearms are not wedged together, when magazines are separated by type, and when critical gear is visible, you are less likely to fumble or make mistakes. Security is not just about keeping intruders out. It is also about making sure the rightful user can access equipment responsibly, predictably, and without confusion. A properly converted safe does exactly that.
5. What common mistakes should I avoid when turning a gun safe into a tactical storage cabinet?
One of the biggest mistakes is trying to store too much gear without a plan. Many people begin the conversion by adding accessories wherever they fit, only to end up with a crowded interior that is harder to use than the original setup. Tactical storage works best when every item has a defined purpose and location. If the safe becomes a catch-all for every firearm part, spare pouch, and random tool in the house, access speed and accountability both suffer. Start with a layout strategy, then add storage solutions that support it.
Another common mistake is ignoring weight distribution and interior durability. Ammunition, armor plates, metal tools, and bulk accessories can add significant weight to shelves and door panels. If you overload weak shelving, adhesive-only mounts, or light organizers, the system may sag, detach, or fail over time. Choose hardware and organizers that are rated for the load, and be realistic about how much stress the door and shelves can handle. A tactical cabinet should feel solid and repeatable, not temporary or improvised.
Poor categorization is another issue. Mixing medical gear with cleaning chemicals, tossing suppressors into hard bins without padding, or stacking optics under loose magazines can lead to damaged equipment and wasted time. Tactical storage should separate life-saving gear, weapons support items, maintenance supplies, and sensitive accessories. Moisture control