Gun safe owners who want better protection against electromagnetic pulse damage usually discover a hard truth first: most residential safes are built to resist theft, fire, and casual tampering, not high-energy electromagnetic events. If your safe includes electronic locks, interior lighting, dehumidifier controllers, biometric readers, wireless sensors, or backup keypads, those components can become failure points during an EMP attack. Making a gun safe more resistant to EMP attacks means reducing conductive openings, protecting vulnerable electronics, improving grounding strategy where appropriate, and choosing modifications that preserve the safe’s core security and fire performance. For anyone focused on gun safes and safety, this subject matters because a disabled locking system during an emergency is not just inconvenient. It can prevent timely access, create expensive repairs, and compromise the reliability you bought the safe to provide.
In my work with secure storage retrofits, the best results come from treating EMP resistance as layered hardening rather than a single product purchase. An electromagnetic pulse is a burst of energy that can induce voltage and current in conductive materials. A high-altitude nuclear EMP is the scenario most people reference, but severe solar activity and localized electromagnetic interference also drive practical preparedness decisions. A Faraday cage is the key concept: an enclosure that helps block electromagnetic fields by redistributing electrical charge around its exterior. A gun safe is not automatically a Faraday cage, even if it is made of steel, because seams, doors, power penetrations, external antennas, poor electrical continuity, and attached electronics create openings that let energy couple into the system. The goal is not perfection. The goal is meaningful risk reduction using sound custom and DIY gun safe modifications.
As a hub article for custom and DIY gun safe modifications, this guide explains what works, what does not, and where tradeoffs appear. You will see how body construction affects shielding, why many electronic locks deserve special attention, which retrofit materials are worth buying, and how to test improvements without damaging the safe. You will also see where related projects fit, such as interior organization changes, humidity control upgrades, anchor improvements, and power-management decisions. EMP hardening should never undermine burglary resistance, fire seals, safe-door alignment, or legal storage compliance. When done correctly, it complements those priorities. The strongest approach is to start with realistic threat modeling, identify vulnerable components, and then upgrade the enclosure and contents in a disciplined way.
Start With Threat Modeling and a Vulnerability Audit
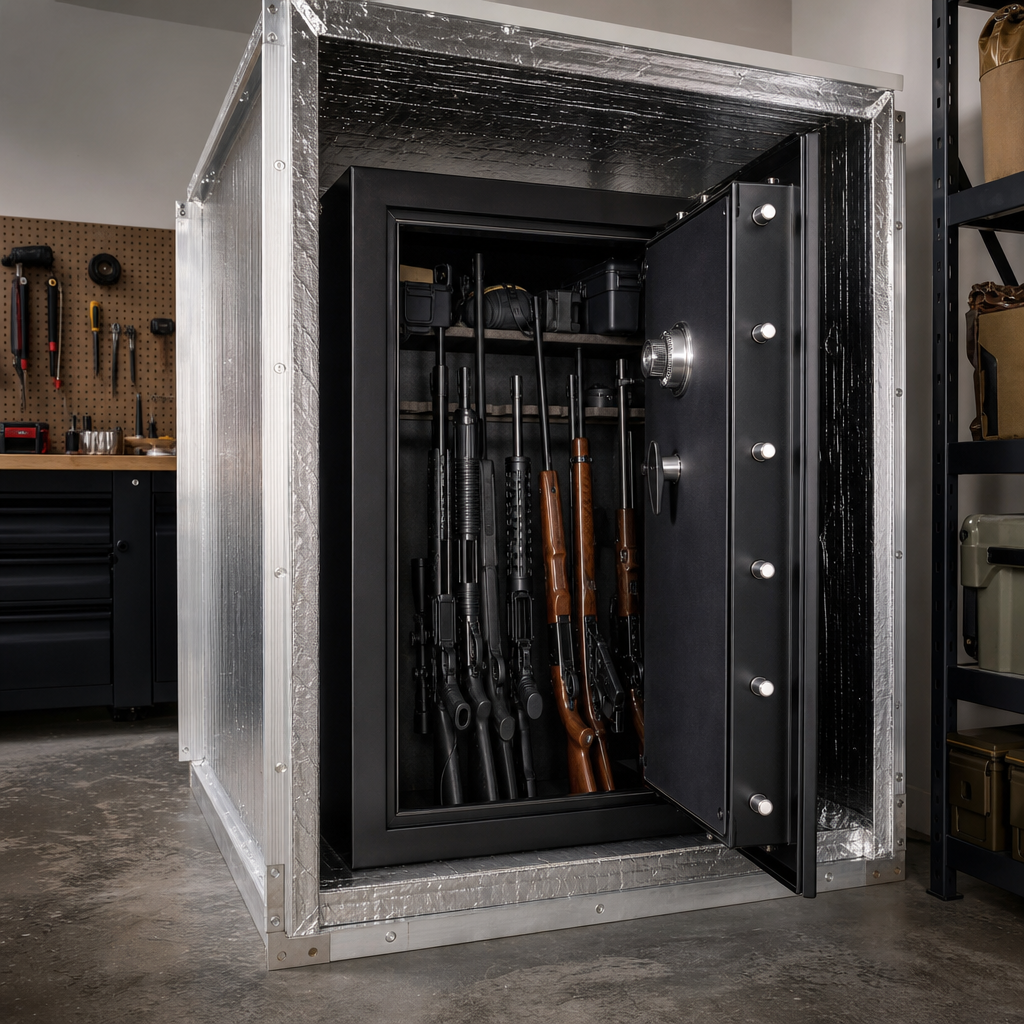
The first step in making a gun safe more resistant to EMP attacks is deciding what you are actually trying to protect. In practical terms, there are three targets: the safe itself, the lock and access system, and the items stored inside. A purely mechanical safe with no powered accessories is already in a much better position than a biometric safe with an external keypad, LED lighting strip, USB charging port, and smart monitoring sensor. I always begin by listing every conductive path that crosses the safe boundary. That includes AC power cords for dehumidifiers, alarm wiring, Ethernet or sensor leads, charging cables, aftermarket lighting, and any bolt-on accessories mounted through the body.
Electronic locks deserve careful evaluation because their vulnerability is not just the keypad. Many gun safes use an external keypad connected by a cable through the door to an internal lock body. If pulse energy couples into that cable, it can damage control electronics even if the safe shell remains intact. Battery-powered systems are not immune. Short wiring runs still act as conductors, and semiconductors remain susceptible to transient overvoltage. Common failure modes include dead displays, nonresponsive keypads, corrupted logic boards, and solenoids that no longer actuate. If your safe is intended for defensive firearms, that access risk should shape every modification decision.
Audit the enclosure next. Inspect the door gap, hinge area, lock penetrations, relocker access points, bolt-handle spindle, and any factory holes used for anchoring or accessory wiring. Steel thickness matters less than continuity. A thick body with poor contact around the door opening may shield less effectively than a thinner enclosure with tighter conductive bonding at seams. Fire-lined safes add complexity because intumescent door seals and composite materials are useful for heat protection but do not improve electromagnetic shielding. In some cases, soft gasket materials can actually interrupt conductive contact where you need it.
Finally, classify stored contents by sensitivity. Firearms with no electronics are relatively robust. Red-dot optics, thermal devices, weapon lights, laser modules, electronic hearing protection, handheld radios, rechargeable batteries, and digital documents are much more vulnerable. This is why EMP protection is often best handled in layers inside the safe rather than by assuming the whole safe will behave like a laboratory-tested shielded enclosure.
Understand What a Gun Safe Can and Cannot Do as a Shield
A steel gun safe can provide some attenuation of electromagnetic energy, but it should not be assumed to offer verified EMP shielding without testing and modification. The reason is simple. Effective shielding depends on continuous conductive surfaces, minimal apertures, good bonding across moving parts, and controlled penetrations. Most residential gun safes are engineered around anti-pry doors, fireboard or composite insulation, and consumer convenience features. They are not built to MIL-STD-188-125, IEC 61000 series laboratory standards, or certified TEMPEST-style shielding practices. That does not make retrofit efforts pointless. It means expectations should be realistic.
Door openings are usually the biggest weakness. Any slot, seam, or discontinuity can act as an aperture that allows energy through. The rule of thumb from shielding design is that performance drops as aperture size increases relative to the wavelength of the interfering energy. Broad-spectrum EMP is challenging because it includes fast, high-frequency components that exploit surprisingly small openings. On many safes, the frame-to-door interface, lock spindle area, and hinge side are more important than adding extra steel plate to the body panels.
Another limitation is conductivity across painted surfaces. Powder coating looks durable but can reduce metal-to-metal contact where two surfaces meet. I have seen owners assume their door creates a continuous conductive seal simply because it closes tightly. When we inspected contact points, the actual electrical continuity was poor because finish layers and gasket materials isolated key sections. That is why conductive gasketing, bonding straps, and selective removal of finish at contact interfaces often produce better shielding gains than cosmetic metal additions.
There is also a tradeoff between shielding and usability. A fully hardened setup may require removing convenience electronics, avoiding powered accessories, and placing sensitive items in secondary shielded containers inside the safe. For many households, that is the right answer. A safe can become the outer theft and fire barrier while smaller Faraday containers inside handle the most delicate electronics. That layered method is usually more practical and more defensible than promising that a standard safe body alone will stop every EMP threat.
Choose the Right Retrofit Path: Mechanical, Electronic, or Layered
The best retrofit strategy depends on your safe’s lock type and how you use it. If maximum resilience is the priority, a mechanical dial lock remains the benchmark. A properly maintained Group 2 or Group 2M mechanical lock has no exposed circuit board, no battery, and no keypad cable to absorb induced transients. Many safe technicians still recommend mechanical conversion for owners who prioritize long-term reliability over speed. The downside is slower access, more user training, and in some cases added conversion cost if the existing lock footprint or spindle arrangement needs adjustment.
If you keep an electronic lock, prioritize models from established manufacturers such as Sargent and Greenleaf, SecuRam, AMSEC-compatible platforms, or La Gard systems with a strong service network. Then protect the system as part of the enclosure. Shorten internal wire runs where possible, avoid unnecessary accessory connections, and keep replacement lock components stored in shielded packaging. Do not assume a surge protector solves the problem. Surge strips are designed for line disturbances on power circuits, not for broad EMP exposure coupled through enclosure seams and lock wiring.
A layered retrofit often delivers the best balance. Leave the safe’s primary anti-theft structure intact, improve conductive continuity at key points, eliminate unnecessary external wiring, and place sensitive accessories inside dedicated shielded boxes or bags. That gives you multiple levels of defense and reduces dependence on any one modification. It also supports this subtopic’s broader custom and DIY gun safe modification philosophy: solve the highest-risk weakness first, then improve organization, climate control, anchoring, and access in ways that do not create new vulnerabilities.
| Retrofit path | Main benefit | Main limitation | Best use case |
|---|---|---|---|
| Mechanical lock conversion | Removes most electronic lock vulnerability | Slower access and installation cost | Preparedness-focused long gun safe |
| Harden existing electronic lock | Keeps faster access and familiar operation | Electronics remain a potential failure point | Daily-use defensive safe |
| Layered inner shielding | Protects optics, radios, and accessories effectively | Does not fully harden safe-wide electronics | Mixed firearm and electronics storage |
| Full accessory simplification | Reduces conductive paths and complexity | Loses lighting, smart sensors, and powered add-ons | Owners favoring reliability over convenience |
Seal Apertures, Improve Conductive Continuity, and Manage Penetrations
Once the threat model is clear, the most effective DIY work usually focuses on openings and continuity. Start with unused holes. Factory anchor holes, shelf-mounting holes, and cable pass-throughs should be closed with conductive hardware rather than left open or plugged only with plastic caps. Steel fasteners with broad contact surfaces are preferable, and star washers can help bite through finish where electrical continuity is required. The objective is not just physically filling a gap, but restoring conductive enclosure behavior.
Door-edge treatment is the next priority. Conductive EMI gasketing can improve shielding where a movable door meets the frame, but material choice matters. Beryllium copper fingerstock is excellent in industrial shielding applications, though cost and installation complexity are higher. Conductive fabric-over-foam gaskets are easier to apply, but they compress and wear over time, especially on heavy safe doors. Any added material must not interfere with boltwork travel, fire seal expansion, or full door closure. I strongly recommend dry fitting, closing the door slowly, and checking for latch resistance before committing to adhesive-backed gasketing.
Bonding is often overlooked. If a removable panel, door section, or accessory bracket is isolated by paint or corrosion, install short bonding straps or create cleaned contact points to maintain continuity. Tinned copper braid is commonly used for bonding, but keep runs short and direct. Long loose conductors can become antennas, which defeats the purpose. In retrofits I trust most, each modification is deliberate, mechanically secure, and electrically simple.
Power penetrations deserve skepticism. Running AC into the safe for a dehumidifier rod, light kit, or charging station creates a direct coupling path. If you need humidity control, consider passive desiccant canisters or rechargeable silica units stored and refreshed outside the safe. If you insist on powered devices, route power through filtered feedthrough components designed for shielding applications, not a loosely fitted cord through a notch. Most homeowners will get better resilience by removing powered penetrations entirely.
Protect Sensitive Contents Inside the Safe
Even after enclosure upgrades, the safest move is to shield critical electronics individually. Small Faraday bags, conductive metal tins with proper gasketing, and nested metal containers lined with nonconductive padding are practical options. I prefer rigid metal containers for optics, night vision devices, radios, spare red-dot emitters, rechargeable battery chargers, and backup documents because they resist compression damage and maintain more consistent contact around the lid. The liner is essential. Contents must not touch bare conductive walls directly.
This interior layer also supports broader gun safe organization projects. For example, a labeled shelf system can separate everyday access gear from EMP-hardened reserve gear. Keep a spare optic, spare weapon light, extra batteries in original packaging, and a printed access record in shielded storage. If your main safe uses an electronic lock, store the override key if available, lock documentation, and replacement keypad parts inside a secondary shielded container. That approach mirrors best practice in continuity planning: protect the backup, not just the primary tool.
Be selective with ammunition and magazines. Conventional cartridges are generally not the main concern in EMP planning, but loaded magazines with electronic couplers, smart accessories, or tracking devices should be treated like other electronics. For most owners, the highest-value interior protection targets are aiming devices, communications gear, hearing protection, and digital media that support identification, training, or inventory management.
Test, Maintain, and Integrate EMP Hardening With Other Safe Modifications
No DIY retrofit should be considered complete without basic testing and ongoing maintenance. You may not have access to a certified shielding lab, but you can still verify whether changes improved performance. A simple screening method is to place a battery radio, phone, or signal-generating device inside the safe or inner container and check attenuation across multiple frequencies. This is not a formal EMP test, and passing it does not guarantee high-level pulse protection, but it can reveal major leakage paths caused by door gaps, cable openings, or poor lid contact. Repeat tests after any modification and document the results.
Maintenance matters because conductive interfaces degrade. Paint creep, corrosion, adhesive failure, compression set in gaskets, and loose hardware all reduce shielding over time. Inspect door seals, continuity points, and plugged penetrations at least annually. If the safe is anchored in a damp basement or garage, corrosion control becomes part of EMP resistance because oxidation weakens electrical contact. Keep contact surfaces clean, dry, and mechanically tight.
Most important, integrate EMP work with the rest of your custom and DIY gun safe modifications. Interior panel systems, rifle racks, LED upgrades, humidification control, anchor reinforcement, and door organizers all affect the enclosure. Every new cable, screw, bracket, and adhesive layer changes performance. When I plan a safe retrofit sequence, I handle structural and penetration decisions first, lock strategy second, interior organization third, and powered accessories last. That order prevents rework and keeps convenience features from undermining resilience.
The key takeaway is straightforward: making a gun safe more resistant to EMP attacks is possible, but it requires a layered, disciplined approach. Start by reducing reliance on vulnerable electronics, especially in locks and powered accessories. Improve conductive continuity at the door and seal avoidable apertures with metal hardware and appropriate gasketing. Use inner shielded containers for optics, radios, and backup components because they provide the most reliable protection for sensitive gear. Test your setup, maintain it, and treat every future modification as part of the same system.
For owners building a stronger gun safes and safety plan, this sub-pillar topic matters because custom and DIY gun safe modifications are rarely isolated projects. EMP hardening connects directly to lock selection, safe organization, environmental control, and emergency access strategy. The best safe is not the one with the longest feature list. It is the one that remains dependable when conditions are at their worst. Review your safe today, remove unnecessary penetrations, identify your most vulnerable electronics, and build layered protection that supports security, fire resistance, and real-world readiness.
Frequently Asked Questions
Can a gun safe really protect firearms and electronics from an EMP on its own?
Usually, no. A standard gun safe is primarily engineered to slow down theft, resist heat during a fire, and deter tampering. Those are very different design goals from shielding against electromagnetic pulse energy. While a safe is made of metal and may provide some incidental shielding, most residential models are not built as true Faraday enclosures. They often have weak points such as door gaps, external keypads, biometric scanners, power cords, dehumidifier ports, interior lighting wiring, and poorly bonded seams. Those openings and attached conductive pathways can allow electromagnetic energy to couple into the safe and damage sensitive electronics inside.
If your safe contains only mechanical components and non-electronic contents, the risk is lower because there is less that can be damaged by an EMP event. The problem becomes more serious when the safe relies on electronic locks, digital access systems, wireless accessories, battery-powered lighting, or powered humidity controls. In that case, the safe may protect the firearms physically while still failing electronically. The practical takeaway is that a normal gun safe should be viewed as a storage container that can be upgraded for better EMP resistance, not assumed to be EMP-proof from the factory.
What parts of a gun safe are most vulnerable during an EMP attack?
The most vulnerable parts are the electronic systems and anything connected to them. Electronic keypads, biometric readers, digital lock bodies, backup control boards, interior LED lighting, humidity controllers, alarm modules, and wireless monitoring devices are all common failure points. Even if the steel body of the safe remains intact, those internal components can be damaged by a strong electromagnetic event if they act like receivers for induced current or voltage spikes.
Wiring is a major concern because it can behave like an antenna. A simple wire run for lights or a powered dehumidifier can carry a surge into sensitive circuitry. External power adapters, charging ports, and feed-throughs are especially problematic because they create direct conductive paths between the outside environment and the inside of the safe. Door seams and penetrations are also important. EMP resistance depends heavily on continuity in the conductive enclosure, so any area where the safe has an imperfect seal or a non-conductive interface can reduce shielding effectiveness. For most safe owners, the best starting point is to identify every electronic feature, every wire, and every opening, then decide which ones can be removed, disconnected, shielded, or replaced with simpler mechanical alternatives.
What are the most effective ways to make a gun safe more resistant to EMP attacks?
The most effective approach is layered hardening, not a single product or trick. First, reduce dependence on electronics wherever possible. A mechanical lock is generally preferable to an electronic keypad or biometric entry system if EMP resilience is a priority. If replacing the lock is not practical, consider keeping spare lock components or an alternate access plan, but understand that backup electronics can be vulnerable too. Second, remove or disconnect unnecessary powered accessories inside the safe, including lighting systems, smart sensors, and powered dehumidifier controls. The fewer conductive paths and sensitive circuits you have, the better.
Third, improve the safe’s shielding characteristics. That may include addressing door gaps, bonding conductive surfaces more effectively, and minimizing penetrations. Some owners use conductive gasketing materials around door interfaces to improve continuity, though fit, corrosion, and lock operation all need to be considered carefully. Any cable entry points or holes should be eliminated, sealed, or filtered with appropriately rated protective components. Fourth, place especially sensitive items inside smaller Faraday containers within the safe. This is often one of the most practical upgrades because it creates a secondary shielded layer for optics, night vision devices, red dots, radios, spare electronics, battery chargers, and other vulnerable gear. In short, the best strategy is to simplify the safe, eliminate unnecessary electronics, reduce entry points, and add nested shielding for critical equipment.
Should I store electronics and firearm accessories in a separate Faraday container inside the safe?
Yes, in many cases that is the smartest and most realistic solution. Even after upgrades, most gun safes still will not match the shielding performance of a purpose-built Faraday enclosure. Storing sensitive electronics in a dedicated Faraday bag, can, box, or other properly designed shielded container inside the safe gives you a second line of defense. This is especially useful for red dot sights, thermal devices, weapon lights, laser modules, rangefinders, radios, spare batteries with integrated circuitry, digital borescopes, and any backup access electronics related to the safe itself.
The key is using the inner container correctly. The contents should not be in direct contact with conductive walls unless the product is specifically designed for that use, and the container should close completely with continuous shielding around the opening. It also helps to organize gear by priority, so your most mission-critical electronics are stored in the best-protected enclosure. Think of the safe as broad physical protection and the Faraday container as targeted electromagnetic protection. That layered method is usually more dependable than trying to transform an ordinary residential safe into a perfect EMP-proof cabinet.
Is it better to buy a new EMP-resistant gun safe or upgrade the one I already have?
For most owners, upgrading an existing safe is the more practical path, but it depends on your current setup and your expectations. If your safe is otherwise solid, the most cost-effective move is often to remove vulnerable accessories, reduce external wiring, and protect critical electronics in internal Faraday containers. If the safe uses an electronic lock, you may also want to evaluate whether conversion to a mechanical lock is possible. These changes can significantly improve resilience without requiring a full replacement.
Buying a new safe may make sense if your current unit relies heavily on integrated electronics, has numerous penetrations, or is low quality overall. However, consumers should be cautious about marketing claims. Terms like EMP-resistant or EMP-proof are not always backed by meaningful testing standards in the consumer safe market. Before paying a premium, ask specific questions about seam continuity, door gasketing, cable penetrations, lock type, grounding claims, and whether any shielding performance has been independently verified. In many real-world cases, a robust mechanical safe combined with well-chosen internal Faraday protection is a more trustworthy and economical solution than a feature-heavy “smart” safe advertised as hardened. The goal is not just buying more steel, but reducing electronic failure points and building redundancy into how you access and protect your gear.