DIY reinforcement techniques for fireproofing your gun safe can significantly improve survivability during a house fire, but only when they are based on how fire, heat transfer, and safe construction actually work. In practical terms, fireproofing means slowing the rise of internal temperature long enough to protect firearms, documents, optics, and ammunition components from heat damage. Reinforcement means upgrading weak points such as door gaps, thin steel panels, seams, anchor points, and the surrounding installation area. As the central guide to custom and DIY gun safe modifications, this article explains the core methods, materials, limitations, and decision-making process I rely on when evaluating whether a home upgrade is worthwhile or whether factory-rated protection should remain the primary line of defense.
Most gun safe buyers assume a printed fire rating tells the whole story. It does not. Fire labels vary by manufacturer, test method, temperature curve, and pass criteria. Some ratings are based on internal temperatures staying below roughly 350 degrees Fahrenheit, a threshold often used to protect paper records, while many firearm components, polymer parts, lubricants, optics adhesives, and electronic accessories can be affected at different temperatures. A safe also faces risk from direct flame, radiant heat, hot gases entering through door gaps, and long heat soak after flames are knocked down. Because of that, DIY fireproofing is not about making a safe invincible. It is about buying time, reducing heat transfer, and improving performance at known failure points.
This matters for anyone storing rifles, handguns, suppressor paperwork, tax documents, cash, hard drives, or inherited items in one enclosure. A well-planned upgrade can complement burglary resistance too, because many reinforcement steps tighten body seams, improve anchoring, and strengthen the installation environment. At the same time, poor modifications can trap moisture, void warranties, interfere with door movement, or create a false sense of security. The best approach is systematic: understand your safe’s construction, identify realistic fire exposures in your home, then use proven materials such as gypsum board, ceramic fiber insulation, intumescent seals, mineral wool, and thermal barriers where they make measurable sense.
How gun safes fail in fires and what DIY reinforcement can realistically fix
In real fire scenes, the most common problem is not steel melting. The issue is heat moving through steel by conduction, then building inside the cabinet until contents are damaged. Thin steel shells transmit heat quickly. Large flat door panels can warp. Gaps around the door let in smoke and superheated gases. Weld seams, bolt penetrations, lock cutouts, and corners often become thermal weak points. If the safe is placed in a garage next to fuel, paint, or a vehicle, the heat exposure may be harsher than in a finished interior room. If it sits on bare concrete in a damp basement, the post-fire environment may combine steam, humidity, and corrosive residue with elevated temperature.
DIY reinforcement can address several of these weak points. Adding interior fireboard layers increases thermal lag. Installing high-temperature expanding seals reduces hot gas infiltration. Building a noncombustible exterior enclosure around the safe reduces direct flame contact and shields the cabinet from radiant heat. Sealing gaps in the room, elevating the safe off combustible flooring, and improving anchor support can also help. What DIY work cannot do is transform a thin residential security container into a true high-end composite safe tested to severe furnace and impact standards. That distinction matters. Home improvements are incremental upgrades, not substitutes for heavy plate steel and engineered insulation systems built at the factory.
I have seen useful gains from simple interventions. A closet installation wrapped with Type X drywall and mineral wool performs better than the same safe exposed in open garage space. A quality intumescent door seal often limits smoke staining and heat entry around the jamb. A properly fitted interior liner can slow internal temperature rise enough to protect paperwork and reduce oil bake-off on firearms. Still, every modification must preserve locking function, boltwork travel, and access speed. Fire protection that prevents the door from closing properly is not protection at all.
Assess your safe before modifying it
Start by identifying exactly what you own. Many products sold as gun safes are residential security containers, or RSCs, built for limited forced-entry resistance rather than severe fire endurance. Check the manufacturer label, model specifications, steel gauge, door thickness, weight, and stated fire rating. Look for clues about construction: drywall-lined walls, poured composite fill, door organizer panels, dehumidifier ports, and whether the seal is cosmetic or intumescent. If the safe already uses multiple layers of gypsum board, your best gains may come from sealing and installation rather than cramming in more interior board that steals storage space.
Next, inspect the installation site. Fire behavior depends heavily on location. A second-floor bedroom closet may see different heat duration than an attached garage with gasoline cans and power tools. A corner placement against two interior masonry walls is better than a freestanding position in an open room. Measure clearances around the safe and the swing of the door. Note nearby electrical outlets, sprinkler heads, HVAC vents, and moisture sources. I recommend documenting body dimensions and available space on all sides before buying materials, because many DIY projects fail when added thickness blocks the handle, keypad, or shelving.
Finally, define your protection targets. Paper documents generally need lower internal temperatures than magnetic media, while optics, batteries, and plastics may degrade in other ways. Firearms themselves can survive substantial heat cosmetically poorly, but stocks, grips, slings, finishes, optics, lubricants, and ammunition packaging are more vulnerable. Once you know what you are trying to protect and for how long, your modification plan becomes clearer and more disciplined.
Best DIY materials for improving fire resistance
Not all insulation is suitable inside or around a gun safe. The most common and practical material is Type X gypsum board, the same fire-resistant drywall used in rated wall assemblies. Gypsum contains chemically bound water that absorbs heat as steam is released, which delays temperature rise. Many factory fire-lined safes use gypsum-based panels for this reason. For DIY work, 5/8-inch Type X board is usually the starting point because it is widely available, affordable, and predictable. It is heavy, dusty to cut, and space-consuming, but it works.
Mineral wool, often sold under brands such as Roxul or Rockwool, is another strong option for noncombustible exterior enclosures. It handles high temperatures better than fiberglass and does not rely on trapped air alone. Ceramic fiber blanket offers superior high-temperature performance, but it requires more care in handling, containment, and selection. For seals, use intumescent products rated for fire door or safe applications. These expand when heated and help block gaps around the door perimeter. High-temperature silicone can be useful at selected seams, but it is not a substitute for a true expanding seal.
| Material | Best use | Main advantage | Main limitation |
|---|---|---|---|
| Type X gypsum board | Interior liner or exterior enclosure | Affordable, proven thermal lag | Reduces interior space, adds weight |
| Mineral wool | Wall cavity around safe | Noncombustible, easy to fit | Needs enclosure for durability |
| Ceramic fiber blanket | High-heat barrier layers | Excellent temperature resistance | Costlier and requires careful handling |
| Intumescent seal | Door perimeter | Blocks smoke and hot gases | Must not impede closing or boltwork |
| High-temp silicone | Selected seam sealing | Flexible, accessible | Limited fire-barrier value by itself |
Avoid common mistakes. Standard foam board is generally a poor choice near high heat. Household weatherstripping can melt and produce smoke. Fiberglass batting is acceptable in surrounding walls, but it is less effective than mineral wool in this application. Also avoid loose materials that can interfere with relockers, hinges, or locking bars. Any product placed inside the safe should be secured mechanically or with adhesives rated for elevated temperatures.
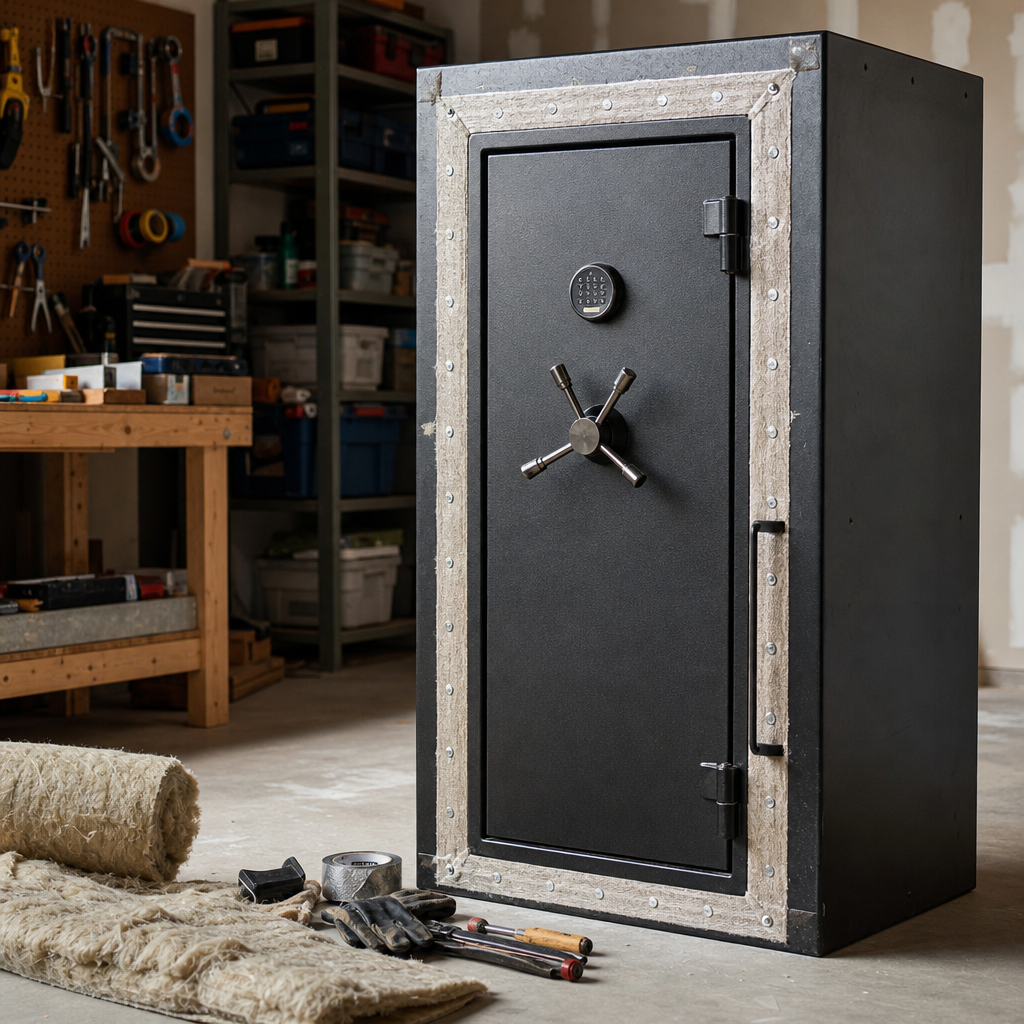
Interior lining, door seals, and seam treatment
The simplest direct modification is adding an interior liner to the body and door. In practice, this usually means cutting Type X gypsum to fit side panels, the top, the floor, and the inside of the door, then covering it with thin steel sheet, fabric panels, or mechanically retained trim so dust and abrasion stay under control. I prefer templates made from cardboard before cutting board, because safe interiors are rarely perfectly square. Keep clearances around lock linkages, hinge arms, door organizers, and shelf supports. Even a quarter inch of interference can stop the boltwork from operating smoothly.
Door perimeter sealing is often the highest-value DIY improvement. If your safe lacks a real expanding seal, install a narrow intumescent strip where it compresses evenly when the door closes. The goal is not to force the door tight; it is to create a continuous heat-activated barrier. On safes with existing seals, inspect for breaks, paint contamination, or misalignment. Small body seams can be treated with high-temperature sealant, especially around pass-through ports or dehumidifier openings, but never block drainage or electrical routes without planning a replacement path.
One nuance many owners miss is moisture. Gypsum and tight seals can change how humidity behaves inside the cabinet. After any modification, add active moisture control. A GoldenRod dehumidifier, rechargeable desiccant packs, or a monitored hygrometer is not optional if you live in a humid climate. Fireproofing that increases rust risk is a poor trade.
Build a protective enclosure around the safe
If you have room, the most effective DIY strategy is often not inside the safe but around it. A noncombustible closet or alcove built with steel studs or conventional framing, multiple layers of 5/8-inch Type X drywall, and mineral wool in the cavities can materially reduce fire exposure. This assembly lowers direct flame contact, slows heat transfer, and may also hide the safe from casual discovery. In one installation I advised on, moving a safe from an exposed garage wall into a drywall-lined interior closet produced a larger practical safety gain than adding a second internal liner.
Placement details matter. Position the safe on a concrete slab when possible, or on a reinforced platform faced with cement board rather than carpeted wood. Keep it away from fuel loads such as paint, gasoline, propane cylinders, and overloaded electrical panels. If local code and room design allow, placing the enclosure against interior masonry or foundation walls improves the thermal environment. For door access, leave enough room for full swing and emergency removal of contents. The enclosure should protect the safe, not trap it in a way that makes daily use frustrating.
Anchoring should be reconsidered during this phase. Expansion anchors into concrete are preferred when the slab is sound. On framed floors, use hardware sized for joists and backing plates where appropriate. A fire can weaken surrounding materials, and a poorly anchored safe can tip if structural members fail or firefighters move it during overhaul. Reinforcement is not only about temperature; it is also about stability under stress.
Electrical, ventilation, and maintenance considerations
Many customized safes now include dehumidifiers, LED lighting, Wi-Fi sensors, and power pass-through kits. Every penetration through the safe body is a potential heat and smoke pathway. If your safe includes a factory electrical port, inspect how it is sealed. If you add a pass-through, use the smallest opening possible and protect it with a high-temperature grommet or sealant system that does not abrade the cable. Do not drill blindly near lock bodies, hard plates, relockers, or wiring harnesses for electronic locks.
Ventilation inside a gun safe is different from ventilation in a room. During a fire, you want fewer pathways for hot gases. During normal use, you need controlled humidity. The solution is not large air vents. It is active humidity management and careful sealing. I recommend checking internal relative humidity with a digital sensor and keeping it generally around 45 to 50 percent for mixed firearm and document storage, adjusting for local climate and manufacturer guidance. After any DIY fireproofing upgrade, run a month of monitoring before assuming the environment is stable.
Maintenance should be scheduled. Test door closure, bolt throw, keypad function, and handle return after every modification. Inspect seals annually. Replace desiccants on schedule. Touch up scratches to prevent corrosion. If the safe is ever exposed to heavy smoke, nearby fire, or sprinkler discharge, unload it and inspect the interior promptly. Heat and moisture damage often continue after the visible event is over.
When DIY upgrades are worth it and when to buy a better safe
DIY fireproofing is worth doing when you already own a decent safe with sound steel construction, your weak points are clear, and your modifications are targeted. It is especially useful for improving door sealing, creating a protected installation alcove, and adding modest interior thermal mass. It is less worthwhile when the base cabinet is extremely light, poorly fitted, or too small to accept liners without sacrificing usability. At some point, added materials, labor, and lost interior volume cost nearly as much as stepping up to a better-built model with thicker steel, factory composite insulation, and verified testing.
Use a simple rule: upgrade the environment first, seal obvious leakage points second, line the interior third, and replace the safe if the structure itself is the main limitation. That order delivers the best return in most homes. If you are storing high-value collections, rare optics, NFA paperwork, business records, or irreplaceable heirlooms, pair safe upgrades with layered protection: monitored smoke alarms, residential sprinklers where available, insurance documentation, off-site backups for digital files, and a household fire plan. No single cabinet carries the entire burden.
DIY reinforcement techniques for fireproofing your gun safe work best when they are grounded in realistic expectations and careful execution. Focus on heat delay, gap control, noncombustible surroundings, moisture management, and secure anchoring. Those improvements support the broader goal of custom and DIY gun safe modifications: making your storage system fit your actual risks rather than generic marketing claims. Review your safe, choose one upgrade you can do correctly this month, and build from there with documented, safety-first decisions.
Frequently Asked Questions
What does “fireproofing” a gun safe actually mean in a DIY context?
In practical terms, DIY fireproofing does not mean making a gun safe truly fireproof in the absolute sense. It means slowing heat transfer so the temperature inside the safe rises more gradually during a house fire. That distinction matters because firearms, optics, important documents, magazines, and ammunition components can all be damaged at different temperature thresholds long before the safe itself visibly fails. The goal of reinforcement is to buy time by improving the safe’s ability to resist radiant heat, conductive heat through steel, and hot smoke infiltration through gaps and seams.
Most residential gun safes are built from steel, and steel is a strong structural material but a poor insulator. On its own, it absorbs and transfers heat relatively quickly. That is why effective DIY upgrades focus on the weak points that let heat move inward fastest: door clearances, body seams, thin wall sections, and exposed external surfaces. Depending on the safe’s design, owners may add fire-rated insulation board, install high-temperature door seals, reinforce panel interiors, and improve the way the safe is positioned in the room. These steps do not turn a budget cabinet into a commercial fire vault, but they can materially improve survivability in shorter-duration fire events.
It is also important to understand what DIY reinforcement cannot do. It usually cannot replicate the tested fire ratings of a purpose-built, laboratory-certified fire safe, and it cannot correct every design limitation of thin steel construction. A realistic approach is to treat DIY fireproofing as risk reduction, not as a guarantee. When done intelligently and with the right materials, it can create a more heat-resistant, better-sealed, and more resilient enclosure that protects contents longer than an unmodified safe.
Which parts of a gun safe should be reinforced first to improve fire resistance?
The first priority is usually the door perimeter, because gaps around the door are one of the most common paths for hot gases and superheated smoke to enter the interior. Even a small clearance can become a major weakness during a fire. Installing an intumescent fire seal designed to expand under high heat can help close those openings as temperatures rise. This kind of seal is often one of the most effective and accessible upgrades because it addresses a clear vulnerability without requiring complete reconstruction of the safe body.
The second priority is the safe walls, roof, and door panel itself, especially if the unit uses relatively thin steel with little or no fireboard lining. Heat radiating onto the exterior quickly raises steel temperature, and that heat then conducts inward. Adding layers of fire-rated gypsum board, ceramic fiber board, or other suitable high-temperature insulating material to the interior can slow that process. The ceiling area of the safe deserves special attention because heat accumulates upward in a structure fire, making the top surface especially vulnerable. The back and sides are also important if the safe is positioned against walls that could become heat sources during a fire.
Third, inspect seams, bolt openings, cable ports, lock penetrations, and any points where the safe body has discontinuities. These areas can act as heat bridges or air entry points. Reinforcing them with appropriate high-temperature sealants and carefully fitted insulation can reduce leakage and improve overall thermal performance. Finally, consider the anchor points and installation location. A safe bolted to concrete can benefit from some thermal stability from the slab, while one sitting exposed in an open room may receive more direct heat. Reinforcing the safe itself matters, but so does reducing how much fire exposure it experiences in the first place.
What materials are best for DIY fireproofing a gun safe, and which ones should be avoided?
The best materials are those designed to handle high temperatures without producing dangerous smoke, losing structure too early, or trapping moisture in a damaging way. Fire-rated gypsum board is a common choice because it is relatively affordable, accessible, and specifically formulated to slow heat transfer. Type X drywall is often used in fire assemblies because the chemically bound water in the core helps absorb heat as it is released as steam. Ceramic fiber board and mineral wool can also be useful in certain applications because they tolerate high temperatures and provide excellent insulation, though they must be handled and installed correctly.
Intumescent seals are another key material for the door frame. These products expand when exposed to heat, helping to close door gaps and limit smoke and hot gas intrusion. High-temperature sealants may be appropriate around seams or small penetrations, but they should be selected carefully based on temperature rating and compatibility with steel and insulation materials. Some safe owners also add internal liner panels to hold insulation in place and create an air gap, which can further reduce direct heat transfer if designed properly.
Materials to avoid include ordinary household foam, standard weatherstripping, general-purpose construction adhesives, carpet padding, and many plastics or rubber products not rated for high heat. These can melt, off-gas, ignite, or fail quickly under fire conditions, sometimes making the interior environment worse. Also be cautious with moisture-retaining materials placed directly against firearms, as they can increase corrosion risk over time. The best approach is to use products with published fire or temperature performance data and to avoid improvising with materials that seem insulating in normal use but are not intended for fire exposure.
Will DIY fireproofing affect the safe’s lock, door operation, or long-term performance?
It can, which is why careful planning matters. Adding insulation, seals, and interior panels changes clearances, door compression, and sometimes the operating feel of the lockwork. If the door seal is too thick or poorly positioned, the door may not shut properly or may put excess strain on hinges and locking bolts. If insulation is installed carelessly around lock bodies, relockers, hard plates, or linkage components, it can interfere with normal operation or make future servicing difficult. Any reinforcement should preserve full bolt travel and allow the lock and handle mechanism to operate exactly as intended.
There is also a long-term environmental issue to consider: moisture. Some fire-resistant materials, especially gypsum-based products, can hold or release moisture depending on ambient conditions. In a tightly enclosed safe, that can affect humidity levels and potentially contribute to corrosion if there is no plan for dehumidification. After any DIY fireproofing upgrade, it is smart to monitor the interior with a hygrometer and use appropriate moisture control such as a desiccant system or a safe dehumidifier rod if the safe design allows it. Protecting contents from fire should not come at the cost of slowly damaging them with humidity.
Weight is another practical factor. Adding multiple layers of board or liner materials increases the load on shelves, door hinges, and anchor points. In some cases that extra mass is beneficial because it adds thermal resistance, but it also changes the handling and structural demands on the safe. The best results come from reinforcing incrementally, test-fitting each component, checking door operation repeatedly, and avoiding modifications that compromise security features or void critical lock access. A DIY fireproofing project should improve resistance without making the safe unreliable in everyday use.
What are the most effective low-cost DIY steps to improve a gun safe’s fire survivability?
If you want the biggest return for the least cost, start with sealing the door gap using a quality intumescent fire seal sized appropriately for the frame and clearance. This addresses one of the most vulnerable areas and can significantly reduce the rapid entry of hot smoke and gases. Next, line the interior walls and especially the top panel with fire-rated board or another suitable high-temperature insulating material, focusing on clean coverage and tight fit rather than excessive thickness in one spot. Even modest added insulation can meaningfully slow internal heat rise when applied strategically.
Placement is another high-value improvement that many owners overlook. Positioning the safe in a basement, on a concrete slab, or against interior masonry can reduce fire exposure compared with placing it in a garage corner surrounded by fuel loads or on an upper wood-framed floor. If possible, avoid locations near stored gasoline, paint, ammunition bulk storage, or utility equipment that can intensify a fire. Surrounding conditions play a major role in whether a safe gets a short, survivable heat exposure or a prolonged, destructive one.
Finally, think in layers. Use door seals to reduce infiltration, insulation to slow conduction, proper anchoring to keep the safe stable, and internal organization to protect the most sensitive items. Documents, optics, and backup media can be placed in additional fire-resistant document pouches or boxes inside the safe to create nested protection. That layered strategy is often more effective than relying on one big modification alone. Low-cost upgrades work best when they are based on real fire behavior: stop gaps, slow heat transfer, reduce exposure, and protect the most vulnerable contents with redundancy.