
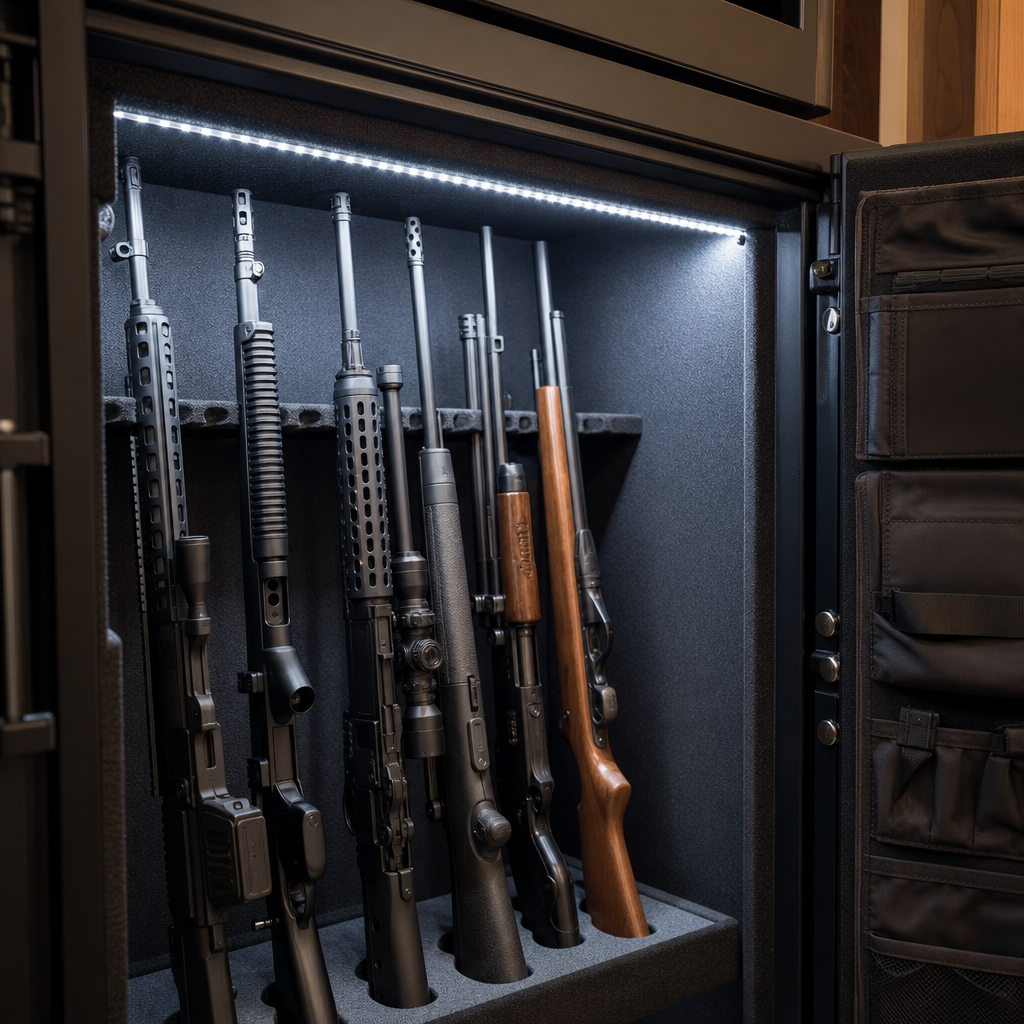
DIY gun safe lighting makes a practical upgrade that improves visibility, speeds access, and helps protect firearms, documents, and accessories stored in dark interiors. In most factory safes, the biggest weakness is not steel thickness or lock quality but poor illumination. A deep safe with shelves, long guns, and door organizers creates shadows that hide serial numbers, optics, keys, and emergency gear. Adding LED strips solves that problem with low heat, low power draw, and flexible placement. It also opens the door to broader custom and DIY gun safe modifications, from dehumidifiers and power outlets to door panels and shelf upgrades. As a hub topic, gun safe lighting matters because it is usually the first modification owners attempt, and it affects every other change that follows.
When I install lighting in safes, I define success by four standards: complete coverage, reliable power, secure mounting, and no interference with firearm storage. LED strip lights are ideal because they can run on 12V DC, fit tight corners, and come in color temperatures that make blued steel, stainless finishes, and paperwork easy to distinguish. Key terms matter here. Lumens measure brightness, color temperature measured in Kelvin describes warm or cool light, CRI or color rendering index shows how accurately colors appear, and IP rating indicates resistance to dust and moisture. For most gun safes, bright neutral white light around 4000K to 5000K with a CRI of 80 or higher works best. Motion sensors, magnetic reed switches, and dimmers add convenience, but core performance still comes from choosing the right LED strip and installing it cleanly.
This guide covers the best LED strip options, the wiring and mounting choices that actually hold up inside a safe, and the broader modification strategy that turns a basic cabinet into a more usable storage system. It also serves as a central reference for related projects such as adding power, improving shelf layouts, upgrading moisture control, and organizing handguns and magazines. If you want one starting point for custom and DIY gun safe modifications, lighting is the smartest place to begin because it improves function immediately and teaches the routing, adhesive, and planning skills used in every later upgrade.
Why LED strip lighting is the best first gun safe modification
LED strip lighting is the best first gun safe modification because it delivers the highest day-to-day benefit for the lowest cost and effort. A quality kit can cost far less than a shelf system or door panel organizer, yet it changes how the entire safe works. Instead of using a handheld flashlight or room light to identify a pistol, inspect a chamber flag, or read a document label, you get even interior illumination the moment the door opens. That matters in routine use, and it matters more in low-light conditions when safe access may be urgent.
Compared with puck lights or battery tap lights, LED strips distribute light more evenly. A puck light creates bright hotspots and deep shadows. A strip mounted vertically along the door frame or around the inside perimeter gives broad, continuous coverage. Heat output is also minimal compared with older incandescent fixtures, which is important in enclosed spaces containing foam, paper, and oil-treated surfaces. In practical use, strips are easier to customize. You can cut many models at marked intervals, use corner connectors, and extend runs to shelves or door pockets.
As a hub within custom and DIY gun safe modifications, lighting also supports other upgrades. Better visibility helps when installing a GoldenRod dehumidifier, placing Eva-Dry desiccants, routing a power pass-through, or fitting handgun racks and rifle rods. Good lighting reveals dead space you can reclaim with shelf risers or pegboard-style panels. It even improves maintenance because you can spot dust, rust, and oil drips before they become bigger problems. In short, gun safe lighting is not cosmetic. It is foundational.
How to choose the best LED strips for a gun safe
The best LED strips for a gun safe combine stable power, strong adhesive backing, safe operating temperature, and the right brightness for confined interiors. Start with voltage. Most reliable safe lighting setups use 12V strips rather than USB-powered 5V strips because 12V systems hold brightness better over longer runs and offer more accessory options, including sensors and splitters. AC-powered integrated strips can work, but they are less flexible in small spaces and usually require more cable management.
Brightness should be judged by total lumens, not marketing phrases like ultra-bright. For a small handgun safe, 150 to 300 lumens may be enough. For a full-size rifle safe, 300 to 800 lumens usually gives effective coverage depending on interior color and shelving. Matte black interiors absorb light, while light gray carpet reflects it. If you have adjustable shelves and a door organizer, plan for the higher end. Color temperature should generally stay in the neutral-to-cool range. Around 4000K looks natural and makes labels readable. Around 5000K appears crisper and is often better for identifying parts and finishes. Very blue 6500K strips can feel harsh, while warm 2700K strips can muddy contrast.
CRI is often overlooked, but it matters if you want to distinguish black polymer, dark wood grain, brass cartridges, and warning labels accurately. A CRI above 80 is acceptable, and above 90 is excellent if available at a reasonable price. For strip type, standard 3528 LEDs are adequate for accent lighting, but 5050 and 2835 SMD strips generally provide stronger practical illumination. COB LED strips are another strong option because they create a smooth continuous line of light with fewer visible hotspots. They cost more, but in a premium safe build they look cleaner and reduce glare on glossy optics.
| LED strip type | Best use in a gun safe | Main advantage | Tradeoff |
|---|---|---|---|
| 3528 SMD | Small pistol boxes | Low cost, low power draw | Lower brightness |
| 2835 SMD | General interior lighting | Efficient, bright, widely available | Quality varies by brand |
| 5050 SMD | Large safes with shelves | High output | Can create hotspots without diffusion |
| COB strip | Premium clean installations | Even continuous light | Higher cost |
Brand quality matters more than many buyers expect. I have had better long-term results with kits using genuine 3M adhesive and UL-listed power supplies. Cheap no-name kits often fail at the power brick, sensor, or adhesive layer before the LEDs themselves die. Look for complete specs, cut marks, connector compatibility, and a listed operating temperature. If your safe sits in an unconditioned garage, summer heat can stress weak adhesive and bargain electronics quickly.
Power options, sensors, and wiring layouts that work
The most dependable gun safe lighting systems use one of three power approaches: an interior outlet kit, an external 12V adapter routed through a factory hole, or a battery pack for temporary or light-duty installations. If your safe includes an electrical pass-through, use it. A 12V adapter plugged outside the safe and routed inside keeps heat and bulk down while providing consistent output. If your safe has a built-in outlet kit, confirm the cord route does not pinch at the door seal and that all added components are rated for indoor low-voltage use.
Battery-powered LED strips are easy to install, but they are rarely the best long-term answer for a full-size safe. Batteries drain at the worst time, and brightness often drops before the cells are fully exhausted. They make more sense in quick-access bedside safes, small lockers, or rental situations where drilling and routing are not practical. For primary safes, wired power is more reliable and cheaper over time.
Automatic activation is worth adding. A magnetic reed switch mounted so the circuit closes when the door opens is the cleanest option for many builds. Passive infrared motion sensors can work, but in cramped interiors they may not always trigger consistently if the sensor angle is poor. Mechanical plunger switches are simple and durable, though they require careful placement so the door compresses them fully. In most installations, I prefer a magnetic switch paired with a dimmer only if the safe is used regularly for long periods, such as inventory checks or maintenance. Otherwise, full brightness on open and off on close is ideal.
For wiring layout, run strips along the hinge side frame, top interior edge, and sometimes both vertical sides for deep safes. Avoid placing strips where long gun barrels or scoped rifles will rub during removal. Leave service loops near connectors instead of stretching wires tight. Use adhesive cable clips or low-profile wire channels to keep leads flat against the liner. If your safe has carpeted panels, mechanical retention becomes especially important because adhesive alone may not hold well on fuzzy surfaces. In those cases, aluminum channels with screws into existing shelf supports or high-bond mounting tape on metal sections work better.
Step-by-step installation tips for a clean, durable result
A clean installation starts with planning, not peeling backing paper. Empty the safe, remove adjustable shelves, and map where shadows fall using a flashlight. Measure every run twice, including turns around door lips and gaps needed for hinges or organizers. Test the full system on a bench before mounting anything. Confirm the power supply, switch, dimmer, and connectors all work together. This simple step prevents the most common DIY failure: discovering a bad connector after the strip is already attached inside the safe.
Surface preparation is critical. Wipe metal mounting areas with isopropyl alcohol to remove oil, silicone residue, and dust. Let the area dry fully. If the interior has thick fabric lining, either mount to exposed metal edges or use channels, clips, or hook-and-loop pads rated for the load. Do not trust generic adhesive backing on dusty carpet. In warm conditions, press the strip firmly for at least thirty seconds per section. If the manufacturer recommends a cure period before full use, follow it.
Cut strips only at marked cut points. Use solderless connectors if you need simplicity, but know that soldered joints are more reliable in vibration and heat cycles. If you choose connectors, buy extras and test each one. Hide connectors in corners or behind shelves where possible. For a professional appearance, use aluminum LED channels with diffusers on visible runs. They protect the strip, improve adhesion, and soften glare. They also make future replacement easier because you swap the tape inside the channel rather than scraping old adhesive from the safe wall.
Route wires away from firearms, optics turrets, sling studs, and door bolts. Use small zip ties, adhesive anchors, or channel covers to secure every loose section. After installation, close the door slowly and watch for pinching points. Then perform a dark-room test. Open the safe and verify you can identify every shelf, door pocket, and muzzle position without moving items around. If you still have dead zones, add a short secondary strip rather than simply increasing brightness. Coverage beats raw output in enclosed storage.
Common mistakes, safety considerations, and related upgrades
The most common mistake in DIY gun safe lighting is overbuying brightness and underplanning placement. Excessively bright strips mounted at eye level create glare off stainless steel, nickel finishes, optic lenses, and laminated documents. Another frequent error is relying on weak adhesive in a hot garage safe. The strip falls, gets snagged by a rifle stock, and the entire system fails. Cheap battery kits, poor connector choices, and unmanaged wires rank close behind.
Safety considerations are straightforward but important. Use low-voltage components from reputable brands, especially if adding a power supply inside or near the safe. Avoid drilling through safe walls unless the manufacturer explicitly allows it, because you may compromise fire lining, security features, or warranty coverage. Keep wiring clear of moving lock bars and relocker mechanisms near the door edge. If you are uncertain about the path of internal components, do not drill. Use existing pass-throughs whenever possible.
Gun safe lighting also connects naturally to other custom and DIY gun safe modifications. Once you can see the interior clearly, organization improvements become obvious. Door panel organizers free shelf space for ammo cans and documents. Handgun hangers and magazine racks increase capacity. Rifle rods can stabilize long guns while opening room below. A dehumidifier rod or rechargeable desiccant helps protect blued steel and wood stocks from corrosion and swelling. Adding a hygrometer gives a measurable target; many owners aim to keep relative humidity below 50 percent inside the safe. Soft shelf liners protect finishes, and labeled bins make accessories easier to track. These upgrades work best together, not as isolated add-ons. Lighting is the enabling layer that makes each one easier to install and use.
If you are building out a comprehensive gun safe project, start with lighting, then move to power routing, moisture control, shelving, and door storage. That order reduces rework because each later modification benefits from visibility and often shares cable or mounting paths established during the lighting install.
DIY gun safe lighting is the highest-value starting point for anyone exploring custom and DIY gun safe modifications. The right LED strip setup makes firearms, documents, and accessories easier to see, easier to organize, and easier to access without adding heat or wasting space. For most owners, the best solution is a 12V LED strip in the 4000K to 5000K range, with solid adhesive or channel mounting, wired power, and an automatic door-activated switch. Brightness should match safe size, while placement should prioritize even coverage over raw output.
The bigger lesson is that lighting is more than a convenience upgrade. It is the foundation for a safer, more functional storage system. Once the interior is illuminated properly, decisions about dehumidifiers, shelf changes, handgun racks, door panels, and power accessories become much easier and more precise. You can spot unused space, reduce clutter, and maintain your firearms with less guesswork. You also avoid common mistakes by planning around cable routes, hinge clearance, and long-term adhesive performance from the start.
If you want to improve your safe without taking on a complicated rebuild, begin with LED strips and a clean wiring plan. Then use this hub as your roadmap for the rest of your gun safe upgrades, moving next into organization, moisture control, and interior storage improvements that build on the same careful DIY approach.
Frequently Asked Questions
What type of LED strips work best for a gun safe?
The best LED strips for a gun safe are low-voltage, high-quality LED tape lights that are easy to mount, produce minimal heat, and provide even light across shelves, door panels, and long-gun compartments. In most cases, 12V LED strips are the most practical choice because they are widely available, reliable, and compatible with common plug-in power supplies. Look for strips with a strong adhesive backing, a durable protective coating, and a brightness level that is high enough to illuminate dark corners without creating glare on optics, stainless finishes, or laminated documents.
Color temperature matters too. A neutral white or cool white strip, usually in the 4000K to 6000K range, tends to work best inside a safe because it makes serial numbers, labels, and stored accessories easier to see. Warm white lighting can feel softer, but it may reduce contrast in a dark interior. If you want the cleanest visibility, especially for identifying small parts or reading paperwork quickly, a daylight-style LED strip is often the better option. It is also smart to choose a strip with a high CRI, or Color Rendering Index, because better color accuracy helps distinguish finishes, ammunition packaging, and stored emergency items more clearly.
For many DIY installations, flexible strip lights are ideal because they can run along the door frame, shelf edges, or interior corners without taking up valuable storage space. Some gun owners prefer motion-activated LED kits designed specifically for safes, while others build a custom setup using standard strip lights and a magnetic or pin switch. Either approach can work well, but the key is choosing a strip that is dependable, cuttable at marked intervals, and bright enough to eliminate the shadow problem that factory safes often have.
How do you power LED strip lights inside a gun safe?
There are two main ways to power LED strip lights in a gun safe: with a plug-in adapter or with batteries. A plug-in power supply is usually the better long-term solution because LED strips draw very little power, and a wired setup gives consistent brightness without the hassle of replacing batteries. Many safes include a factory power access hole, often near the back or bottom, specifically for a dehumidifier rod or accessory wiring. That opening can usually be used to route the LED power cable cleanly into the interior without drilling new holes or compromising the safe body.
If your safe does not have a power pass-through, battery-powered LED kits can still be a useful option, especially for renters or anyone who wants a quick, no-drill upgrade. The tradeoff is convenience versus maintenance. Battery systems are easier to install, but they may dim over time, require more frequent replacement, and can be less dependable if the safe is accessed regularly. For a safe used for defensive firearms or emergency gear, reliability matters, so a stable wired connection is generally preferable.
When selecting a power source, match the voltage and wattage requirements of the LED strip. For example, if you are using a 12V strip, use a 12V adapter with enough amperage to handle the full length of the lighting run. It is always better to have a little extra capacity than to run an undersized adapter. Also, keep wiring neat and protected. Route cables along interior seams or edges, secure them with clips or adhesive mounts, and avoid placing wires where rifles, shelves, or door organizers might snag them. A clean power setup not only looks better but also makes the lighting system more dependable over time.
Where should LED strips be installed inside a gun safe for the best visibility?
The most effective placement is usually around the door frame and along vertical interior edges, not just on the ceiling of the safe. A single light mounted at the top often creates harsh shadows below shelves and behind long guns, which defeats the purpose of the upgrade. By placing LED strips down both sides of the interior opening, and sometimes across the top as well, you create a more balanced light pattern that reaches deeper into the safe. This makes it easier to identify firearms, optics, magazines, documents, and accessories quickly without having to move everything around.
For safes with adjustable shelving or door storage panels, think in zones. The long-gun section benefits from vertical strips mounted near the front corners. Shelf compartments may need additional short runs under shelf lips or along side panels. Door organizers can cast shadows onto the main interior, so lighting on the hinge side or latch side can help reduce those dark pockets. The goal is not simply to add more light, but to place it so the light spreads across surfaces instead of shining directly into your eyes.
Before permanently sticking anything down, test the layout. Temporarily hold the strips in place with painter’s tape, close the door enough to simulate real use, and check whether any gear blocks the light. This step is especially important in safes with scoped rifles, bulk ammo cans, or document pouches that change the light pattern. A few minutes of testing can prevent wasted strip length and produce a much more professional result. Good placement is what turns a basic LED upgrade into a genuinely useful visibility improvement.
What is the best way to install LED strips in a gun safe without damaging the interior?
The safest approach is to use adhesive-backed LED strips or mounting clips and install them on clean, dry interior surfaces without drilling into the safe walls. Most quality LED strips come with peel-and-stick backing, but preparation is what determines whether they stay in place. Wipe the mounting surface with isopropyl alcohol first to remove dust, oil, and factory residue. Let it dry fully before applying the strip. This is especially important on carpet-lined or textured interiors, where direct adhesion may be weaker and clips or channel mounts may be a better solution.
If your safe interior is carpeted or felt-lined, many owners find that adhesive alone is not enough. In that case, use light-duty mounting clips, adhesive cable tie bases, or aluminum channels designed for LED tape. Channels offer an extra advantage because they protect the strip, improve appearance, and can soften the light with a diffuser. That said, keep the installation as low-profile as possible so it does not interfere with firearm stocks, barrel rests, shelves, or door pockets. Avoid routing strips where they may be rubbed by stored items every time the safe is opened.
You should also avoid modifications that could affect the safe’s fire lining, body integrity, or warranty. Drilling through the safe wall is rarely necessary for a lighting project and is generally not recommended unless the manufacturer explicitly allows it. Use existing pass-through openings whenever possible. A clean DIY installation should look intentional, stay secure in changing temperatures, and remain easy to service later if a strip segment or switch needs replacement. Taking a little more time during installation usually leads to a much better result than rushing to get lights up in a single pass.
Should you use motion sensors, door switches, or always-on lighting in a gun safe?
For most gun safes, a door-activated switch or motion sensor is the best choice because it provides instant illumination only when needed. That gives you the convenience of an automatic lighting system without unnecessary power draw or battery drain. A magnetic door switch is one of the most popular options because it turns the LEDs on when the door opens and off when it closes, creating a simple and dependable user experience. This is especially useful for deep safes where immediate visibility matters for fast access to firearms, documents, or emergency equipment.
Motion sensors can also work well, particularly in battery-powered setups, but they are usually best in safes where the sensor has a clear line of detection and where slight delays are acceptable. Some motion units can be overly sensitive or may not trigger consistently if items block the sensor. A pin switch or plunger-style door switch is another solid option, though installation may be a little more involved depending on the safe’s layout. The right choice depends on how often the safe is opened, how quickly you need light, and whether you want a custom or plug-and-play solution.
Always-on lighting is generally the least efficient option unless the system is switched manually and used only during organization or maintenance. While LED strips consume little power and produce very little heat, there is usually no advantage to leaving them on inside a closed safe full time. Automatic controls are more practical and extend the life of the system. For most DIY gun safe lighting projects, the sweet spot is a low-voltage LED strip paired with an automatic trigger, giving you bright, reliable visibility the moment the door opens and darkness again when the safe is secured.