DIY gun safe mods for better ammo storage can turn a crowded steel box into an organized, safer, and more usable system for firearms, magazines, documents, and ammunition. In practical terms, a gun safe modification is any owner-installed change that improves storage, access, moisture control, lighting, security, or interior layout without compromising the safe’s basic fire and burglary protection. Ammo storage, meanwhile, means more than stacking boxes on the floor. It involves controlling humidity, managing weight, labeling calibers clearly, separating defensive loads from training stock, and keeping everything accessible without blocking long guns or door bolts. This matters because poor internal organization causes real problems: crushed cardboard boxes, mislabeled rounds, unstable piles, slow access in low light, and excess moisture that can corrode brass and steel. I have worked on enough safes to know that the factory interior is rarely designed around how people actually store ammunition. Most are built to display long guns, not to handle dense, heavy ammo in a way that remains tidy over time. A thoughtful DIY approach solves that gap while helping owners use the full volume of the safe more effectively.
Good custom and DIY gun safe modifications start with limits, not tools. Every safe has constraints tied to load capacity, shelf strength, door clearance, bolt travel, anchor placement, and fire liner construction. If you ignore those constraints, a simple ammo shelf project can damage fabric panels, strip shelf clips, stress hinges, or interfere with lock operation. The best modifications work with the safe’s existing structure: adjustable shelves, carpeted panels, steel walls, door organizers, dehumidifier ports, and anchor holes. They also account for the nature of ammunition itself. Ammo is compact, but it is heavy. A single .50 cal can full of 9mm can weigh around thirty-five pounds, and rifle calibers add up quickly. That means shelf reinforcement, balanced weight distribution, and labeled containers are not optional details; they are the foundation of a reliable setup. As a hub for custom and DIY gun safe modifications, this guide covers the core decisions, materials, and methods that make better ammo storage possible, while pointing toward the wider ecosystem of upgrades that improve the entire safe.
Start with safe capacity, weight distribution, and a storage plan
The first step in any gun safe ammo storage project is assessing the interior like a load-bearing cabinet, not a closet. Manufacturers often advertise overall volume and gun count, but those numbers say little about shelf strength. In many consumer safes, shelves are MDF or particleboard wrapped in carpet. They look finished, but heavy ammo cans can bow them over time. I recommend pulling everything out, measuring width, depth, and adjustable shelf spacing, and then planning where dense ammunition will sit relative to the safe floor and side walls. Weight belongs low whenever possible. Floor-level storage reduces shelf stress, improves stability, and makes cans less likely to shift if the safe is bumped. It also keeps the center of gravity lower, which matters even more in an unanchored cabinet, though every true safe should be anchored to concrete or a structural floor system.
A practical plan separates contents by use case. Store defensive ammunition where it is visible and quickly reachable, range ammunition in bulk containers below, and specialty loads or hard-to-find calibers in clearly labeled bins higher up. If you own both pistols and rifles, do not bury pistol ammo behind long-gun stocks. Instead, assign zones: lower shelf or floor for bulk cans, mid-shelf for active calibers, door panel for documents or light accessories, and top shelf for infrequently used items. This is also the point to decide what should not live in the safe. Solvents, heavily oiled rags, loose batteries, and anything that off-gasses aggressively can create odor and moisture issues. Better storage is not just about fitting more inside. It is about creating a system that stays organized after repeated use, because the best DIY gun safe modifications are the ones you can maintain without constant reshuffling.
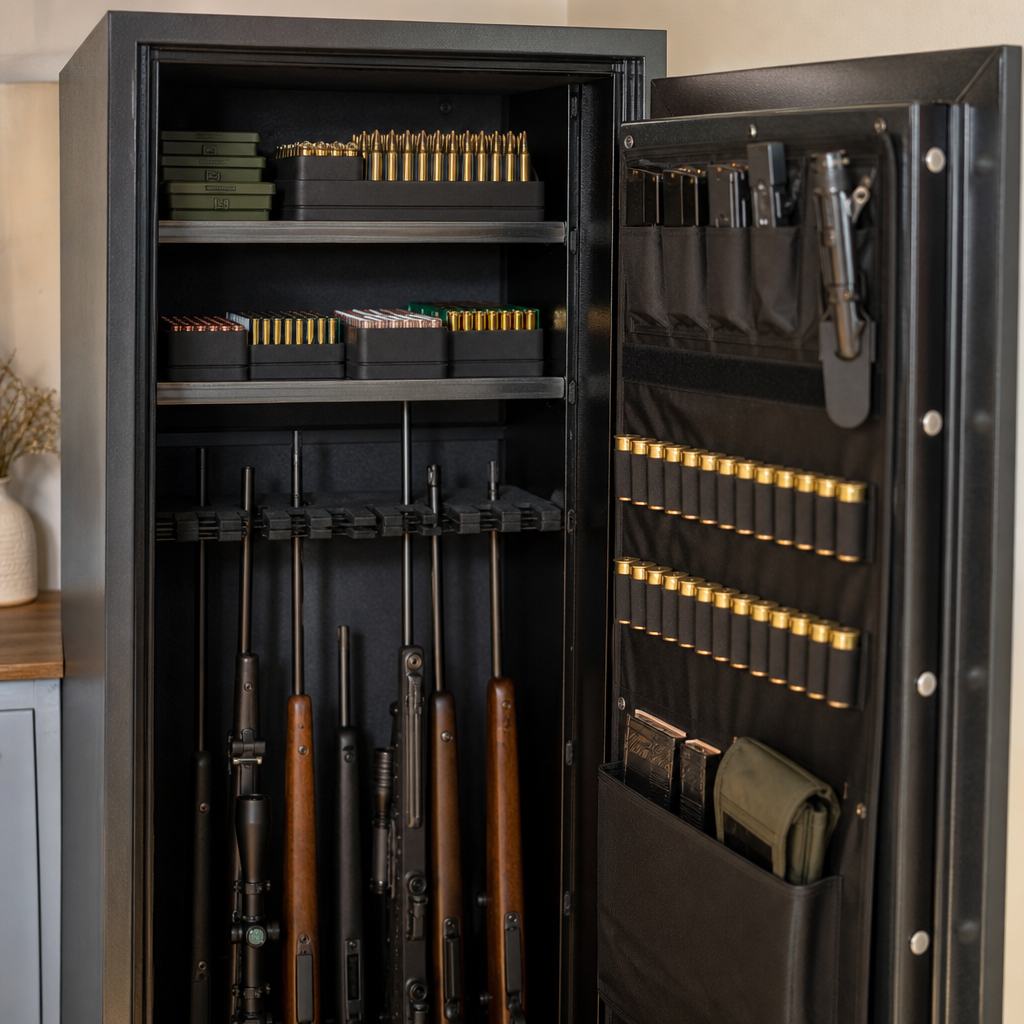
Reinforce shelves and build modular ammo platforms
The most effective DIY modification for better ammo storage is usually shelf reinforcement. Factory shelves often handle light gear but struggle with repeated concentrated loads from metal ammo cans. A simple upgrade is replacing a weak shelf with three-quarter-inch plywood, sealed on all sides with polyurethane to reduce moisture absorption, then wrapped in automotive carpet or bonded felt to protect finishes. If the safe uses side cleats or shelf pins, verify their rating and spread the load across the widest possible contact points. For wider spans, add a front hardwood edge band or a steel angle under the shelf to reduce sag. I have seen inexpensive safes gain years of useful life from nothing more complicated than stronger shelves and better weight placement.
Modular platforms make the layout more flexible. Instead of stacking random boxes, use standardized containers: .30 cal and .50 cal cans, labeled polymer bins, or low-profile trays sized to a shelf. Keep each caliber in one container type whenever possible. Uniform footprints stack more safely and waste less space. For quick inventory checks, place adhesive labels on the top and front of each container with caliber, bullet weight, load type, and quantity. If your safe is deep, build a shallow riser or stepped platform so rear ammo remains visible. A raised rear row prevents forgotten stock and helps rotate older lots forward. For owners with mixed storage needs, a split shelf works well: one side for upright ammo cans, the other for magazines in vertical dividers. That kind of modular thinking turns an ordinary safe into a purpose-built storage system without drilling into the body or affecting the fire liner.
| Modification | Best Use | Main Benefit | Key Caution |
|---|---|---|---|
| 3/4-inch plywood replacement shelf | Bulk ammo cans | Higher load capacity, less sag | Seal wood against humidity |
| Steel angle shelf brace | Wide shelf spans | Improves stiffness | Check door clearance |
| Labeled polymer bins | Loose boxes and mixed calibers | Fast identification | Avoid overloading upper shelves |
| Rear riser platform | Deep safes | Better visibility and stock rotation | Maintain stable footing for containers |
| Floor-level ammo can zone | Heavy reserve ammunition | Best weight distribution | Protect from condensation with matting |
Use the door, side walls, and dead space intelligently
Many safes waste prime space on the inside of the door. A quality door organizer can hold pistol magazines, small boxed ammo, documents, bore lights, and compact accessories, but it should not become a dumping ground for heavy cans. The rule is simple: light items on the door, dense items on reinforced shelves or the floor. If your safe has a factory fabric panel, hook-and-loop pouches are the easiest upgrade. If it has a bare steel door liner, magnetic organizers can work well, though they must not interfere with moving bolts, relockers, or the handle spindle. Before mounting anything, close the door slowly and watch clearances around shelves and long-gun barrels. A pouch that rubs lightly when empty may jam when filled.
Side walls and dead zones near corners are also useful. Magnetic document holders, handgun racks, and slim LED light strips can reclaim narrow spaces that would otherwise do nothing. One of the most practical modifications I recommend is a vertical divider beside the long-gun section for cleaning rods, suppressor accessories where legal, chamber flags, and boxed defensive ammo. Another is a shallow side bin for desiccant packets and spare labels. The goal is to prevent the common “safe floor pile,” where tools, mags, and ammo boxes slide under stocks and become hard to reach. Efficient use of dead space is what separates a basic interior refresh from a true custom gun safe modification. It also supports future internal linking within the broader topic, because lighting, door storage, pistol racks, document protection, and shelf reinforcement are closely related upgrades that work best as a coordinated system rather than isolated add-ons.
Control humidity, temperature swings, and corrosion risks
Better ammo storage is impossible without moisture control. Ammunition is more durable than many people assume, but prolonged humidity and condensation still damage boxes, tarnish brass, corrode steel cases, and can eventually affect primers or projectiles. In my experience, the bigger threat is not constant high heat inside the safe. It is cycling humidity caused by garages, basements, exterior walls, or frequent door openings. The standard solution is combining a low-wattage convection-style dehumidifier rod with rechargeable desiccants or silica gel canisters. The rod gently warms the interior air, reducing relative humidity and helping moisture move toward the desiccant. A hygrometer, preferably digital with min-max memory, tells you whether the setup is working. For most interiors, keeping relative humidity roughly in the forty to fifty percent range is a sensible target.
DIY modifications should support that environment. Line the floor with a rubberized shelf mat or sealed composite panel so metal cans are not sitting directly on carpet over cold steel. Avoid untreated lumber scraps that absorb and release moisture unpredictably. If you use ammo cans with intact gaskets, inspect them periodically; a damaged gasket defeats the whole point of sealed storage. Label the date when desiccants were recharged and set a reminder every few months. Also remember that fire-resistant safes often use gypsum-based liners, and those materials can release moisture after manufacturing or under changing conditions. That is another reason a new safe may feel damp inside at first. Humidity control is not an accessory upgrade. It is part of the core design of any long-term ammo storage system, and every other modification works better when that baseline is handled correctly.
Add lighting, labeling, and inventory control for fast access
Lighting is one of the cheapest upgrades with the biggest payoff. Battery puck lights work in a pinch, but hardwired or rechargeable LED strips with a door-activated switch are better for a gun safe used regularly. Place lights vertically along the door frame or side walls rather than only on the ceiling; top lighting alone creates shadows behind shelves and under long-gun barrels. Good illumination makes caliber labels readable and reduces the chance of grabbing the wrong load. In low light, that matters more than many owners realize. I have reorganized safes where 300 Blackout and 5.56 were stored in similar cardboard boxes with vague handwriting, which is a preventable risk. Clear printed labels on bins, cans, and shelf edges eliminate guesswork.
Inventory control sounds excessive until ammunition starts multiplying across shelves, bags, and range kits. A simple spreadsheet or note app can track caliber, quantity, lot number, and storage location. If you rotate defensive ammunition annually or keep match loads separate from practice stock, inventory becomes part of safety and budgeting, not just neatness. Color coding helps too: one label color for pistol calibers, another for rifle, another for rimfire, and a distinct style for defensive loads. Inside the safe, place active-use ammo at eye level and reserve stock below. Keep the same category in the same place every time. This consistency turns your custom and DIY gun safe modifications into a working system. You stop hunting for boxes, stop forgetting what you have, and reduce duplicate purchases because your organization finally supports accurate stock awareness.
Know what not to modify and when to upgrade instead
Not every idea belongs in a safe. Drilling new holes through the body, cutting into fire liner panels, grinding door interiors, or adding anything that blocks boltwork is a bad trade. Those changes can weaken burglary resistance, void warranties, reduce fire performance, or create lock failures that are expensive to fix. The same caution applies to overloaded door panels and cantilevered shelves. If the safe is already at capacity, forcing more ammunition into it is not efficient; it is a sign that your storage needs have outgrown the interior. In that case, the right answer may be a separate ammo cabinet, a second safe, or a full interior rebuild using stronger materials and a revised layout.
There are also legal and household considerations. Local rules, insurance policies, and common-sense safety practices may influence how ammunition, firearms, and documents should be stored. Households with children, frequent guests, or shared access need stricter labeling and separation protocols, especially for loaded magazines and defensive loads. If you are unsure whether a modification could affect the lock, relocker, or fire barrier, call the manufacturer before starting. The best hub article on custom and DIY gun safe modifications should be honest about this point: some projects are smart weekend upgrades, and some are false economy. Better ammo storage comes from disciplined planning, reinforced shelves, moisture control, lighting, and consistent labeling. Start with one high-impact improvement, test it under real use, and build from there. That measured approach delivers a safer, cleaner, and more dependable gun safe over time.
Frequently Asked Questions
What are the best DIY gun safe mods for better ammo storage without reducing usable space?
The most effective DIY gun safe mods are the ones that create dedicated zones instead of letting ammunition compete with firearms, documents, and accessories for the same floor space. A strong starting point is adding door panel organizers, shelf dividers, and stackable ammo bins so boxed cartridges are stored vertically and visibly rather than piled into unstable towers. Many safe owners also benefit from installing adjustable shelving or retrofitting existing shelves with stronger supports, especially if they plan to store heavier calibers in bulk. Labeling shelves by caliber, intended use, or firearm platform can make a major difference in daily usability and inventory control.
Another smart modification is shifting ammo off the floor of the safe whenever possible. The floor is often where clutter starts, and it can also be a risk area for condensation or unnoticed moisture buildup. Elevated storage trays, wire racks, polymer bins, or reinforced pull-out shelves can help keep ammunition organized and easier to inspect. If the safe interior allows for it, separating defensive ammo, training ammo, and long-term reserve stock into different containers improves access and reduces unnecessary handling. The best DIY setup is usually not the one with the most accessories, but the one that makes every item easy to reach, easy to identify, and easy to keep dry.
How should ammunition be organized inside a gun safe to keep it safe, accessible, and protected from moisture?
Ammunition should be organized with three priorities in mind: stability, visibility, and environmental protection. Start by grouping ammo by caliber and type, then place it in sturdy containers that prevent boxes from collapsing or sliding when the safe door opens and closes. Clear bins, labeled cans, and shelf-edge markers are especially useful because they reduce the need to rummage through the safe. It is also wise to keep frequently used ammunition at chest or waist height, while reserve ammunition can go on lower reinforced shelves. Heavier bulk loads should always be distributed carefully so they do not overstress a single shelf or make the safe interior awkward to navigate.
Moisture control is just as important as physical organization. Ammo should not be pressed against exterior safe walls if condensation is a concern, and it should never sit directly on carpeted floors that may trap humidity. Desiccant packs, rechargeable dehumidifiers, and electric dehumidifier rods are common additions that can help maintain a more stable interior environment. Many owners also use sealed ammo cans with intact gaskets for long-term storage, but those cans should still be checked periodically rather than forgotten in the back corner. A well-organized ammo storage plan not only protects reliability and shelf life, but also makes the safe faster to use and easier to maintain.
Are ammo cans, bins, or shelving systems better for storing ammunition in a modified gun safe?
Each option has strengths, and the best choice usually depends on how much ammunition you keep, how often you rotate it, and how your safe is laid out. Ammo cans are excellent for protecting cartridges from dust, impact, and changing humidity, especially for longer-term storage. They are particularly useful for keeping bulk ammunition consolidated and for separating calibers into clearly defined units. However, they become very heavy very quickly, so they need to be placed on shelves or platforms that can truly support the load. Overusing metal cans in a small safe can also make access more difficult if everything ends up stacked too tightly.
Bins and shelving systems are often better for everyday convenience. Open-top or front-access bins make it easier to grab a few boxes without moving an entire container, while a properly designed shelf system turns dead space into organized storage. For many gun safe owners, the most practical solution is a hybrid setup: sealed cans for deep storage, labeled bins for active use, and reinforced shelving to support both. When planning a DIY modification, think less about one “best” container and more about creating a layered system that matches your habits. If you train often, quick-access bins matter. If you store long-term reserves, sealed cans matter more. If your shelves sag under weight, no container choice will solve the real problem until the structure is improved.
Can adding shelves, lights, or organizers to a gun safe affect its fire protection or security?
Yes, it can if the modifications are done carelessly, which is why thoughtful planning matters. Interior upgrades such as battery-powered lighting, adhesive organizers, shelf kits, and freestanding storage accessories are generally low risk because they do not require drilling through the safe body or altering the door structure. These kinds of mods can greatly improve visibility and organization without affecting the safe’s core protective design. Motion-activated LED lighting, for example, is a popular upgrade because it helps owners identify ammo, magazines, and gear quickly without introducing much heat or requiring invasive wiring.
The real concerns begin when a DIY project involves cutting, drilling, routing wires through the safe body, overloading door panels, or adding materials that trap moisture or interfere with door seals. Any penetration through the safe shell can potentially weaken burglary resistance, affect fire lining performance, or create a path for moisture. Heavy organizers mounted to the door can also strain hinges or alter how the door closes over time. A good rule is to keep modifications internal, reversible, and weight-conscious unless the safe manufacturer specifically allows a more permanent upgrade. The goal is to make the safe more usable, not to compromise the very protections that made it worth buying in the first place.
What mistakes should be avoided when doing DIY gun safe mods for ammo storage?
One of the biggest mistakes is focusing only on capacity and not on weight, airflow, or access. Ammunition is dense, and a shelf that looks strong enough may bow or fail if too much weight is concentrated in one area. Another common error is turning the safe into a tightly packed container where nothing can be inspected easily. If ammo boxes are crammed behind rifles, beneath loose gear, or under unstable stacks of magazines, the safe becomes harder to use and harder to keep dry. Poor labeling is another avoidable problem. Without a system for identifying caliber, load type, and rotation order, even a visually neat setup can become inefficient fast.
Moisture neglect is also a frequent and expensive mistake. Some owners install organizers and containers but do nothing to monitor humidity, check desiccants, or inspect for early corrosion. Others place ammo directly on the safe floor or against interior walls where temperature differences may encourage condensation. It is also a mistake to assume every accessory marketed for safes is suitable for ammunition weight. Cheap adhesive products, weak shelves, and flimsy baskets may fail under real load. The best DIY modifications are simple, durable, and based on realistic use. Before adding anything, think through how the safe opens, how often you access your ammo, what your humidity conditions are, and whether each mod improves both safety and efficiency rather than just making the interior look more full.