DIY gun safe shelving lets you turn wasted vertical space into organized, secure storage for firearms, ammunition, documents, optics, and maintenance gear. Custom gun safe storage racks are aftermarket or homemade additions that change the factory interior layout without compromising the safe’s locking system, fire lining, or structural body. In practice, that means replacing flimsy partitions, adding adjustable shelves, building rifle barrel supports, and creating dedicated spaces for pistols, magazines, suppressors, and valuables that otherwise end up stacked in piles. I have rebuilt several cramped safe interiors for households that outgrew the standard factory setup, and the difference is immediate: easier access, fewer dings on stocks and scopes, and better accountability for every item stored.
This topic matters because most gun safes are sold with generic interiors designed to fit broad price points, not the specific mix of long guns, handguns, optics, and paperwork a real owner keeps. A “24-gun safe” often holds far fewer than 24 long guns once you factor in scoped rifles, sling swivels, bipods, and AR-style magazines. Custom and DIY gun safe modifications solve that mismatch. Good shelving increases usable capacity, reduces clutter, improves visibility, and supports safe handling by preventing unstable leaning or overstacking. Done properly, these upgrades are low-risk, reversible, and cost-effective. Done poorly, they can block dehumidifiers, snag door bolts, stress fireboard, or create accidental contact points that mar finishes. The goal of this hub is to explain how to build DIY gun safe shelving, how to plan custom storage racks, which materials work best, and which modifications belong in a serious gun safe organization project.
Start With a Safe Interior Audit
Before cutting a single board, measure the interior width, depth, height, door swing clearance, and any protrusions such as internal hinges, lock housings, relockers, power outlets, and dehumidifier rods. Count what you actually store, not what the brochure claims the safe holds. Separate long guns by type: scoped bolt actions need more lateral clearance than iron-sighted shotguns, while AR-platform rifles often need room for pistol grips and magazines. Handguns, ammo cans, hard drives, passports, suppressors, jewelry, and cleaning supplies all compete for shelf space. I start every build by emptying the safe, grouping contents on the floor, and noting frequency of access. Daily-carry pistols and important documents go high and forward; seasonal hunting rifles can sit deeper in the layout.
This audit also determines whether you need permanent shelving, modular bins, or a hybrid system. If the safe interior uses carpeted fiberboard panels, avoid driving screws into walls unless the manufacturer explicitly allows it. Many interiors are built around soft liners over sheet metal and fireboard, so mechanical fastening can damage fire protection or create poor anchor points. Free-standing shelf towers, cleat-supported dividers, and compression-fit barrel rests are usually safer choices. Also inspect airflow. GoldenRod dehumidifiers and desiccant packs only work well when air can circulate around contents. Tight, solid partitions can create dead zones where humidity lingers. A good custom gun safe modification improves organization without trapping moisture or interfering with the door seal, locking bolts, or relocker components.
Choose Materials That Are Stable, Soft, and Safe-Friendly
The best materials for DIY gun safe shelving are dimensionally stable, easy to cut accurately, and gentle on firearm finishes. Plywood is the usual winner. Half-inch birch plywood offers a strong balance of rigidity and manageable weight for shelf towers and vertical partitions; three-quarter-inch plywood is better for wide spans carrying dense ammo or boxed valuables. Medium-density fiberboard can look smooth, but it is heavy, sags faster under load, and releases fine dust when cut. Solid pine works for cleats and trim but can warp with humidity changes. Coroplast, EVA foam, closed-cell polyethylene, and automotive headliner material are useful for liners and barrel supports because they cushion contact surfaces without shedding lint aggressively.
Adhesives and fabrics deserve more attention than most guides give them. Solvent-heavy glues can off-gas in a closed safe for weeks, which is not ideal around blued steel, wood stocks, optics coatings, or paper records. Water-based contact cement, low-VOC spray adhesive, and acid-free felt or automotive trunk liner are safer picks. Avoid ordinary household carpet remnants with crumbly backing that traps grit. For shelf edging, iron-on veneer is optional, but a soft wrapped fabric edge is often better because it reduces abrasion. If you use magnets, keep them weak and isolated from electronic media. If you use metal brackets, deburr every edge and cover exposed corners. The safest custom storage racks are usually wood-and-fabric builds with minimal metal inside the storage cavity.
| Material | Best Use | Advantages | Limitations |
|---|---|---|---|
| 1/2-inch birch plywood | Shelf towers, dividers | Strong, stable, easy to upholster | May need edge support on wide spans |
| 3/4-inch plywood | Heavy-load shelves | Better stiffness for ammo and documents | Heavier, reduces interior space slightly |
| EVA or closed-cell foam | Barrel rests, handgun slots | Non-marring, easy to cut | Needs firm backing for structure |
| Automotive trunk liner | Shelf wrap, shelf liners | Durable, low lint, clean appearance | Requires careful adhesive application |
| MDF | Budget prototypes only | Smooth and cheap | Heavy, moisture-sensitive, sags under load |
Build a Simple Shelf Tower First
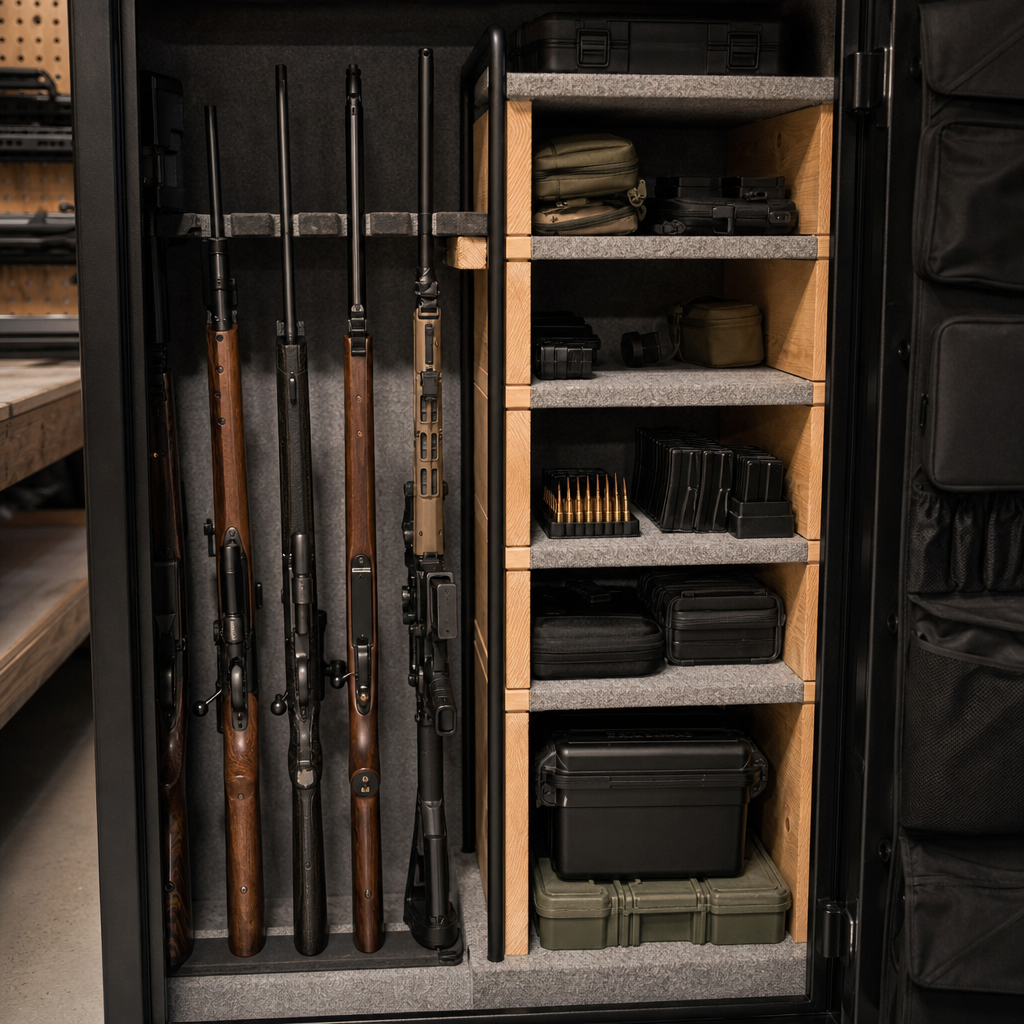
If you want the highest return on effort, build a freestanding shelf tower that occupies one side of the safe while preserving a long-gun bay on the other. This is the foundation of many custom gun safe storage racks because it converts dead side space into stacked utility shelves. A basic tower uses two vertical side panels, a top, a bottom, and several fixed or adjustable shelves. Measure the opening carefully and leave enough clearance to remove the tower without scraping the liner. In a typical 60-inch-tall safe interior, a tower 10 to 14 inches wide and 11 to 15 inches deep works well for pistols, binoculars, ammo boxes, and documents.
Use dados or cleats if you want greater shelf strength, especially for dense loads. For adjustable shelves, drill shelf-pin holes with a jig so rows stay aligned. Cover all visible surfaces with felt, trunk liner, or marine carpet using light, even adhesive coats. Then test fit the tower before loading it. I prefer adding a slightly recessed toe clearance at the bottom so the tower sits flat over the interior lip or carpet bunching that many safes have. Fixed top shelves are ideal for passports, cash boxes, and hard drives, while mid-level shelves can hold pistol stands or labeled bins. A shelf tower also creates a natural anchor surface for side-mounted handgun racks, removable magazine trays, and document cubbies, making it the core module for broader DIY safe organization.
Create Better Long-Gun Capacity With Barrel Rests and Staggering
Most factory gun racks waste space because they assume narrow stocks and no optics. A custom barrel rest can dramatically improve usable capacity. The principle is simple: support each long gun at a repeatable spacing point so scopes and bolt handles do not collide. One common approach is a horizontal plywood strip or foam-backed panel with evenly spaced semicircular cutouts. Another is a stepped rest that alternates depth, letting every other rifle sit slightly forward. This staggered arrangement works especially well for scoped hunting rifles, chassis rifles, and AR-pattern carbines, which otherwise tangle together.
For the lower support, evaluate whether the factory floor rack is helping or hurting. In many safes, replacing the bottom rack with a flatter, padded platform gives more flexibility. You can then use stock blocks, muzzle cups, or hook-and-loop restraints sized to your actual collection. Leave enough vertical clearance so barrels do not contact the top liner under compression. Keep optics from bearing weight against side walls. When clients ask how to fit more rifles in a safe without scratching them, the answer is almost always smarter spacing, not tighter packing. A custom gun safe modification should make every firearm easier to remove one-handed, with the muzzle staying controlled and adjacent guns remaining stable. If you have youth rifles or short-barreled firearms, consider a split-level rack so shorter items are not lost behind full-length guns.
Add Dedicated Storage for Handguns, Magazines, and Accessories
Handguns are where disorganization spreads fastest. Loose pistols, spare magazines, optics plates, holsters, and suppressor tools consume shelf space inefficiently unless each category has a defined home. Pistol racks can be built from plywood dividers wrapped in felt, from foam blocks with cut channels, or from commercial wire-style handgun stands placed on custom shelves. Door panel organizers are useful, but they should never overload the door or interfere with boltwork. Check the manufacturer’s door panel rating and watch for pressure points when the door closes against shelf contents.
Magazines store best in labeled bins or shallow drawers where capacities and calibers stay separated. For example, a carbine owner may dedicate one bin to 5.56 magazines, one to 300 Blackout magazines, and another to pistol magazines to prevent dangerous mix-ups. Small parts should go into transparent latching boxes with desiccant nearby. Accessories such as ear protection, rangefinders, borescopes, and batteries belong in upper shelves away from oils and solvents. One practical rule I use is this: if an item can roll, leak, or get confused for another caliber, it needs containment. That single rule prevents many of the clutter problems owners blame on the safe itself. Custom storage racks are not just about fitting more gear; they establish a repeatable system that reduces handling errors and speeds up inventory checks before a trip to the range or field.
Manage Weight, Moisture, Fire Lining, and Access
The most overlooked part of DIY gun safe shelving is load management. Ammunition is heavy. A single .50-caliber ammo can can exceed 30 pounds depending on contents, and multiple cans on one wide shelf will make weak materials sag. Place the heaviest loads low and close to the safe floor, where the cabinet structure carries them best and tip risk stays low. Store lighter items, paperwork, and handguns higher. If your safe is already near floor load limits in an upstairs room, calculate total mass before adding dense shelving and ammo. Wood, optics, documents, and loaded magazines add up quickly.
Moisture control is equally important. Any custom interior should preserve airflow around a dehumidifier rod or allow room for rechargeable desiccant. Avoid sealing every void with foam or fabric. Leave channels behind towers and under shelves where warm air can move. Never drill through the safe body to mount shelving, run wires, or add hooks; you can void warranties, reduce fire or burglary performance, and invite corrosion at exposed steel. Be cautious when gluing to gypsum-based fireboard liners because surface layers can delaminate under stress. Reversible mounting methods are better. Finally, maintain access discipline. Emergency documents, backup drives, and defensive firearms should remain reachable without unloading half the safe. The best custom & DIY gun safe modifications improve security and efficiency at the same time, rather than maximizing capacity at the expense of practical use.
Plan Modular Upgrades and Know When to Stop
Because this page serves as a hub for custom and DIY gun safe modifications, it helps to think in modules. Shelving is the core project, but related upgrades often include LED lighting, humidity monitoring, removable ammo trays, false-floor compartments, handgun door boards, and labeled archive boxes for records. Build the interior so each module can be removed independently. That makes future changes easier when your collection shifts from hunting guns to tactical carbines, or when optics get larger and old spacing no longer works. A modular approach also supports troubleshooting. If a shelf starts to sag or a door organizer rubs, you can fix one component without dismantling the entire safe.
Know the stopping point. If a modification affects lock mechanisms, door seals, anchoring, structural steel, relocker systems, or fire insulation, it is no longer a simple DIY interior project. At that point, call the safe manufacturer or a qualified safe technician. I have seen owners turn a good organizational idea into an expensive repair by screwing through liners, blocking door bolts with overstuffed pockets, or routing power cables across moving boltwork. Stay inside the boundaries of interior organization, soft-contact storage, and reversible mounting. That is where DIY delivers the most value.
DIY gun safe shelving is one of the smartest upgrades a safe owner can make because it converts a generic interior into a layout built around real firearms, real accessories, and real habits. Start by auditing what you own, measuring the interior carefully, and deciding which items need priority access. Use stable materials such as plywood, non-marring liners, and foam where contact occurs. Build a freestanding shelf tower first, then improve long-gun spacing with custom barrel rests and staggered placement. Add dedicated storage for handguns, magazines, and small accessories so nothing is loose, hidden, or confused. Throughout the project, protect airflow, respect weight limits, and avoid any modification that touches the safe’s structure, lockwork, or fire lining.
The main benefit of custom gun safe storage racks is not simply fitting more inside. It is creating a safer, faster, more accountable storage system that protects finishes, reduces handling friction, and keeps critical items easy to find. A well-planned interior makes routine use smoother and long-term storage more dependable. If you are building out a broader safe organization plan, start with shelving, document your dimensions, and expand one modular upgrade at a time.
Frequently Asked Questions
What materials work best for DIY gun safe shelving and custom storage racks?
The best materials are the ones that balance strength, moisture resistance, ease of cutting, and protection for your firearms. For most DIY gun safe shelving projects, plywood is the top choice because it is stable, widely available, and strong enough to support ammunition, pistols, optics, and documents without sagging when properly supported. Cabinet-grade plywood, typically in 1/2-inch or 3/4-inch thickness, is especially useful because it has a smoother finish and fewer voids than cheap construction panels. Medium-density fiberboard can look clean and cut neatly, but it is heavier, more vulnerable to moisture, and not ideal in a safe environment where humidity control matters. Solid wood can work for trim, cleats, and decorative face frames, but plywood is usually more practical for the main shelves and dividers.
For shelf coverings and firearm contact points, soft protective materials are just as important as the structural parts. Automotive carpet, felt, closed-cell foam, and marine vinyl are commonly used to line shelves, barrel rests, and pistol racks. These help prevent scratches on blued steel, wood stocks, and optics housings. If you are building rifle supports, a wood or plywood frame wrapped in foam and fabric works well because it protects barrels while keeping long guns upright and separated. Avoid rough fabrics that trap debris or coatings that can off-gas strong chemicals in a confined space. Low-odor adhesives and staple-fastened fabric are usually safer choices.
Hardware selection matters too. Adjustable shelf pins, aluminum standards, screws, wood glue, and small angle brackets can make a DIY setup stronger and more adaptable. If you want a non-permanent installation, build the shelving as a freestanding insert that fits tightly inside the safe rather than fastening into the steel body. That approach helps preserve the factory interior and reduces the chance of interfering with fireboard or inner wall panels. In short, a smart combination of plywood, protective lining, and simple hardware usually gives the best result: durable custom gun safe storage that looks clean, functions well, and does not compromise the safe itself.
How do you add shelves and storage racks without damaging the safe’s locking system, fire lining, or structural body?
The safest approach is to treat the gun safe interior like a finished enclosure rather than a framing cavity. In other words, do not drill into the walls, door frame, ceiling, or floor unless the manufacturer specifically states that certain mounting points are safe to use. Many safes include fire-resistant board behind interior fabric panels, and drilling in the wrong place can weaken that barrier, create pathways for moisture, or in the worst case interfere with lockwork, relockers, or moving bolts. A much better method is to build custom shelving as a drop-in or friction-fit insert. This means measuring the interior carefully, then constructing a cabinet-style organizer that sits inside the safe and uses its own vertical sides, shelves, and supports to hold weight.
Freestanding inserts are ideal because they let you completely change the layout while preserving the original shell of the safe. You can design one side for rifles with a barrel rack and buttstock base, and the other side for adjustable shelves that hold ammo cans, handguns, ear protection, cleaning supplies, and important papers. If your safe already has removable factory partitions, you can often use those as templates for new pieces. Some DIY builders also use cleats, spacer blocks, or tensioned side panels that stay in place from a snug fit rather than screws into the safe body. This gives you stability without permanent alteration.
It is also important to leave clearance around door bolts, hinges, internal lock covers, and dehumidifier cords. Before finalizing your design, open and close the door several times and verify that nothing projects into the path of the locking bars or door seal. If you use adhesive-backed accessories, apply them only to approved surfaces such as removable fabric panels, not unknown hidden structural layers. The goal is to improve organization without affecting security, fire performance, or the mechanical operation of the safe. When done correctly, custom racks and shelving enhance storage while leaving the locking system and safe body fully intact.
What is the best layout for organizing rifles, pistols, ammunition, documents, and accessories inside a gun safe?
The best layout depends on what you own and how often you access it, but the general rule is to organize by size, weight, and frequency of use. Long guns usually belong in a dedicated vertical section with a stable buttstock platform and a barrel support near the top. This prevents crowding, keeps optics from bumping into one another, and makes each rifle easier to identify and remove. If you have scoped rifles, staggered spacing or notched barrel rests with wider intervals can prevent scope turrets and bolt handles from colliding. For shorter firearms and defensive handguns, shelves or angled pistol racks near chest height are usually more convenient than stacking cases on the floor of the safe.
Heavy items such as ammunition should generally be placed on lower shelves to keep the center of gravity down and reduce stress on upper panels. Ammo can get surprisingly heavy, so shelf depth and material thickness matter. Reinforced lower shelves with center supports are a smart addition if you store multiple calibers or bulk quantities. Documents, passports, cash, and heirlooms are best stored in dedicated bins, file pouches, or fire-rated document sleeves positioned away from oily cleaning supplies. Optics, suppressor accessories where lawful, magazines, range gear, batteries, and maintenance tools should each have dedicated zones so they do not migrate into firearm space and create clutter.
A highly functional safe layout also accounts for real-world access. Frequently used firearms should not be blocked behind hunting rifles you only handle once a season. Defensive items, if legally and practically appropriate for your household, should be quick to reach while still secured. Adjustable shelving is especially valuable because collections change over time. You may add a scoped rifle, switch to storing more handguns, or need extra room for paperwork and valuables. The most efficient custom gun safe storage systems are modular: they use removable dividers, movable shelves, pistol pegs, bins, and labeled sections so the interior can evolve without a complete rebuild.
How do you measure and plan a custom gun safe shelving project so everything fits correctly?
Accurate planning starts with measuring the true interior, not just the exterior dimensions listed by the manufacturer. Safe interiors are often narrower near door frames, shallower at certain heights, or partially obstructed by hinge covers, carpeting, door organizers, electrical outlets, or dehumidifier rods. Measure width, depth, and height in multiple places, and note any protrusions or tapering. It is a good idea to sketch the safe interior on paper and mark obstacle locations, including door swing clearance and lock bolt travel zones. If removable factory shelves or partitions are present, take them out and measure them too, since they can provide a useful reference for thickness and spacing.
Next, inventory what you actually need to store. Count the number of rifles, note which ones wear scopes or bipods, estimate ammunition weight, and identify whether you need room for pistol cases, magazines, paperwork, jewelry, or maintenance kits. This step matters because a layout that looks good on paper can fail quickly if one shelf is overloaded or if scoped rifles need more spacing than expected. Many DIY builders make cardboard templates or mock-up shelves before cutting plywood. That extra step can save time and material because it reveals clearance issues early. Testing a cardboard barrel rack or shelf divider inside the safe is much easier than recutting finished wood.
When planning dimensions, build in small tolerances. A shelving insert that is exactly the same width as the tightest interior point may bind during installation, especially once fabric or carpet is added. Leaving a little room for fitment is smart, but not so much that the insert shifts around. Also think about future flexibility. Adjustable shelf pin holes, removable bins, and replaceable barrel supports make the setup far more useful over time. The most successful DIY gun safe shelving projects come from careful measuring, realistic load planning, and a design that respects both the physical limits of the safe and the changing needs of the collection.
How can you control moisture and protect firearms after installing custom shelves inside a gun safe?
Moisture control is essential because better organization does not help much if rust, mildew, or stock damage develops inside the safe. Custom shelving can actually improve air circulation when designed well, but it can also trap humidity if shelves are packed too tightly or lined with materials that hold moisture. Start by using dry, fully cured materials. If you paint, stain, or glue components, let them air out completely before placing them in the safe. Fresh finishes can release fumes in a sealed environment, and damp wood products can add unnecessary humidity. Whenever possible, use low-odor finishes and breathable protective coverings instead of thick materials that trap condensation.
Active humidity management is still important after the shelving is installed. A dehumidifier rod, rechargeable desiccant unit, or other safe-appropriate moisture control product helps maintain a stable interior environment. The right choice depends on your climate and whether the safe has power access. In humid regions, combining a heat-based rod with desiccant can be especially effective. You should also avoid overpacking the safe. Leaving some air gaps between rifles, ammo containers, and shelf contents allows conditioned air to circulate more evenly. This is one