DIY gun safe ventilation upgrades for temperature control help owners protect firearms, optics, documents, and ammunition from the two enemies that quietly do the most damage inside a closed steel box: heat buildup and trapped moisture. In practical terms, ventilation means creating a controlled path for air movement, while temperature control means limiting the swings that push metal surfaces below the dew point and trigger condensation. I have worked on safes in garages, closets, basements, and workshops, and the pattern is consistent: most problems blamed on “humidity” actually begin with poor air exchange, bad safe placement, and unchecked temperature differentials. A gun safe is not a climate-controlled vault by default. It is an insulated or semi-insulated enclosure with door seals, steel walls, and very little natural circulation.
That matters because corrosion starts early, wood stocks swell and shrink, adhesive-backed organizers fail, battery-powered optics age faster in heat, and paperwork can mildew long before rust becomes visible. Temperature control is also part of everyday usability. A safe that smells stale, feels damp, or runs too warm around electronics is harder to trust. The good news is that DIY gun safe ventilation upgrades can solve a large share of these issues without compromising security, provided the work is planned around airflow, power routing, fire protection, and warranty limits. This hub covers the core modification paths, when each makes sense, and how they connect to broader custom and DIY gun safe modifications such as lighting, electrical pass-throughs, insulation improvements, door panel systems, and sensor integration.
Why Temperature Swings Damage Contents Faster Than Most Owners Realize
The key concept is not absolute temperature alone but temperature change relative to moisture in the surrounding air. When a safe sits in a garage that warms during the day and cools quickly at night, the steel shell can drift below the dew point. Moisture in the air then condenses on the coldest surfaces, often barrel exteriors, scope tubes, hinges, and the back wall. In my experience, this is why a firearm can rust in a “dry” safe located in a humid region or an unconditioned space. The problem is amplified when the safe is packed tightly, because stagnant pockets form behind long guns and under shelves.
Gun owners often use desiccants or electric dehumidifier rods, and both can help, but neither is a full substitute for airflow strategy. Desiccants absorb moisture until saturated and require regeneration or replacement. Heating rods raise internal temperature slightly to discourage condensation, but they do not remove trapped hot air near the top of the safe and they do not equalize conditions if the safe sits against a damp concrete wall. Ventilation upgrades work best when they are designed to support these tools: moving air gently, reducing hot spots, and creating a predictable path from intake to exhaust without turning the safe into a dust collector.
Start With Placement, Seals, and Baseline Measurements
Before cutting, drilling, or wiring anything, establish a baseline. Place a digital thermo-hygrometer inside the safe and another outside it. Models from Govee, SensorPush, and ThermoPro make trend tracking easy, and a week of readings usually tells the story. Compare daytime peaks, overnight lows, and relative humidity swings. If the safe is on bare concrete, add a sealed riser or rubber isolation feet. If it is pressed tightly against an exterior wall, leave an air gap so the steel back does not mirror wall temperature. If the room itself is uncontrolled, no internal fan will completely overcome that environment.
Inspect the door seal, factory cable ports, and anchor holes. Many owners discover that a safe already has a pass-through hidden behind shelving or carpet. Using an existing port is almost always better than drilling a new hole because it preserves fire lining and reduces warranty concerns. Check whether shelving blocks upper corners where heat accumulates. A simple reconfiguration can improve natural convection. Also inventory what you store: long guns, optics, paper documents, rechargeable devices, and ammunition all react differently to heat and moisture. Good ventilation design starts with the actual load inside the safe, not a generic assumption about empty volume.
Choose the Right DIY Ventilation Upgrade for the Safe and Room
Not every safe needs active ventilation. In a conditioned interior closet, a dehumidifier rod plus smart monitoring may be enough. In a detached garage, active intake and exhaust may be justified. The best DIY gun safe ventilation upgrades are modest, quiet, and directional. You want slow, consistent air movement, not high-CFM turbulence. Computer-style DC fans are ideal because they are compact, inexpensive, and available in quality versions from AC Infinity, Noctua, and Arctic. Pair them with a fused low-voltage adapter and, if possible, a thermostat or hygrostat controller so they run only when needed.
| Upgrade option | Best use case | Main benefit | Main limitation |
|---|---|---|---|
| Dehumidifier rod only | Conditioned room, mild humidity | Reduces condensation risk with simple installation | Minimal airflow, no hot-spot removal |
| Internal circulation fan | Packed safe with stagnant zones | Evens out temperature inside the enclosure | Does not exchange air with room |
| Exhaust fan through factory port | Warm upper safe, existing pass-through | Removes trapped heat efficiently | Needs intake path to work well |
| Intake and exhaust fan pair | Garage or basement installations | Creates controlled air path and faster stabilization | More wiring, more dust management |
| Room dehumidifier plus safe monitoring | Very damp environments | Treats root cause, not just the safe interior | Higher energy use and room noise |
For most owners, the sweet spot is an internal circulation fan combined with a low-wattage heating rod and sensor-based monitoring. For harsher spaces, add a quiet exhaust fan near the top using the factory access port, then allow makeup air to enter from a lower gap or secondary port fitted with a dust screen. If you move enough air to equalize temperature but not enough to constantly pull in humid outside air, the safe becomes easier to control.
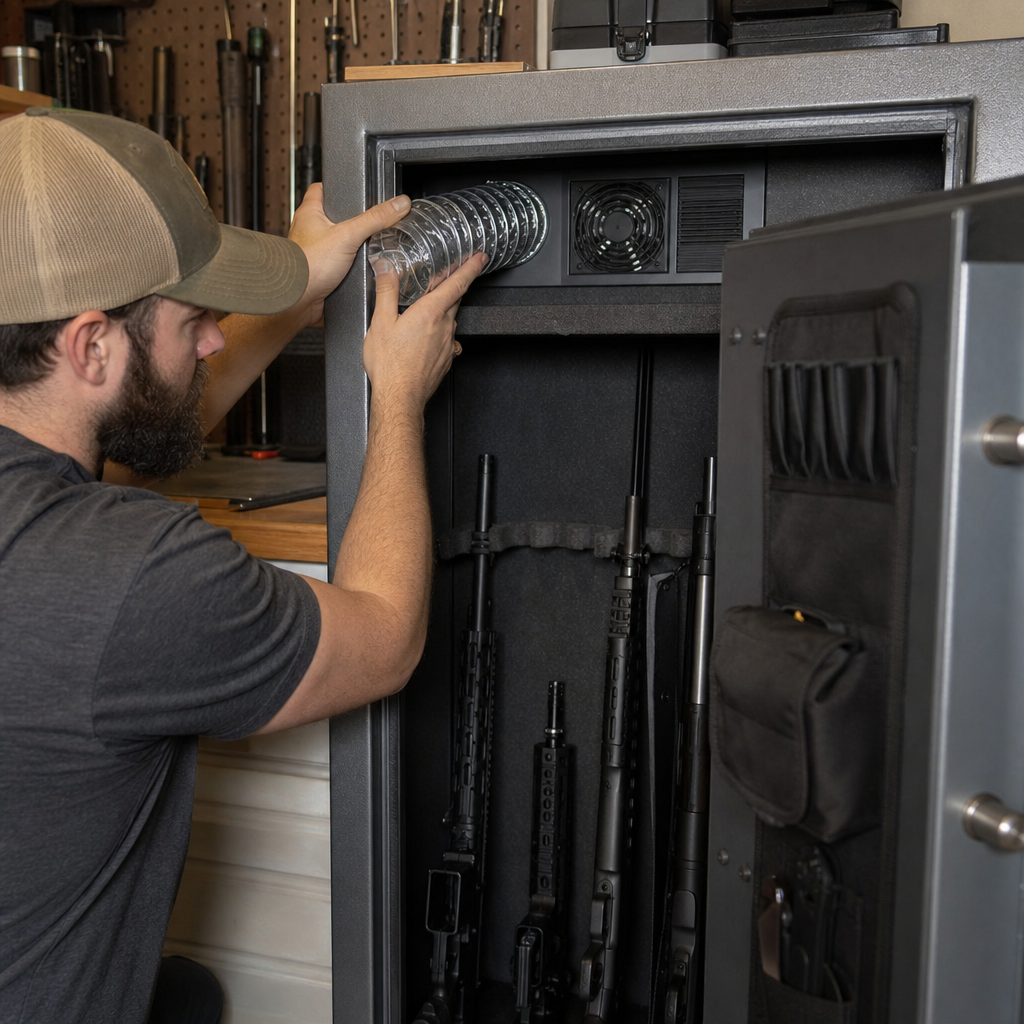
How to Add Fans Without Undermining Security or Fire Protection
The safest rule is simple: use existing penetrations first. Factory-installed electrical pass-throughs are designed for accessories and are usually lined or capped in a way that limits damage to fireboard and upholstery. If your safe has one, route a low-voltage cable through it, not a household extension cord jammed around the door seal. Inside the safe, mount fans with magnetic brackets, industrial hook-and-loop, or short fasteners only where you are certain there is no wiring, relocker, or fire lining behind the panel. I prefer reversible mounting whenever possible because layouts evolve as collections change.
If no pass-through exists, review the manufacturer’s documentation before drilling. Some safes use composite fire lining that loses integrity when punctured, and many warranties are voided by owner-made holes. Security matters too. A poorly placed vent can become a pry point, a moisture ingress point, or a path for sparks and dust. If drilling is unavoidable, choose a protected side or rear location inaccessible when the safe is installed, use a tight grommet, fit metal mesh, and seal exposed edges against corrosion. Keep openings small and purposeful. The goal is controlled ventilation, not turning the safe into a cabinet with decorative louvers.
Build an Effective Airflow Path: Intake Low, Exhaust High
Heat rises, so the most effective pattern usually pulls cooler air in low and removes warmer air high. In a gun safe, that often means an exhaust fan mounted near an upper corner and an intake path near the lower opposite side. This diagonal path sweeps across shelves, long-gun barrels, and dead zones behind door organizers. If you use only one fan, make it an exhaust fan near the top. That setup encourages passive intake through available gaps and generally controls heat better than a low-mounted intake fan alone.
Fan size should match enclosure volume and restriction. Most residential safes do not need anything close to server-rack airflow. A quiet 80 mm or 120 mm fan moving roughly 20 to 50 CFM is often enough, especially when controlled by a thermostat or timer. Excessive airflow can backfire by drawing dusty or humid room air continuously. Add a washable dust filter on the intake side if the safe lives in a garage or workshop. Keep wiring tidy with adhesive cable clips rated for metal surfaces, and leave enough slack for shelf adjustment. Airflow works only when it can move around contents, so avoid stuffing soft cases, paperwork, or bulk ammo directly against fan outlets.
Pair Ventilation With Heating, Desiccation, and Smart Monitoring
The strongest DIY setups combine methods. A GoldenRod or similar low-wattage heater keeps interior surfaces slightly warmer than surrounding air, which reduces the chance that steel drops below the dew point. A fan then distributes that gentle warmth so it does not stratify near the bottom or remain trapped behind long guns. Rechargeable silica canisters provide backup moisture capture during seasonal spikes or power outages. None of these tools replaces room-level climate control in a severely damp basement, but together they create a stable microclimate.
Monitoring closes the loop. A Bluetooth or Wi-Fi sensor lets you confirm whether modifications are working instead of guessing from smell or touch. I look for two outcomes: lower daily temperature swing inside the safe and relative humidity that stays in a safe band for steel and wood, commonly around 40 to 50 percent. Brief excursions are usually less important than repeated condensation events. Smart plugs can automate fans based on schedule, while dedicated controllers can trigger them when temperature or humidity rises past a threshold. That kind of automation is one of the most useful custom gun safe modifications because it turns passive protection into measurable control.
Integrating Ventilation With Other Custom Gun Safe Modifications
This subtopic goes beyond fans. Ventilation upgrades connect directly to lighting, power management, organization, and insulation changes. LED light strips, for example, add visibility but also a small heat load, especially if drivers are mounted inside the safe. Rechargeable task lights avoid wiring complexity but need periodic charging. Door panel organizers improve storage density, yet they can block natural convection near the door and create hidden stagnant pockets behind holsters and document pouches. Shelf retrofits made from sealed plywood or steel mesh can either improve airflow or choke it, depending on spacing and orientation.
That is why this article serves as a hub for custom and DIY gun safe modifications. When planning any change, think in systems. If you add interior outlets for charging optics or radios, account for heat. If you line shelves with thick foam or fabric, account for reduced air movement. If you insulate a safe more aggressively, understand that insulation slows heat transfer but does not eliminate moisture risk. The best modifications work together: a clean cable pass-through, low-heat LED lighting, sensor-driven ventilation, a heating rod, thoughtful rack spacing, and room-level humidity control when needed. Each improvement is small; the combined effect is significant.
Common Mistakes, Maintenance, and When DIY Is Not the Right Choice
The most common mistake is treating rust prevention as a one-product problem. Owners buy desiccant, forget to recharge it, and assume the safe is protected. The second mistake is over-ventilating in a bad room. If the surrounding space is hot and humid, a powerful fan may simply pull worse air into the safe faster. Another frequent error is routing cords through the door jamb, which can damage seals and create pressure points. I also see fans mounted with weak adhesives that fail in summer heat and drop onto firearms. Use hardware and adhesives rated for the environment and test them unloaded before trusting the setup.
Maintenance is simple but not optional. Clean intake filters, verify fan operation, inspect wires for abrasion, and review sensor logs through seasonal changes. Replace noisy sleeve-bearing fans with quality fluid-dynamic-bearing models if the safe runs often. If you notice persistent readings above target despite upgrades, step back and address the room: seal the garage, run a dehumidifier, or relocate the safe. DIY is not the right choice when modifications would violate fire rating requirements, void a high-end safe warranty, or require drilling near lockwork and relockers. In those cases, use manufacturer-approved accessories or hire a safe technician.
DIY gun safe ventilation upgrades for temperature control work because they address the real mechanism behind corrosion and stale interiors: unstable conditions inside a sealed metal enclosure. The practical sequence is straightforward. Measure first, improve safe placement, use existing pass-throughs, create gentle airflow, and combine ventilation with heat, desiccation, and sensors. For most owners, that delivers better protection than relying on a single product and hoping for the best.
As the hub for custom and DIY gun safe modifications, this topic should guide every future upgrade you make. Lighting, power access, shelving, door organizers, insulation, and monitoring all affect temperature and moisture behavior. Plan them together, not as isolated add-ons. If you want the best next step, start by logging temperature and humidity in your safe for one week, then choose the smallest ventilation upgrade that solves the actual problem. That measured approach protects your firearms, preserves your safe, and makes every later modification smarter.
Frequently Asked Questions
What is the main goal of a DIY gun safe ventilation upgrade for temperature control?
The main goal is to reduce the conditions that cause condensation, rust, mildew, and long-term damage inside a gun safe. Many owners assume the problem is simply “too much humidity,” but in real-world storage, temperature swings are often what trigger moisture to become dangerous. When the air inside a safe warms up and cools down faster or slower than the steel walls and the items stored inside, metal surfaces can drop below the dew point. Once that happens, moisture condenses on firearms, optics, magazines, and other valuables. A ventilation upgrade helps create more stable internal conditions by encouraging controlled air movement rather than allowing hot, stale, damp air to sit trapped in a sealed steel box.
In practical terms, a good DIY setup works by balancing airflow, temperature moderation, and moisture management. That might mean adding a low-power fan, improving intake and exhaust paths, using a dehumidifier rod, or routing air through existing access ports without compromising security. The objective is not to turn the safe into an open-air cabinet. It is to manage the internal environment so temperature swings are less severe, humidity does not accumulate in dead zones, and the contents remain dry and stable over time. This matters especially in garages, basements, closets against exterior walls, and other locations where ambient conditions change throughout the day.
Do I need active ventilation with fans, or is passive airflow enough for a gun safe?
That depends on where the safe is located and how severe the temperature and humidity swings are in that space. Passive airflow can be enough in a climate-controlled room where the safe is opened regularly, the surrounding air stays relatively stable, and a dehumidifier rod or desiccant system is already doing most of the moisture control. In those situations, simply improving circulation through an existing cable pass-through or vented accessory port may help prevent stagnant pockets of air without adding much complexity. Passive strategies are usually quieter, simpler, and easier to implement while preserving the original structure of the safe.
Active ventilation becomes much more useful when the safe sits in a garage, basement, workshop, or other area with large temperature swings and higher moisture loads. A small fan can move air more consistently and reduce hot spots near the top of the safe or damp corners near the floor. It can also help distribute warmth from a dehumidifier rod more evenly, which improves the rod’s effectiveness. That said, fan power should be modest. You do not want aggressive airflow pulling large amounts of humid room air into the safe all day long. The best DIY systems use gentle, continuous or thermostat-controlled circulation and pair that airflow with a moisture-control method. In other words, fans are not a substitute for dehumidification, but they can make a good humidity-control strategy work better.
What are the safest ways to add ventilation without weakening the safe or hurting fire protection?
The safest approach is to use existing openings first. Many gun safes already have a power cord pass-through, anchor bolt hole, accessory port, or interior channel that can be adapted for controlled airflow. If you can route wiring for a fan or dehumidifier through a factory opening, that is usually better than drilling new holes. It reduces the risk of damaging fire lining, compromising warranty coverage, creating security concerns, or exposing bare metal edges that could later rust. For many DIY upgrades, a small fan mounted internally near an existing pass-through and paired with a filtered intake path is more than enough to improve circulation.
If a modification is necessary, plan it carefully and understand the construction of the safe before cutting anything. Some safes use layered steel, gypsum-based fireboard, and interior paneling that can all be affected by drilling. Poorly placed holes can interfere with locking bolts, relockers, wiring, door seals, and fire insulation. They can also create direct pathways for heat and smoke in a fire. For that reason, many owners avoid drilling the body or door entirely unless they have confirmed what is behind the panel and are comfortable sealing and protecting the opening properly. Any metal edge created during a DIY upgrade should be deburred, primed if needed, and protected with a grommet or trim ring. From a practical standpoint, the best ventilation upgrade is usually the least invasive one that still provides measurable improvement in circulation and temperature stability.
How do ventilation, dehumidifier rods, and desiccants work together inside a gun safe?
They each do a different job, and the most reliable setup usually combines them. Ventilation moves air so moisture does not stay trapped in stagnant pockets. A dehumidifier rod gently warms the air at the bottom of the safe, encouraging convection and helping keep internal surfaces slightly above the point where condensation would form. Desiccants absorb excess moisture from the air, which is especially useful in safes that are opened frequently or located in damp environments. When used together, these tools create a more stable microclimate than any single product can deliver on its own.
A common mistake is relying on one method while ignoring the others. For example, a fan alone can circulate humid air but cannot remove moisture from it. A desiccant pack alone can become saturated quickly if the safe is in a humid garage and the door is opened often. A dehumidifier rod alone can help a lot, but if the safe has poor internal circulation, some corners may still stay cooler and more moisture-prone than others. In a strong DIY setup, the rod provides gentle heat, the fan distributes that warmth and evens out the internal temperature, and the desiccant acts as a backup buffer against moisture spikes. This layered approach is especially effective for protecting blued steel, optics with sealed housings, paper documents, wood stocks, and ammunition packaging from slow, cumulative damage.
How can I tell whether my gun safe ventilation upgrade is actually working?
The best way is to measure the internal environment instead of guessing. A compact digital hygrometer and thermometer placed inside the safe will show whether humidity and temperature are staying within a safer, more stable range over time. Ideally, you want to see fewer sharp swings after the upgrade, especially during changes in weather or between day and night. In many setups, consistency matters as much as the exact number. If the safe interior is no longer experiencing dramatic drops that push metal below the dew point, the risk of condensation goes down significantly. A wireless sensor can be especially useful because it lets you check conditions without opening the door and disturbing the environment.
You should also look for practical signs. If the musty smell inside the safe decreases, if silica packs take longer to saturate, if optics remain clear, and if you no longer see faint surface oxidation on lightly oiled metal, those are all good indicators that your system is helping. It is also worth checking for airflow balance. If the fan is running but one area still feels noticeably cooler or stale, you may need to reposition components or improve the intake and exhaust path. A successful DIY ventilation upgrade does not need to be complicated, but it should be tested in real conditions. Monitor it for a few weeks during changing weather, make small adjustments, and aim for stable, repeatable results rather than assuming the first configuration is perfect.