A gun safe protects against theft, but heat is often the faster and more destructive threat. The best DIY methods for fireproofing the exterior of a gun safe focus on slowing heat transfer, protecting seals and hinges, and reducing direct flame exposure without compromising security, warranty terms, or safe operation. In practical terms, exterior fireproofing means adding noncombustible barriers, reflective layers, insulated enclosures, and smart placement around the safe so the steel shell heats more slowly during a house fire.
This matters because many gun owners assume a listed fire rating tells the whole story. It does not. Fire ratings vary by test standard, duration, temperature curve, and whether the rating applies to paper, electronics, or internal temperature limits. I have worked with gun safes in garages, closets, and workshops, and the same pattern shows up repeatedly: location, surrounding materials, and simple retrofit choices can make a meaningful difference even before you buy a higher-rated safe. A budget safe placed on bare concrete against an exterior wall usually performs better than the same safe boxed in by plywood shelving, paint cans, and stacked cardboard.
For readers researching custom and DIY gun safe modifications, this article serves as the hub for the entire subtopic. Exterior fireproofing sits alongside other common projects such as dehumidification upgrades, interior shelving changes, lighting, anchor improvements, door organizer installation, and power pass-through management. Fireproofing deserves hub status because it intersects with all of them. Add a power outlet incorrectly and you create a heat leak. Mount decorative wood around a safe and you increase fuel load. Build a false wall without ventilation planning and you can trap moisture while chasing fire resistance.
The goal is not to turn a residential security container into a commercial fire vault. The goal is to buy time. In most residential fires, every extra minute before interior temperatures spike can help protect stocks, optics, documents, and ammunition packaging. The most effective DIY approach combines four ideas: use materials that do not burn, leave operating clearances so the door and lock work normally, avoid trapping moisture against steel, and reduce the chance that the safe sits in the hottest part of the room. Done correctly, exterior fireproofing is a practical, affordable upgrade that complements the safe you already own.
Understand What Fireproofing Can and Cannot Do
Before adding anything to a gun safe, define the problem correctly. Fireproofing does not mean making the safe immune to fire. Steel conducts heat well, and once the shell absorbs enough energy, the interior temperature climbs. Many factory fire ratings rely on layers such as gypsum-based fireboard, ceramic wool, expanding door seals, and carefully designed air gaps. A DIY project can improve performance, but it cannot reliably reproduce a UL-classified fire test result unless the entire assembly has been tested as a system.
That limitation does not make DIY work pointless. It means you should prioritize methods with predictable value. Noncombustible coverings reduce direct flame contact. Mineral wool and Type X gypsum board slow heat transfer in a surrounding enclosure. Intumescent caulk seals joints that would otherwise channel hot gases. Stand-off spacing behind a radiant barrier can reduce heat gain from nearby flames. These are proven building-fire concepts adapted to gun safe use.
It is also important to protect function. Do not block boltwork access panels, relocker service points, hard plate areas, hinges, anchor holes, keypad battery compartments, or dehumidifier ports. If your manufacturer prohibits exterior coatings or structural modifications, follow that guidance. A voided warranty or a lockout caused by trapped heat around a keypad defeats the purpose of the project.
Choose Safe, Effective Exterior Materials
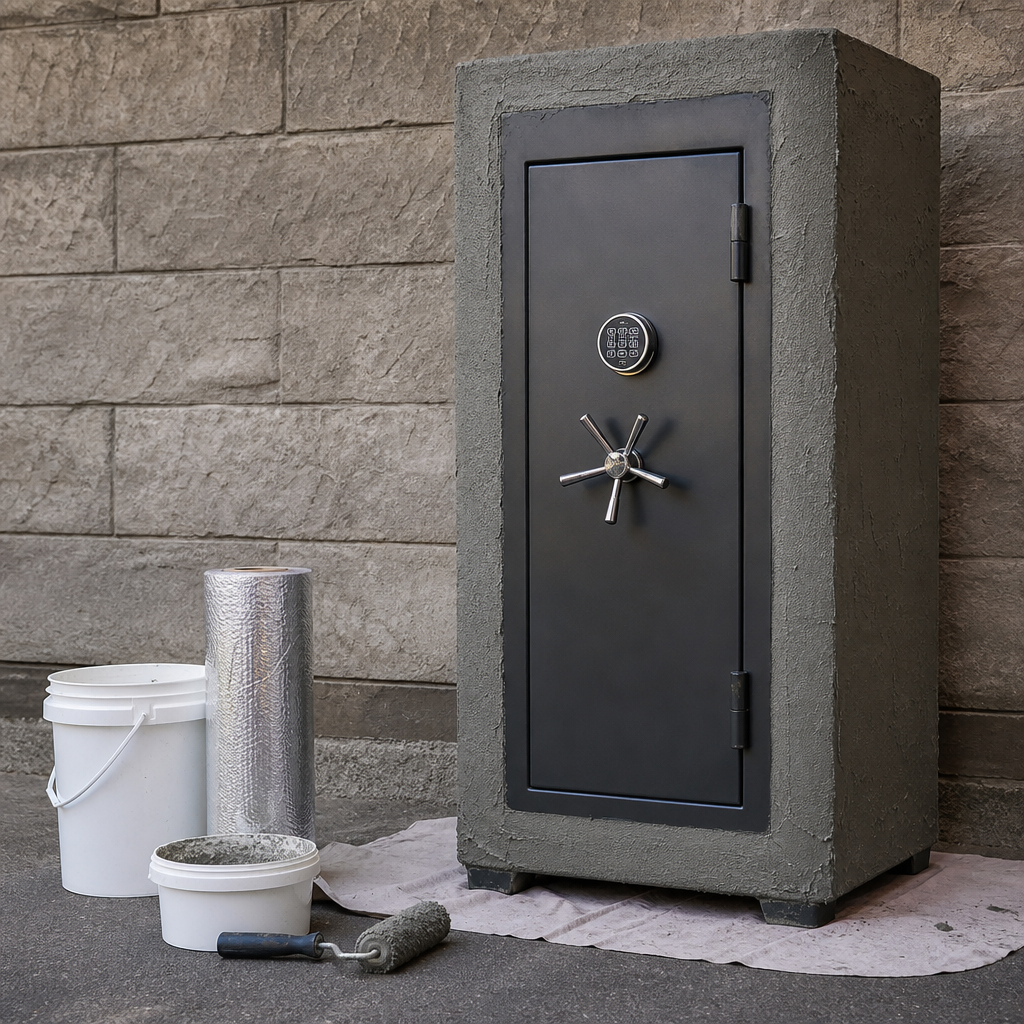
The best DIY materials are noncombustible, dimensionally stable, and easy to source from building-supply stores. Type X drywall is common because its gypsum core contains chemically bound water that slows temperature rise. It is inexpensive and cuts easily, making it useful for building a fire-resistant closet or chase around a safe. Cement board is tougher and less vulnerable to moisture damage, though it is heavier and less insulating than gypsum. Mineral wool board or batts, sold under brands such as ROCKWOOL, perform especially well because they are noncombustible and retain structure at very high temperatures.
For seams and penetrations, use a listed firestop sealant or intumescent caulk rather than generic painter’s caulk. Intumescent products expand when heated and help seal gaps. For radiant heat, a foil-faced barrier can help when installed with an air gap, but foil directly glued to steel offers limited benefit because conduction through the steel remains the main path. High-temperature silicone can be useful around nonmoving trim pieces, but it is not a substitute for a tested door seal.
Avoid products that sound rugged but add little fire resistance. Spray foam is not appropriate near a safe enclosure unless it is a code-compliant fireblocking product with a protected installation, and even then it is usually the wrong choice. Carpet, MDF panels, wood trim, and adhesive acoustic foam all add fuel. Automotive heat mats vary widely; many are designed for vibration damping and moderate heat, not prolonged fire exposure. When in doubt, choose building materials with clear fire-performance data sheets.
Build a Fire-Resistant Surround Instead of Modifying the Safe Shell
The most effective DIY method is usually not coating the safe itself. It is building a fire-resistant surround around it. Think of it as a dedicated closet, alcove, or cabinet chase made from metal studs or minimal wood framing protected by layers of Type X drywall or cement board, with mineral wool in the cavities. This approach preserves safe serviceability and improves protection from both flame and radiant heat.
I recommend maintaining clearance around the safe so air can circulate during normal conditions and the door can open fully. In most projects, a few inches on the sides and top is enough for installation tolerance, dehumidifier routing, and future maintenance. The enclosure should not touch the safe tightly. Contact points create heat bridges and make repainting or moving the safe difficult. If the safe is in a garage, use durable finishes and keep the bottom edge of wall materials off damp concrete.
A simple one-hour-style enclosure concept works well for many homeowners: mineral wool in the stud bays, one or two layers of Type X board depending on space and budget, staggered seams, and firestop sealant at perimeter joints. If you include a door for access, use a solid-core door with rated hardware if possible, or at minimum avoid hollow-core interior doors that fail quickly under heat. The enclosure should still allow anchoring the safe directly to slab or framing as required by the manufacturer.
Use Placement and Room Hardening to Reduce Fire Exposure
Safe placement is a fireproofing method because it changes the heat environment. The hottest conditions in a structure fire often occur where fuel load is highest and ventilation drives flame spread. A gun safe surrounded by shelving, solvents, paint, and lumber in a workshop faces a worse scenario than one placed in a low-fuel closet on a concrete slab. Whenever possible, avoid rooms that store gasoline, propane cylinders, oily rags, or bulk cardboard.
Exterior walls can help if they are not sun-baked and if the location is not vulnerable to hose-stream collapse from overhead contents. Basements often offer thermal advantages because of surrounding earth and concrete, but flood risk and humidity can be severe. Garages are common, yet they are also where many fires start. If the garage is the only option, place the safe away from ignition sources, install it on concrete, and consider adding gypsum protection on adjacent walls and ceiling. Even cleaning up combustible clutter around the safe can change outcomes.
Room hardening matters too. A layer of Type X drywall on nearby walls, replacing combustible shelving with steel shelving, and relocating paint or ammunition packaging can all reduce fire intensity around the safe. If you build a closet for concealment, line it with noncombustible materials rather than plywood. This is also where related custom and DIY gun safe modifications connect: electrical outlets for lights or dehumidifiers should be sealed properly, and any pass-through should be kept as small as practical.
Best DIY Fireproofing Methods Compared
Homeowners usually want to know which upgrade delivers the most protection per dollar and per hour of labor. The answer depends on whether your threat is direct flame, radiant heat, or general room involvement. In most cases, combining several modest measures beats investing in one exotic material. The table below summarizes the methods I see deliver the best real-world value.
| DIY method | How it helps | Best use case | Main limitation |
|---|---|---|---|
| Fire-resistant enclosure with Type X drywall and mineral wool | Slows heat transfer and shields from direct flame | Closets, garages, utility rooms | Requires space and careful access planning |
| Room hardening around the safe | Reduces local fuel load and fire intensity | Garages, workshops, storage rooms | Does not change safe construction itself |
| Stand-off radiant barrier panel | Reflects some radiant heat when an air gap is maintained | Safe near a likely heat source or exposed wall | Less useful against prolonged direct flame |
| Intumescent sealing of enclosure joints | Blocks hot gas entry through cracks | Any custom surround or closet build | Only effective as part of a complete assembly |
| Concrete slab anchoring with noncombustible base area | Keeps safe stable and away from combustible flooring | Garages and basements | Improves exposure conditions more than insulation |
Practical Build Steps for a DIY Exterior Fireproofing Project
Start with documentation. Measure full door swing, handle travel, keypad access, and anchor-bolt locations. Check the manual for service clearances and note where serial labels or battery compartments sit. Then inspect the room for hazards: extension cords, fuel containers, shelving, and water intrusion. Fix these issues before adding materials.
Next, decide whether you are building a surround, hardening the room, or adding a stand-off shield on one side. For most people, a three-sided enclosure plus top shield provides the best balance. Use metal studs if possible, fit mineral wool without compression, and install Type X board with staggered seams. Seal joints with firestop sealant. Keep a removable panel or access route for anchoring and future lock service.
If you add a radiant shield, mount a noncombustible panel with a deliberate air gap rather than gluing reflective foil straight to the safe body. If you paint the exterior, use only coatings rated for the temperature range and compatible with the finish; paint alone is not fireproofing. Finally, test usability. Open the door fully, replace keypad batteries, run your dehumidifier cord, and confirm that humidity does not rise inside the new enclosure.
Mistakes That Ruin Performance or Create New Risks
The most common mistake is trapping moisture. Any exterior fireproofing method that prevents air movement can increase condensation on steel, especially in garages and basements. That leads to rust on the safe body and corrosion on firearms if interior humidity control is weak. Use a hygrometer, maintain dehumidification, and avoid wrapping the safe in impermeable layers that hold damp air against metal.
Another mistake is adding combustible finish materials for appearance. Decorative shiplap, plywood cabinets, and carpeted platforms may look custom, but they increase fire load and often conceal poor clearances. I also see people block ventilation around electronic keypads or route power through oversized holes that compromise the enclosure. Keep openings minimal and sealed.
Finally, do not assume DIY upgrades replace insurance, documentation, and realistic expectations. Fire can damage optics, ammunition packaging, and paperwork even when firearms survive. Photograph serial numbers, store copies off-site, and keep critical documents in a separately rated document safe if needed.
The best DIY methods for fireproofing the exterior of a gun safe are straightforward: reduce surrounding fuel, place the safe intelligently, build a noncombustible enclosure, seal gaps with proper firestop products, and preserve clearances so the safe still works exactly as intended. These measures do not turn a residential gun safe into a laboratory-tested vault, but they do buy time, which is the currency that matters in a fire.
As the hub for custom and DIY gun safe modifications, this topic ties directly to anchoring, power management, dehumidification, shelving design, and concealment builds. Each modification should support the same outcome: stronger protection without introducing new failure points. Fireproofing succeeds when it is treated as part of the whole storage system, not as a single magic layer added to the outside.
If you plan one upgrade this year, start with the highest-value combination: clean the area around the safe, move combustibles elsewhere, and build a properly sealed fire-resistant surround with mineral wool and Type X board. Then review your other gun safe modifications with the same standard. Practical, code-aware improvements beat gimmicks every time.
Frequently Asked Questions
What are the most effective DIY ways to fireproof the exterior of a gun safe?
The most effective DIY approach is to focus on slowing heat transfer rather than trying to make a standard gun safe completely fireproof. In practical terms, that means combining several noncombustible layers and placement strategies so the safe absorbs heat more slowly during a fire. Good options include building a fire-resistant enclosure around the safe with cement board or Type X drywall, adding an air gap between the safe and the enclosure, and using noncombustible insulation such as mineral wool in the surrounding structure. Reflective radiant barriers can also help reduce some heat gain, especially when paired with a ventilated gap, but they work best as part of a system rather than as a standalone fix.
Another smart DIY method is to reduce direct flame exposure by locating the safe away from high-fuel-load areas and away from walls shared with garages, utility rooms, or workshops. A safe placed on a concrete slab, in a basement, or against a masonry wall generally has a better chance of staying cooler than one sitting in a closet full of combustible materials. Protecting vulnerable areas such as door edges, hinges, and gaps is also important, but any added material must not interfere with opening, locking, or anchoring the safe. The best overall strategy is layered: improve the environment around the safe, build a noncombustible exterior buffer, and avoid modifications that trap moisture or damage the finish.
Can I add fireproof insulation or panels directly onto the outside of my gun safe?
Yes, but it has to be done carefully. Attaching materials directly to the outside of a gun safe can help reduce heat transfer, but the wrong products or installation methods can create problems. Noncombustible panels such as cement board may be useful in a surrounding enclosure, and certain high-temperature insulation products can be incorporated into a shield system around the safe. However, directly gluing or fastening materials to the steel shell may affect the safe’s finish, create condensation issues, interfere with the door swing, or even void the manufacturer’s warranty. That is especially true if adhesives are not rated for high heat or if screws penetrate the body of the safe.
In most cases, it is better to build a protective shell around the safe rather than permanently bond thick layers to the safe itself. A freestanding or semi-freestanding enclosure gives you the benefit of insulation and flame resistance without compromising the steel body. If you do add anything directly to the exterior, verify that it is noncombustible, moisture-resistant, and placed clear of hinges, boltwork areas, electronic keypads, vents, and anchoring points. Always check the manufacturer’s guidelines first. A DIY upgrade should improve thermal resistance without creating operational failures or reducing the safe’s reliability when you need it most.
What materials are best for a DIY fire-resistant enclosure around a gun safe?
The best materials are those that are noncombustible, dimensionally stable under heat, and suitable for residential fire-resistant construction. Cement board is a top choice because it handles high temperatures well and does not burn. Type X drywall is another commonly used material because it is designed to resist fire longer than standard drywall and is widely available. Mineral wool insulation is especially useful inside the wall cavities of an enclosure because it is noncombustible, resists high temperatures, and helps slow conductive and convective heat transfer. Together, these materials can create a significantly better thermal buffer around the safe than steel alone.
If you want to go a step further, a layered design often works best. For example, a DIY enclosure might include a stud frame around the safe, mineral wool in the cavities, and one or more layers of Type X drywall or cement board on the outside. Leaving a modest air gap around the safe can also help by reducing direct heat conduction from the enclosure to the safe body. Reflective foil barriers may add value where radiant heat is a concern, but they should be installed correctly with an adjacent air space to be effective. Avoid combustible foam boards, untreated wood interiors close to the safe body, and decorative materials that can ignite or off-gas in extreme heat. The goal is not just insulation, but a durable, heat-resistant assembly that does not interfere with access, anchoring, or ventilation.
Should I try to seal the door edges, hinges, and gaps on a gun safe to improve fire protection?
You can improve protection around vulnerable areas, but this is one of the places where DIY modifications need the most caution. Door seams, hinge areas, and other gaps are natural weak points because heat and smoke can exploit them faster than solid steel surfaces. Some safes already include factory-installed intumescent seals that expand when exposed to heat, helping block smoke and hot gases. If your safe has such a feature, you should not replace, cover, or compress it with aftermarket materials unless the manufacturer explicitly approves it. Improper additions can keep the door from sealing correctly, damage the finish, or interfere with locking performance.
If your safe does not have advanced sealing features, the safest DIY approach is usually indirect protection rather than aggressive door modification. In other words, reduce the temperature and flame exposure around the entire safe so the seals and seams are less stressed in the first place. A fire-resistant enclosure, proper room placement, and noncombustible shielding near the door side can do more good than applying random gasket products. Any sealant or gasket material used near the door must be heat-rated, compatible with metal, and installed so it does not obstruct bolts, hinges, or the latch path. Preserving safe operation is non-negotiable. A gun safe that resists heat but becomes hard to open or fails to lock properly is not a successful upgrade.
Where should I place a gun safe in the home to reduce fire exposure and improve the results of DIY fireproofing?
Placement is one of the most overlooked parts of exterior fireproofing, yet it can make a major difference. In general, the best location is an area with lower surrounding fuel load, more stable temperatures, and noncombustible surfaces. A basement with concrete floors and masonry walls often offers advantages because it is naturally cooler and less exposed to fast-moving flames than upper-level living spaces. A first-floor location on a concrete slab can also be a strong option, especially if the safe is kept away from garages, furnace rooms, laundry areas, and storage rooms packed with cardboard, paint, solvents, or other combustibles.
Try to avoid placing the safe against lightweight interior walls that back up to high-risk rooms or in closets full of clothing, paper, and wood shelving. The area around the safe should be kept as clear as possible so flames have less fuel nearby. If feasible, surround the installation zone with fire-resistant materials such as cement board or Type X drywall and keep the safe anchored securely to a solid base. Also think about water and humidity. Some locations reduce fire risk but increase moisture exposure, so it is important to balance thermal protection with corrosion control. The ideal setup is a safe in a low-fuel, lower-temperature zone, surrounded by noncombustible materials, with enough clearance for airflow, maintenance, and full door operation.