Water is one of the fastest ways to ruin firearms, documents, optics, and the safe meant to protect them, which is why learning how to reinforce a gun safe against water damage and flooding is essential for any serious owner. In the gun safes and safety category, water protection sits beside burglary resistance and fire performance because floodwater attacks steel, lockwork, insulation, electronics, and everything stored inside. A gun safe can survive a break-in attempt yet still fail after a few inches of standing water if its seams, anchor points, door sweep, and interior materials were never prepared. When I have helped owners evaluate damaged safes after storms and burst pipes, the same pattern appears: the safe was heavy, expensive, and fire-rated, but it was not elevated, sealed, drained, or monitored.
Water damage in this context includes direct flooding from storms, groundwater seepage, plumbing failures, roof leaks, sprinkler discharge, and the humidity spike that follows all of them. Reinforcing a safe means adding layers of protection through placement, custom barriers, corrosion control, sealing, interior moisture management, and recovery planning. DIY gun safe modifications are often the most practical route because every room, slab, climate, and safe model is different. Some changes are simple, such as adding a raised platform and silica gel. Others are more technical, such as replacing door seals, building a curb, adding marine-grade coatings, or modifying anchor methods so water cannot wick upward through bolt holes.
This article is the hub for custom and DIY gun safe modifications related to water defense. It explains what actually works, where common mistakes happen, and how to prioritize upgrades based on flood risk, safe construction, and the value of what is stored inside. If you want a direct answer, here it is: the best way to protect a gun safe from flooding is to keep water from reaching it, slow water entry if it does, control moisture inside, and make every component easier to dry and restore afterward. That requires treating the safe as part of a larger room system rather than as a sealed box.
Start With Risk Assessment, Placement, and Elevation
The first and most important modification is often not on the safe itself. It is choosing the least vulnerable location in the home and raising the safe above the most likely water line. Basements are convenient, but they are also the highest-risk location for seepage, sump failure, and flash flooding. A first-floor interior closet on a post-tension or conventional slab is usually safer than a basement corner near an exterior wall. If the safe must stay below grade, place it away from floor drains that can backflow, away from water heaters and washing machines, and away from foundation walls where hydrostatic pressure drives moisture through concrete.
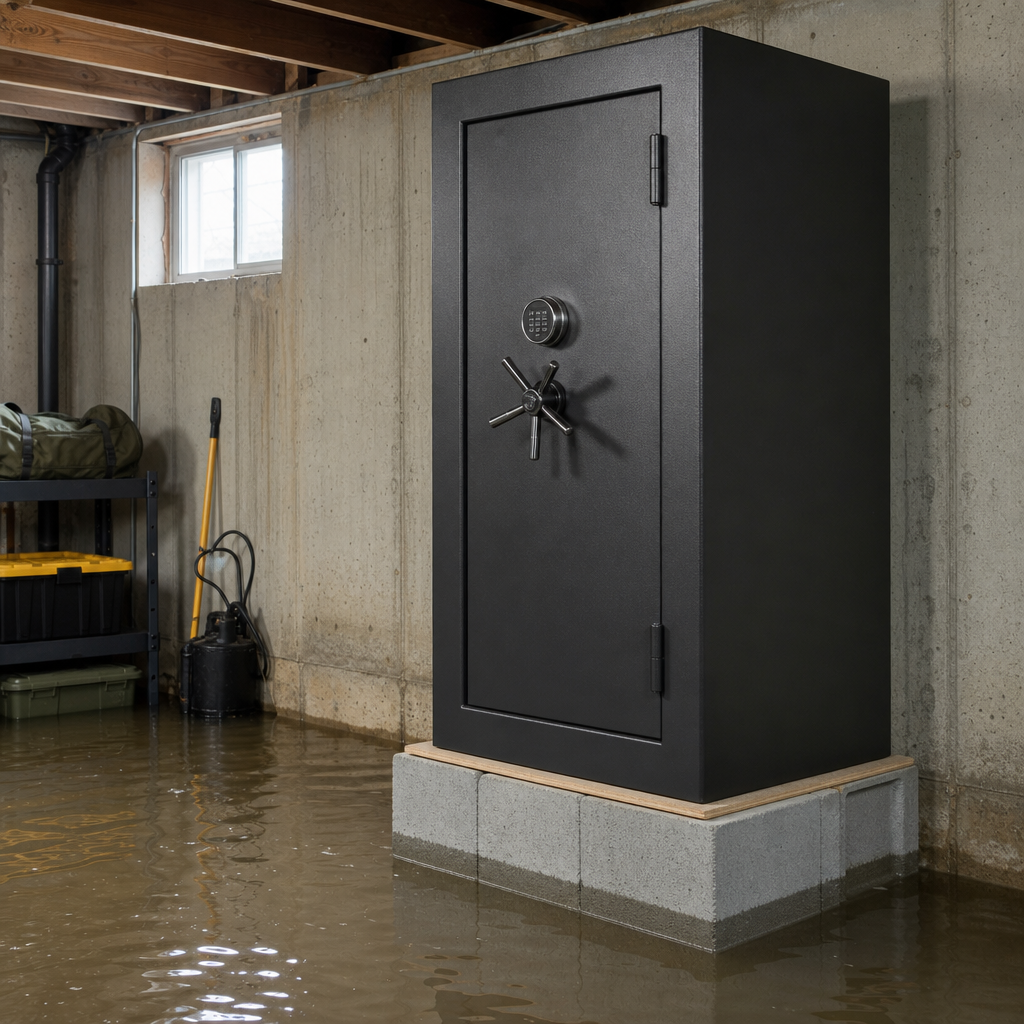
Elevation matters because even two to four inches can prevent a total loss during minor flooding. In practice, I recommend a rigid steel stand, welded tube platform, or reinforced concrete curb rather than plywood blocks. Wood swells, delaminates, and can keep the safe base wet for days. A proper stand should exceed the safe footprint, support the full loaded weight, and keep anchor geometry stable. Many owners use pressure-treated sleepers, but steel with a corrosion-resistant finish is the stronger long-term choice. If local flood history shows six inches of nuisance flooding, build for more than six. Safety margin is cheaper than replacing firearms.
Placement should also account for access during cleanup. A safe jammed into a tight corner is harder to inspect, dry, and dehumidify. Leave clearance behind and alongside when possible so you can check for condensation, rust streaks, and seal failure. If you are planning a broader custom safe installation, include room-level water controls such as a battery-backed sump, leak sensors, and floor slope corrections. These modifications are part of gun safe water protection because they reduce the odds that the safe ever faces standing water.
Seal the Vulnerable Points Without Trapping Moisture
A common misconception is that a gun safe can be made fully waterproof with a bead of silicone around the door. Most residential gun safes are not engineered like marine lockers or UL-listed waterproof data safes. Their fire seals expand under heat, but they do not necessarily stop prolonged water intrusion. The practical goal is to reduce the speed and volume of water entry at the most vulnerable points: door gaps, body seams, bolt-down holes, electrical pass-throughs, and accessory mounting penetrations.
Start by inspecting the factory door seal. If it is damaged, compressed, or missing sections, replace it with the manufacturer’s specified gasket or a compatible closed-cell EPDM or neoprene profile that will not interfere with door closure. Closed-cell materials are preferred because they absorb less water than open-cell foam. For body seams and penetrations, use a high-quality polyurethane or marine sealant where appropriate, but apply it only after confirming that the change will not void the safe warranty or trap moisture inside fireboard cavities. Some gypsum-based fire linings can retain water if external seams are oversealed while interior moisture has no path to escape after exposure.
Anchor holes deserve special attention. Water can enter from below or wick through unsealed hardware. If you are bolting to concrete, use corrosion-resistant anchors and seal around penetrations with a non-shrinking sealant compatible with the slab and anchor system. I prefer stainless or heavily coated hardware where chemistry allows it, although galvanized wedge anchors remain common. Avoid creating a bowl effect under the safe with excess caulk. The base should shed water, not hold it. Electrical pass-throughs for dehumidifier rods or lights should be fitted with grommets and sealed collars so they do not become direct entry points.
Build a Water-Resistant Base and Barrier System
The most effective DIY safe modification for flooding is usually a layered base system: elevation, barrier, and drainage. Think of it as buying time. A raised safe on a sealed steel stand can stay dry in shallow flooding; adding a perimeter curb or pan can delay contact longer; adding a path for water to move away can prevent prolonged immersion. In rooms with recurring seepage, I have seen excellent results from low-profile concrete curbs coated with masonry waterproofing and topped with a powder-coated steel frame. The curb separates the safe from wet slab conditions, and the frame keeps airflow moving under the base.
For moderate-risk spaces, a fabricated steel drip pan or containment tray can work if it is large enough, rigid enough, and paired with a drain path or water alarm. The limitation is obvious: once the tray fills, the protection ends. That is why trays are best for plumbing leaks, not river flooding. If you are building a surrounding barrier, keep the front edge low enough for door swing and safe loading while ensuring the barrier does not channel water toward wall penetrations. Every water control should be tested with controlled amounts of clean water before you trust it.
| Modification | Best Use Case | Main Benefit | Key Limitation |
|---|---|---|---|
| Steel stand or concrete curb | Minor flooding, damp slabs | Raises safe above standing water | Needs proper load capacity and anchoring |
| Closed-cell door gasket replacement | Door gap seepage | Slows water entry at the door perimeter | Will not make a safe fully waterproof |
| Sealed anchor penetrations | Slab-mounted safes | Reduces wicking through bolt holes | Incorrect sealants can trap moisture |
| Interior dehumidifier plus desiccant | High humidity after leaks or floods | Limits rust and mold inside | Requires power or regular maintenance |
| Leak sensors and room alarms | Pipe failures, early seepage | Provides rapid warning before major damage | Only useful if alerts are monitored |
Material choice matters here. Bare carbon steel stands should be primed and coated, especially at welds. Aluminum resists rust but can deform under high point loads if undersized. Concrete blocks are widely used but often unstable unless mortared and capped with a continuous plate. Rubber mats under the stand can reduce direct contact with damp concrete, but choose dense neoprene or similar materials that do not stay saturated. The best barrier systems are boringly robust: overbuilt, easy to inspect, and designed for the exact weight of the safe when fully loaded with firearms, ammunition, and accessories.
Protect the Interior: Humidity Control, Rust Prevention, and Storage Layout
Even if floodwater never enters the safe, elevated humidity after a storm can condense on steel and trigger corrosion within hours. Interior moisture management is therefore not optional. Use an electric dehumidifier rod if the safe has a pass-through and reliable power, then back it up with rechargeable silica gel canisters placed at different levels. Heat rises, but moisture distribution inside a packed safe is uneven because gun socks, carpet panels, and document pouches create dead zones. Multiple desiccant points work better than one large canister in the bottom corner.
Storage layout also affects survivability. Keep paper documents, tax stamps, and photographs in waterproof document pouches or dedicated waterproof boxes inside the safe. Store firearms so they are not pressed tightly against fabric-covered walls that can hold moisture. Avoid foam-lined cases inside the safe for long-term storage because many foams trap humidity against metal surfaces. After flood events, I have opened safes where the steel looked recoverable but every firearm in a foam sleeve showed surface rust. A silicone-treated gun sock is usually better than hard foam for long storage if the interior environment is actively controlled.
For corrosion protection, use a proven rust inhibitor on metal surfaces, especially blued steel and small internal parts. Products such as CorrosionX, Eezox, and Break-Free Collector are commonly used because they leave a protective film suited to storage conditions. Stainless steel firearms resist corrosion better, but they are not rust-proof, particularly around springs, screws, and sights. Optics, magazines, suppressors, and ammunition need equal attention. Primers and powder can be compromised by prolonged moisture exposure even when cartridges look visually normal, so any ammunition exposed to floodwater should be segregated and assessed conservatively according to manufacturer guidance.
Upgrade Hardware, Finishes, and Monitoring for Long-Term Resilience
Many custom and DIY gun safe modifications focus on the obvious surfaces while ignoring the hardware that fails first. External hinges, keypad housings, relocker covers, shelf clips, anchor washers, and door organizer screws often corrode faster than the main body because they have thinner coatings or mixed-metal contact. If you live in a flood-prone or coastal environment, replace vulnerable fasteners with stainless steel where mechanically appropriate, isolate dissimilar metals when possible, and touch up coating damage immediately. On safe exteriors, a marine-grade wax or corrosion inhibitor can help shed moisture, though it does not substitute for proper drainage and climate control.
Electronic locks deserve special planning. Some modern keypads and lock bodies are better sealed than older units, but few residential gun safe locks are intended for submersion. If flood risk is significant, know whether your lock is UL Type 1, who services it locally, and how to protect or replace the keypad after exposure. Keep override keys, combinations, and serial numbers stored separately in a secure waterproof location. Mechanical dial locks generally tolerate moisture better than consumer-grade electronics over the long term, but they still suffer if water enters the lock case or rusts the spindle and mounting screws.
Monitoring is one of the highest-value upgrades. Install leak sensors at the safe base, near nearby appliances, and at the lowest point of the room. Use a system that sends app alerts, not just an audible chirp. Add a hygrometer inside the safe and another in the room so you can spot trends before rust appears. In my experience, owners who monitor humidity act earlier and lose less. A room sitting at 75 percent relative humidity after a storm can put a supposedly dry safe at risk if the door is opened repeatedly during cleanup. Data turns guesswork into maintenance.
Create a Post-Flood Recovery Plan Before You Need It
No amount of reinforcement guarantees zero water damage, so the final modification is procedural: build a recovery plan and store the supplies to execute it. After any flood exposure, disconnect power to affected accessories if it is safe to do so, document conditions for insurance, and avoid forcing a swollen or contaminated door until the lock and jamb have been inspected. If the exterior was submerged, assume the interior humidity is high even if water did not visibly enter. Move quickly on firearms because flash rust can form in a single day under warm, wet conditions.
Your recovery kit should include nitrile gloves, microfiber towels, rust-preventive oil, bore patches, nylon brushes, desiccant packs, a portable fan, and contact information for a qualified safe technician and gunsmith. If muddy or chemically contaminated water entered the safe, every firearm should be field stripped, cleaned, dried, and lubricated, with special attention to bores, trigger groups, magazine bodies, and optic battery compartments. Wood stocks can swell; laminated stocks can delaminate; leather slings can mold. Paper records should be separated, air dried, or frozen for later archival treatment if they are irreplaceable.
Insurance and documentation close the loop. Photograph the safe installation, serial numbers, modifications, receipts, and contents before disaster strikes. Confirm whether your homeowners policy, riders, or collectibles coverage addresses flood loss, because standard policies often exclude flooding unless separate coverage applies. Keep a written checklist of your custom water-protection upgrades and inspection dates. Reinforcing a gun safe against water damage and flooding is not one product or one trick. It is a system built from smart placement, resilient materials, careful sealing, interior moisture control, and disciplined maintenance. Start with elevation and monitoring, upgrade the weak points you can see, and plan for recovery from the hazards you cannot fully prevent.
The core lesson is simple: a gun safe protects best against water when it is treated as part of the room, not as an isolated steel box. The most effective improvements are practical and cumulative. Raise the safe above likely water levels, choose a lower-risk location, seal penetrations and door gaps wisely, and build a base that resists wicking and allows drainage. Inside the safe, control humidity aggressively with powered dehumidification, desiccants, rust inhibitors, and storage methods that do not trap moisture against metal or paper. Around the safe, add leak sensors, maintain nearby plumbing and drainage systems, and keep records that make insurance and recovery faster.
As a hub for custom and DIY gun safe modifications, this topic connects directly to related upgrades such as safe room planning, anchoring methods, interior organization, lock selection, dehumidifier setup, and long-term firearm preservation. The water-resistance side of the equation is where many owners underestimate risk because burglary and fire receive more attention. Yet in real homes, burst supply lines, failed water heaters, roof leaks, and localized flooding are common and often more likely than a major fire. A safe that stays dry through those events protects not only firearm value but also function, legal paperwork, and family records that may be impossible to replace.
If you take one action today, inspect your current installation and identify the weakest point where water would reach the safe first. Then fix that point with a durable upgrade, whether that means a steel stand, better seals, a leak alarm, or an interior humidity plan. Small improvements made now are far cheaper than restoring rusted firearms later. Build your water-defense system one layer at a time, and your gun safe will perform like the protective asset it was meant to be.
Frequently Asked Questions
How can I keep floodwater from reaching the bottom of my gun safe in the first place?
The most effective strategy is elevation. If you are serious about learning how to reinforce a gun safe against water damage and flooding, start by getting the safe off the floor. Even a few inches of elevation can make a major difference during minor leaks, appliance failures, heavy rain intrusion, or shallow flooding. Many owners use a reinforced steel stand, a properly engineered concrete platform, or a heavy-duty pedestal that is rated for the full weight of the safe when loaded. The goal is to create a stable, non-compressible base that keeps the lowest seam and door gap above the level where water usually accumulates first.
Placement matters just as much as height. Avoid basements if your property has a history of seepage, stormwater backup, or high groundwater. If the basement is the only realistic location, choose the highest point in the room and keep the safe away from floor drains, sump pits, foundation cracks, exterior walls that sweat, and plumbing lines that could burst. On upper floors, confirm the structure can safely support the total load, especially if you are placing a large safe on a platform. A structural assessment is often worth it because a poorly supported floor can become its own safety hazard.
It also helps to think in layers of protection. Elevate the safe, improve drainage around the room, use water alarms nearby, and make sure gutters, downspouts, grading, and sump systems are doing their jobs. Reinforcement is not just about the safe itself; it is about reducing the chance that standing water ever surrounds it. In real-world flood scenarios, prevention outside the safe is often what determines whether the safe and its contents remain intact.
Are gun safes actually waterproof, or do I need to add extra protection?
Most gun safes are not truly waterproof in the way many owners assume. Some are marketed as water-resistant or may survive brief exposure to moisture, but that is very different from withstanding rising floodwater, prolonged submersion, or pressure-driven water intrusion. The weak points are usually the door gap, bolt openings, wiring ports, anchor holes, seams, and any penetrations for dehumidifiers or electronic accessories. Even on a well-built safe, water can find its way in surprisingly fast once the lower portion of the body is submerged.
That is why extra protection is usually necessary. A practical upgrade is adding a high-quality door seal or gasket system designed for moisture resistance, provided it does not interfere with lock operation or fire performance. Owners should also inspect the safe body for factory openings, unused mounting holes, and cable pass-throughs that can be sealed appropriately. If the safe is bolted down, the anchor points should be examined carefully because they can become a hidden path for moisture from beneath the safe or through the slab itself.
Just as important, understand the limit of aftermarket sealing. A gun safe is not a dive case. If floodwater rises high enough, hydrostatic pressure and prolonged exposure can still force moisture inside, and the safe’s interior may trap that moisture afterward. The best approach is to combine sealing improvements with elevation, internal moisture control, and waterproof secondary containers for the most sensitive items such as passports, tax records, suppressor paperwork, optics manuals, and heirloom documents. In other words, treat the safe as one layer of a broader water-defense system, not as a guaranteed watertight vault.
What should I store inside the safe to protect firearms, optics, and documents from humidity and water intrusion?
Interior protection is critical because even small amounts of moisture can do lasting damage after a flood event or even after a brief exposure to damp air. Start with active and passive humidity control. A dehumidifier rod helps raise the interior temperature slightly to reduce condensation, while rechargeable desiccant packs absorb residual moisture in corners, shelves, and enclosed compartments. These should be monitored and replaced or recharged on schedule, especially in humid climates. If your safe uses electric dehumidification, make sure the power entry point is properly sealed and does not create a vulnerability for water intrusion.
For firearms, apply a quality corrosion-inhibiting protectant to metal surfaces and store each firearm so air can circulate around it. Avoid foam-lined cases for long-term storage inside the safe because foam can trap moisture against blued steel, stainless parts, and optics mounts. Silicone-treated gun socks are a better option for many owners because they add another barrier against abrasion and humidity while still allowing the firearm to breathe. Optics, magazines, and small components should be kept in sealed containers with desiccant if you live in a flood-prone or coastal environment.
Documents, cash, hard drives, and irreplaceable paperwork deserve their own waterproof inner containers, even when stored inside the safe. Use high-quality document pouches, gasketed lockboxes, or purpose-built waterproof media boxes rated for the contents you are protecting. This is especially important because papers and electronics are often destroyed by humidity and dirty floodwater long before a firearm shows obvious external rust. A reinforced gun safe should contain its own internal protection plan: corrosion prevention for firearms, moisture absorption for the airspace, and waterproof secondary storage for anything that cannot tolerate even a little water.
Can bolting down a gun safe make flooding problems worse, and how should it be anchored correctly?
Bolting down a gun safe is still the right move for theft resistance and tip prevention, but it needs to be done intelligently in areas where water is a concern. The potential downside is that anchor penetrations and direct floor contact can create routes for moisture transfer. If the safe sits flat on concrete, water can pool beneath it, remain trapped there, and accelerate corrosion on the underside where owners rarely inspect. In a flood, that hidden moisture can linger long after the visible water is gone.
The better solution is to anchor the safe to an elevated base or stand that is engineered for both weight and stability. A steel riser or reinforced concrete curb can give you needed clearance while still allowing secure anchoring. If you are anchoring directly to concrete, use the manufacturer’s recommendations for hardware and spacing, and consider moisture-resistant sealing methods around penetrations where appropriate. The exact materials matter, because some sealants can degrade, trap water, or interfere with future servicing. When in doubt, consult both the safe manufacturer and a qualified installer familiar with flood-prone installations.
You should also inspect the underside and anchor area periodically. Reinforcing a gun safe against water damage is not a one-time project. Check for rust staining, mineral deposits, dampness around bolts, swelling of floor coatings, and signs that water has wicked upward through the slab. A secure installation should protect against forced removal without turning the bottom of the safe into a permanent moisture trap. Done correctly, anchoring improves overall protection rather than undermining it.
What should I do if my gun safe has already been exposed to water or flooding?
Act quickly. The first priority is safety. If floodwater was involved, assume contamination is present and avoid opening the safe until the surrounding area is stable and electrical hazards are addressed. If the safe has an electronic lock, power issues or internal corrosion may affect access, so follow the manufacturer’s guidance before forcing anything. Once it is safe to proceed, open the safe as soon as possible to vent trapped humidity. The longer moisture stays sealed inside, the greater the damage to firearms, lockwork, shelving, insulation, paperwork, and interior fabric.
Remove all contents immediately and separate firearms, optics, ammunition, and documents for individual treatment. Wipe down exterior moisture, then begin a proper drying and corrosion-control process for each firearm. In many cases, that means field stripping, drying hidden recesses, cleaning away contaminated residue, and reapplying lubricant and rust protection. Floodwater is especially destructive because it often carries silt, salts, sewage, and chemicals that keep attacking metal long after the water appears gone. Optics and electronics may require professional evaluation if water got inside housings or battery compartments.
The safe itself needs careful inspection. Look for rust beginning at seams, around the lock, along the bottom edge, behind the door panel, and at anchor points. Interior drywall-style fire lining and fabric panels can trap moisture, odors, and contamination, so do not assume the safe is fine just because the exterior looks dry. Dehumidify the room aggressively, run air circulation, and document all damage for insurance purposes. If the lock, relocker, boltwork, or insulation has been compromised, contact the manufacturer or a safe technician for a full assessment. A gun safe that has been flooded may still be usable, but only after you verify that both its security functions and its moisture resistance have not been permanently weakened.