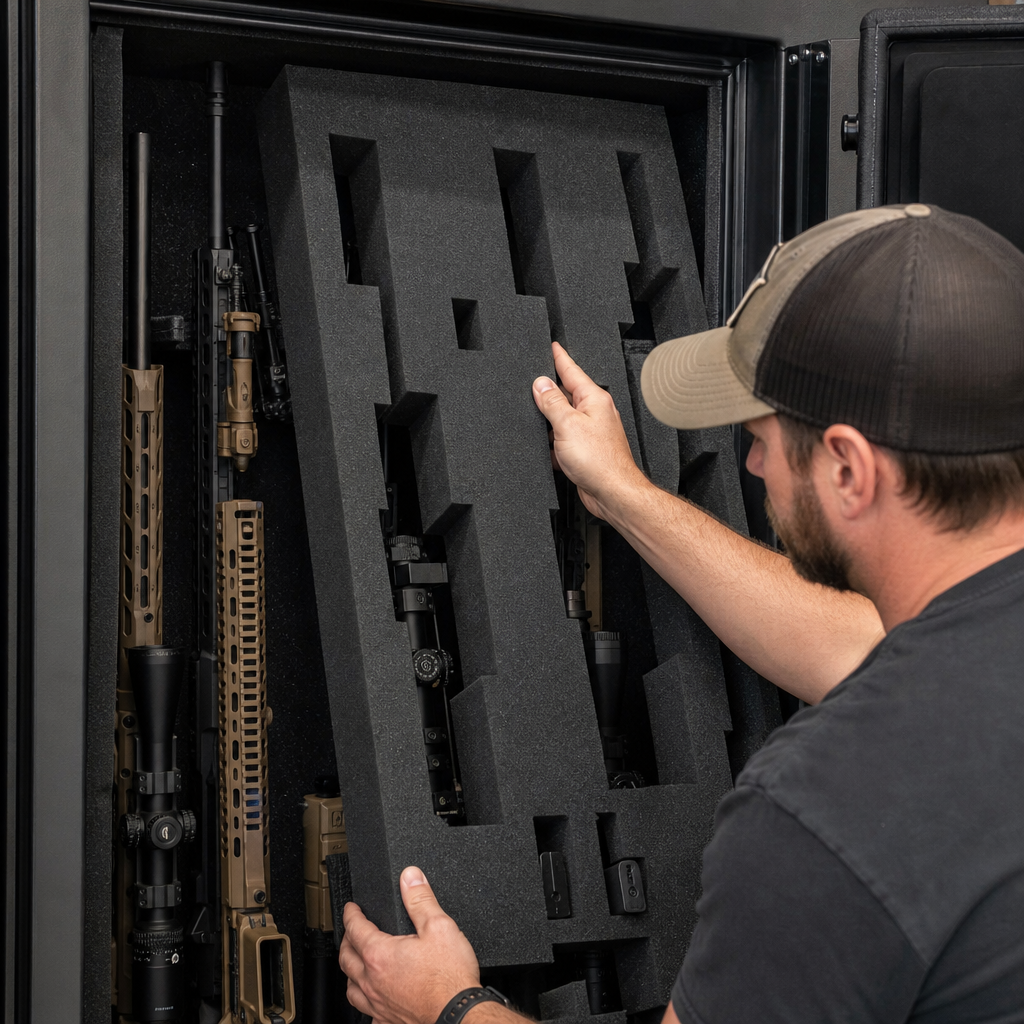
Installing a custom foam cutout system for gun safe organization is one of the most practical upgrades you can make if you want faster access, better protection, and cleaner use of space inside a crowded safe. A custom foam cutout system uses layered foam, usually closed-cell polyethylene or EVA, trimmed to the exact shape of firearms, magazines, optics, documents, and support gear. In plain terms, it turns a cluttered shelf or floor into a structured layout where every item has a dedicated place. I have installed these systems in both residential gun safes and shop storage cabinets, and the difference is immediate: fewer dings on finishes, less shifting during door movement, and a much easier way to verify what is present or missing at a glance.
This topic matters because gun safe organization affects more than convenience. It influences firearm condition, corrosion risk, safe handling, inventory control, and emergency readiness. A poorly arranged safe can force awkward lifting, stack weight on optics, trap moisture between soft cases, and bury defensive firearms under range gear. A well-designed custom and DIY gun safe modification plan solves those problems systematically. For owners building a complete gun safe organization strategy, foam cutouts work best when considered alongside shelf placement, lighting, dehumidification, door panel storage, anchor access, and long gun spacing. This hub article covers that full modification landscape, with foam as the centerpiece, so you can plan upgrades in the right order and avoid common mistakes.
Why a Custom Foam Cutout System Works Better Than Basic Shelving
Standard gun safe interiors are designed to fit the broadest possible range of owners, not your specific collection. That usually means a carpeted floor, adjustable shelves, and barrel rests for long guns. The setup works, but it is inefficient for handguns, optics-ready pistols, suppressor hosts, magazines, chronographs, and documents. Foam cutouts solve this by matching storage to actual item dimensions. Instead of letting two pistols slide together on a shelf, you create separated recesses that support them evenly and protect sights, controls, and finish. The same approach works for revolvers, magazines, hearing protection, and maintenance tools.
Closed-cell foam is preferred because it resists water absorption better than open-cell upholstery foam and keeps its shape under repeated use. Polyethylene plank foam is the most common professional option because it is firm, durable, and easy to cut cleanly with a sharp utility knife, hot knife, or oscillating tool. EVA foam is slightly more flexible and often easier for DIY users to source in layered sheets. Kaizen-style laminated foam is especially useful because you can peel out layers gradually to dial in depth. In practical use, that matters when storing pistols with red dot optics, weapon lights, or extended magazines, where a depth mistake can leave the grip proud of the surface or put pressure on the optic housing.
Another advantage is accountability. When every item has a visible outline and dedicated recess, inventory checks become faster. I recommend this to owners who keep defensive firearms, serialized suppressors, or shared family-access equipment because it reduces uncertainty. If a slot is empty, you know immediately what is out of the safe. That seems simple, but it is one of the strongest organizational benefits of a custom foam cutout system.
Planning the Full Safe Modification Before You Cut Foam
The most expensive mistake in custom and DIY gun safe modifications is starting with the insert before planning the entire interior. Measure the safe interior width, depth, shelf heights, door swing clearance, hinge intrusion, and any electrical boxes, lights, or dehumidifier rods. Then list what the safe must hold now and what it will likely hold within two to three years. Include handguns, long guns, removable optics, important papers, magazines, ammunition you actually intend to store there, batteries, and NFA paperwork if applicable. The layout should support access frequency, not just total capacity.
Weight distribution matters too. Dense foam is light, but loaded shelves are not. Put heavier ammo cans on lower levels and avoid creating a top-heavy arrangement that makes upper shelves sag or complicates quick retrieval. If you are adding slide-out trays, verify drawer hardware ratings and confirm you still have clearance when the door organizer is loaded. In several installs, I have seen owners build beautiful foam trays only to discover that protruding pistol grips strike the door panel pockets when the door closes. A cardboard mockup prevents that problem.
Humidity control should be addressed before foam goes in. Install a GoldenRod-style heater, rechargeable desiccants, or a monitored dehumidifier setup first. The National Shooting Sports Foundation and most major safe manufacturers consistently recommend controlling moisture because safes are enclosed metal boxes subject to condensation swings, especially in garages and basements. Foam organization improves storage, but it does not replace corrosion prevention. Leave some air gaps around walls and avoid packing every square inch so tightly that airflow stalls.
Choosing Foam, Tools, and Layout Methods
The right material and cutting method determine whether the finished insert looks professional or homemade. For most gun safe applications, use 1.7 to 2.2 pound density polyethylene foam for firm support, or laminated workshop foam if you want easy layer-by-layer depth control. Dark charcoal and black are popular because they hide dirt and create visual contrast with stainless, nickel, or polymer frames. If you want improved visibility in low light, a contrasting underlayer can help identify empty slots quickly.
Before cutting, unload every firearm, double-check clear status, and remove magazines and chambered rounds from the workspace entirely. Trace each item using a silver paint marker, chalk pencil, or cardboard template. Keep at least 1 inch between cutouts and 1.5 inches at tray edges for structural integrity. For handguns, orient grips consistently so retrieval is intuitive. For optics-equipped pistols, mark the highest point of the optic and cut a relief pocket instead of forcing pressure onto the sight body. For rifles stored horizontally on shelves, support at the stock and fore-end rather than on delicate accessories.
| Component | Best Practice | Why It Matters |
|---|---|---|
| Foam type | Closed-cell polyethylene or EVA | Better moisture resistance and long-term shape retention |
| Tray depth | Match item height with slight finger clearance | Prevents pressure points and speeds removal |
| Cut spacing | At least 1 inch between items | Reduces tearing and keeps inserts rigid |
| Tool choice | Sharp utility knife, hot knife, or electric carving knife | Produces cleaner edges with less foam deformation |
| Labeling | Use printed or engraved identifiers nearby | Improves inventory control and family consistency |
Use multiple shallow passes rather than trying to cut full depth at once. If using layered foam, remove one layer at a time and test-fit frequently. A snug fit should hold the item in place without requiring force. If you need to press hard, the cutout is too tight and can abrade finishes over time.
Installing Foam Inserts on Shelves, Drawers, and Safe Floors
There are three common installation styles: shelf-top trays, drawer inserts, and base-floor panels. Shelf-top trays are the easiest DIY option because they can be built outside the safe and lifted in. I often use thin plywood, HDPE sheet, or aluminum composite panel as a rigid backing, then bond foam to it with a low-VOC adhesive that will not attack the foam. This creates a removable module you can rework later. For handgun safes or larger safes with retrofitted slide-out shelves, drawer inserts are ideal because they bring the cutouts toward you instead of forcing you to reach into the back. Base-floor panels are useful for ammo, camera gear, suppressors, or pistols stored under long guns, but they should not block anchor bolt access or dehumidifier placement.
When mounting trays permanently, avoid drilling into safe walls unless the manufacturer explicitly allows it. Fire lining, relockers, and anti-pry structures can be compromised by unnecessary holes. Friction fit, shelf clips, removable rails, and adhesive-backed hook-and-loop fasteners are safer choices. If you need vertical storage, a foam-backed panel mounted to a shallow rack can hold pistols or magazines on the interior side wall, but test retention carefully. Gravity is less forgiving on vertical systems than on flat trays.
For long-gun safes, the best custom setup is often mixed-use. Keep traditional barrel supports for rifles and shotguns, then convert upper or side shelves into foam-managed zones for handguns, optics, bolt assemblies, documents, and spare magazines. This preserves long-gun capacity while giving your highest-touch items a protected, repeatable home.
How Foam Fits Into Other DIY Gun Safe Modifications
Foam cutouts are the hub upgrade, but they perform best when paired with other modifications. LED lighting is the first companion upgrade I recommend. Motion-activated LED strips or hardwired low-heat light bars make cutout layouts usable in dim interiors and help confirm whether a slot is occupied. Next is a door organizer. Door panels free shelf space for foam trays by moving passports, handguns, choke tubes, and small accessories onto the door. Just keep bulk low enough that the door closes without contact.
Adjustable shelving is another major improvement. Many factory shelves waste vertical space, especially above compact pistols. By adding half shelves or shelf dividers, you can create dedicated levels for foam trays while keeping a separate bay for bins and paperwork. Some owners also add pull-out shelves rated on full-extension slides. This is one of the most effective custom gun safe modifications for accessibility, particularly in deeper safes where rear items otherwise disappear.
Power management deserves attention as well. If you keep rechargeable optics, vault lights, or humidity monitors inside the safe, route cables cleanly through the factory power port where available. Do not pinch cords under foam trays or block ventilation around charging devices. Finally, use labels. Even a simple printed map taped inside the door helps family members return items to the correct positions and simplifies annual inventory checks for insurance records.
Common Mistakes, Maintenance, and When DIY Is Not Enough
The most common mistake is designing for a perfect snapshot of the current collection instead of leaving expansion room. Firearm ownership changes. Optics are added, lights get replaced, magazines multiply, and one new pistol can invalidate a tightly packed tray. Reserve at least 15 to 20 percent open capacity if possible. Another mistake is using soft foam that compresses permanently. It may feel protective at first, but it can sag, trap moisture, and lose retention. Likewise, avoid storing firearms in foam that is contaminated with oils, solvents, or uncured adhesive residue.
Maintenance is straightforward. Vacuum dust from cutouts, wipe trays occasionally, and inspect for compression around high-use slots. If you live in a humid climate, inspect hidden surfaces under stored firearms during routine cleaning, because even good foam can mask early condensation if the safe environment is poorly controlled. Replace inserts that become brittle or deformed. High-quality closed-cell foam lasts for years, but not forever.
Some projects are better handled by a professional fabricator. If you need CNC-cut inserts for a high-value collection, museum-style presentation, or a law-enforcement armory where standardization matters across many users, outsourced fabrication can be worth the cost. Professional shops use waterjet, CNC routing, or templated hot-wire systems for cleaner tolerances and repeatability. DIY remains the better value for most homeowners, but professional cutting makes sense when precision, scale, or presentation is the priority.
A custom foam cutout system for gun safe organization is more than a cosmetic upgrade. It is the central planning tool for custom and DIY gun safe modifications because it forces you to decide what belongs in the safe, how often each item is used, and how to protect it properly. When done well, foam inserts reduce clutter, protect finishes and optics, support faster retrieval, and make inventory control almost effortless. They also expose weaknesses in the rest of the safe setup, which is useful. If lighting is poor, shelves are inefficient, or humidity control is missing, a foam project will reveal those issues early.
The smartest approach is to treat the safe as a system. Measure carefully, control moisture first, choose closed-cell foam, cut conservatively, and install removable trays whenever possible. Pair the inserts with lighting, door storage, shelf adjustments, and clear labeling so the whole interior works together. If you are building out the broader Gun Safes and Safety topic, this hub should guide your next steps into shelf retrofits, lighting upgrades, dehumidification strategy, and door panel optimization. Start with one tray for your most-used handguns, refine the method, and expand from there. A disciplined layout today will protect your collection and make your safe easier to use every day.
Frequently Asked Questions
1. What are the main benefits of installing a custom foam cutout system in a gun safe?
A custom foam cutout system brings order, protection, and efficiency to a space that often becomes overcrowded over time. Instead of stacking firearms, magazines, optics, paperwork, and accessories on top of one another, the foam creates a dedicated location for each item. That matters because it reduces accidental contact between hard surfaces, helps prevent scratches on finishes and optics, and keeps gear from shifting every time the safe door opens or closes.
Another major benefit is faster access. When every firearm and accessory has a clearly defined position, you can immediately see what is present, what is missing, and where each item belongs. This is especially useful for owners who rotate equipment seasonally, maintain multiple handguns or rifles, or store supporting gear such as suppressors, lights, spare magazines, batteries, and documents in the same safe. A properly planned layout also improves space usage by turning wasted flat shelf or floor area into organized storage with a much cleaner footprint.
There is also a long-term preservation advantage. Closed-cell foam materials such as polyethylene or EVA are commonly used because they are durable, resist moisture better than open-cell alternatives, and hold their shape well over time. When installed correctly, they cushion equipment without compressing excessively, helping protect delicate accessories and reducing unnecessary wear from movement inside the safe. In short, a custom foam system is not just about appearance. It is a practical organizational upgrade that improves protection, visibility, and daily usability.
2. What type of foam works best for a gun safe cutout system?
For most gun safe applications, closed-cell foam is the preferred choice. Polyethylene and EVA foam are the two materials most often recommended because they offer a strong balance of firmness, durability, and clean cutting performance. Closed-cell foam does not absorb moisture the way many open-cell foams can, which is important in a safe environment where humidity control matters. It also tends to support the weight of firearms and accessories better, so cutouts hold their shape longer and provide more reliable support over time.
Polyethylene foam is known for being firm and resilient, making it an excellent option for heavier items or setups where you want crisp edges and strong structural support. EVA foam is also a strong choice and is often appreciated for its smooth finish, slightly more refined look, and dependable cushioning. In many installations, users combine layers of foam to achieve the right depth and support for specific items. For example, a deeper lower layer may support the body of a handgun while an upper layer creates a precise top profile around the grip, slide, or optic.
Thickness matters just as much as material. A shallow accessory tray may only need a thinner layer, while rifles, handguns with mounted optics, and other bulkier gear may require multiple stacked layers. The right foam should be thick enough to secure the item without forcing it into the cavity too tightly. It should support the object firmly while still allowing a smooth lift-out. In general, avoid soft upholstery-style foam or packing foam because it breaks down faster, offers less structural integrity, and does not deliver the clean, professional fit that a dedicated safe organization system requires.
3. How do you measure and plan cutouts so firearms and accessories fit correctly?
The planning stage is where the quality of the final installation is decided. Before any cutting begins, remove the items you want to store and group them by category, such as handguns, magazines, optics, documents, ammunition boxes, and maintenance tools. Think carefully about what needs immediate access and what can be stored deeper in the safe. This helps you create a layout that is practical, not just visually neat. It is also smart to account for future additions so the system does not become obsolete as soon as you add another firearm or accessory.
To measure accurately, place each item on the foam and trace its outline carefully. Many people use chalk, silver marker, or a removable marking tool that is visible without damaging the foam. Keep the tool vertical while tracing so the outline reflects the true footprint. It is generally best to leave a small amount of clearance rather than tracing too tightly. Firearms with mounted optics, lights, extended magazines, or slings require extra attention because their profile may be wider or taller than expected. If possible, test the fit on a scrap piece first before committing to the final cut.
Depth planning is equally important. The goal is not simply to create a silhouette in the top layer. You want enough depth for the item to sit securely while still leaving a portion accessible for an easy grip. A handgun, for example, should usually sit low enough to stay stable but high enough that you can remove it without digging your fingers into the foam. For magazines and smaller accessories, finger relief cutouts can make retrieval much easier. Careful spacing between cutouts also improves durability because thin foam walls between heavy items can tear over time. A well-designed layout balances density, protection, and ease of access.
4. Can you install a custom foam cutout system yourself, or is professional help better?
Many gun owners can install a custom foam cutout system themselves with good results, especially if the project involves shelves, safe floors, or straightforward handgun and accessory layouts. A do-it-yourself approach works well when you are comfortable measuring carefully, cutting slowly, and making a few test passes before finalizing the design. Basic installations often require only foam sheets, a straightedge, a sharp knife or foam cutter, marking tools, adhesive if needed, and patience. If the safe interior is relatively simple, a DIY setup can be cost-effective and highly customizable.
That said, professional help can be worthwhile for more complex projects. If you are organizing a large collection, fitting unusual shapes, creating multi-layer drawer systems, or trying to maximize every inch of a premium safe, a professional fabricator may deliver cleaner and more precise results. This is especially true when the goal is a polished appearance with tight tolerances around firearms, optics, suppressors, and support gear. Professionals may also use CNC cutting or advanced templating methods that produce consistent, highly refined cavities that are difficult to replicate by hand.
The decision often comes down to budget, complexity, and your expectations for the final finish. If your priority is functional organization and better protection, a careful DIY install is often more than adequate. If your priority is a showroom-grade result or a highly engineered storage plan, professional cutting may be the better route. In either case, the key is not rushing the process. A thoughtful layout and clean execution matter more than whether the work is done by hand or by a shop.
5. How do you maintain a foam cutout system and keep it working well over time?
Maintenance is straightforward, but it does matter if you want the system to stay clean and supportive for years. Start by keeping the safe interior dry and controlled. Even though closed-cell foam resists moisture better than many alternatives, the safe itself should still be managed with a dehumidifier, desiccant, or another humidity-control method appropriate for firearm storage. Foam is part of the organization system, not a substitute for proper environmental protection. Stable humidity helps protect both the firearms and the foam-supported layout.
Routine cleaning is also important. Dust, grit, carbon residue, and small metal particles can accumulate in cutouts over time, especially if firearms and accessories are returned to the safe after range use. Remove the contents periodically and vacuum the foam gently or wipe it with a clean, dry or slightly damp cloth if the foam manufacturer permits it. Avoid harsh chemical cleaners that could damage the material or leave residues near stored firearms. If the foam is layered, inspect the edges and adhesive points occasionally to make sure everything remains secure and aligned.
You should also reevaluate the layout as your collection changes. A foam system works best when it reflects how you actually use the safe. If you add optics, switch to larger magazines, reconfigure a rifle, or start storing additional accessories, forcing items into old cutouts can damage both the foam and the gear. Small adjustments early prevent larger problems later. High-quality closed-cell foam can last a long time, but like any storage solution, it performs best when it is kept clean, dry, and updated to match your current equipment.