A gun safe that survives burglary but topples during an earthquake still fails its most important job: keeping firearms secured, inaccessible to children, and protected from damage. Learning how to modify a gun safe for maximum earthquake resistance means treating the safe as part of the building, not just a heavy box on the floor. In practical terms, earthquake resistance is the safe’s ability to remain upright, anchored, closed, and structurally intact when the ground shakes, walls rack, and nearby objects slam into it. That requires more than weight. A six-hundred-pound safe can walk, tip, or tear out weak anchors if it is installed on brittle concrete, attached with undersized hardware, or positioned where a falling shelf drives force into the door.
This matters because seismic events create complex loads. Instead of a single pull straight outward, a safe may see repeated side-to-side acceleration, uplift at one corner, torsion across the base, and impact from surrounding contents. I have seen homeowners assume a factory-drilled anchor hole and a pair of expansion bolts were enough, only to discover cracked slab edges, loosened hardware, and door misalignment after a moderate quake. The better approach is a system: evaluate the safe, the floor, the wall, the room layout, and the contents together. Once you do that, most custom and DIY gun safe modifications become straightforward. You are not trying to make the cabinet indestructible. You are trying to control movement, prevent tipping, limit secondary damage, and preserve quick post-event access without compromising security.
As a sub-pillar hub for custom and DIY gun safe modifications, this guide covers the full framework homeowners actually use. It explains anchoring methods, anti-tip strategies, base reinforcement, door and interior upgrades, environmental controls, and installation mistakes that create hidden failure points. It also points toward adjacent subtopics many owners research next, including dehumidifier routing, shelving reinforcement, fireboard repair, lighting, handgun rack customization, and garage installation challenges. If your goal is a safer, more stable gun safe in an earthquake-prone home, the core principle is simple: strengthen the connection between safe and structure, reduce leverage and impact, and verify every modification against the manufacturer’s instructions and local seismic conditions.
Start with risk assessment, placement, and manufacturer limits
The first step in any earthquake-focused gun safe modification is a site assessment. Check the safe’s unloaded and loaded weight, base dimensions, center of gravity, factory anchor hole pattern, door swing direction, and any stated anchoring requirements from the manufacturer. Many residential gun safes are top-heavy once rifles, optics, and door organizers are installed. Add ammunition on upper shelves and the tipping risk increases. Measure the slab thickness if the safe sits on concrete. In many garages and utility rooms, slab thickness near edges, expansion joints, or stem walls may be inadequate for standard wedge anchors. On wood-framed floors, determine joist direction, joist size, span, and subfloor thickness before drilling anything.
Placement matters as much as hardware. A gun safe positioned in a corner generally performs better than one standing free in the middle of a room because two walls help limit lateral movement and shorten the path to a rigid tie-in. Still, do not jam the safe tightly against drywall and assume the wall adds strength. Drywall crushes easily, and non-structural partition walls are poor restraint points. Place the safe where you can anchor to a sound slab or directly into structural framing. Avoid locations below heavy shelving, water heaters without seismic strapping, or overhead storage that can collapse onto the top and door. If possible, orient the safe so the narrowest side faces the expected strongest open-room direction, reducing overturning leverage.
Manufacturer limits are not optional. Some safes allow anchoring through the bottom only; others permit rear-wall anchoring in designated zones. Drill outside approved areas and you may hit relockers, fire insulation, wiring for lights, or dehumidifier pass-throughs. You can also void the warranty or create corrosion points. Before any custom modification, document the model, photograph the interior, and confirm approved anchor locations, floor loading limits, and minimum edge distance for concrete fasteners. That groundwork prevents the most common DIY mistake: upgrading one weakness while accidentally introducing three new ones.
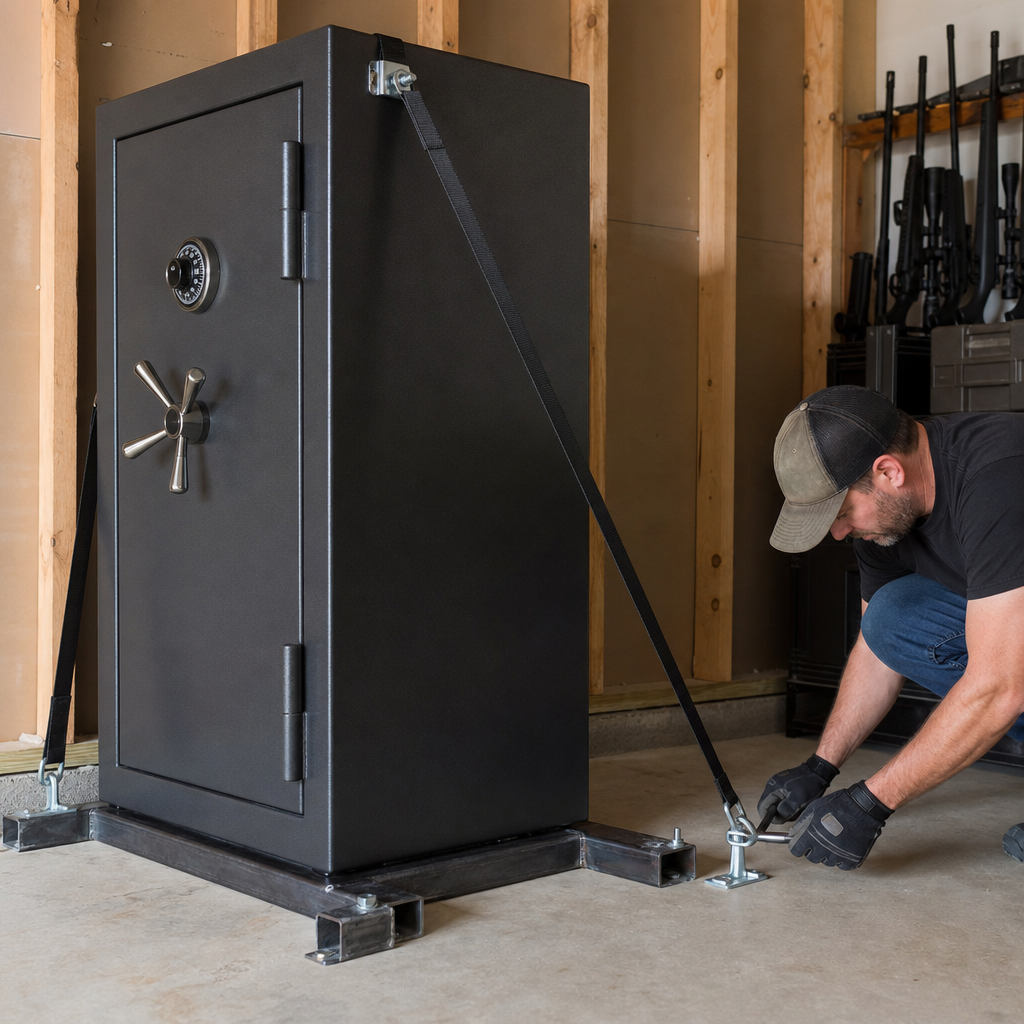
Anchor the safe correctly: concrete, wood floors, and wall restraint options
The most effective gun safe earthquake modification is proper anchoring. On concrete slabs, use anchors sized to the safe and the slab condition, not whatever came in the box. For many mid-size residential safes, 1/2-inch diameter wedge anchors or approved concrete screw anchors are common, but the right choice depends on embedment depth, edge distance, crack condition, and seismic rating. In my own installations, I prefer using hardware from established structural fastening lines such as Simpson Strong-Tie, Hilti, or DeWalt/Powers because technical data is published clearly. Wedge anchors provide strong holding power in sound concrete, while certain concrete screw anchors can be advantageous where precise torque control and removable serviceability matter.
On wood floors, anchoring into subfloor alone is insufficient. You want direct connection to floor joists or a structural blocking assembly installed below the safe. A common method is to span two or more joists with steel plate or heavy timber blocking, then through-bolt the safe using large fender washers or backing plates. This spreads load and reduces the chance of bolt pull-through during repeated rocking cycles. In upper-story installations, verify the floor system can carry the concentrated live load. A safe loaded with firearms and ammunition can exceed the design assumptions of many residential rooms, especially when placed near midspan.
Some owners add rear restraint by tying the safe to wall framing. This can be useful, but it is not a substitute for base anchoring. Wall ties are best treated as anti-tip supplements that reduce sway and door-frame racking. Connect only to studs or masonry, never just drywall. Use steel brackets or rated structural connectors with a slight stand-off so the safe does not pound directly into the wall finish. In seismic retrofits, redundancy is valuable: a bottom anchor system carries the primary load, while a rear restraint limits excessive displacement if the floor interface begins to deform.
| Installation surface | Best modification approach | Why it works in earthquakes | Common DIY mistake |
|---|---|---|---|
| Concrete slab | Use properly sized seismic-capable concrete anchors in factory-approved holes | Resists sliding, uplift, and overturning when embedment and spacing are correct | Anchoring too close to slab edges or into cracked, weak concrete |
| Wood floor over joists | Through-bolt into joists or reinforced blocking with backing plates | Distributes loads and reduces pull-through during rocking | Lag screwing into subfloor only |
| Garage near stem wall | Anchor to slab while checking thickness, slope, and moisture exposure | Maintains base stability in a common safe location | Ignoring uneven floor pitch and corrosion risk |
| Corner installation | Combine floor anchors with controlled wall restraint to framing | Limits lateral travel and tipping leverage | Assuming drywall contact provides support |
Reinforce the base, level the footprint, and reduce tipping leverage
Earthquake resistance is not only about keeping bolts from pulling out. It is also about making the safe behave predictably under load. Many gun safes sit on decorative feet, thin shims, carpet, or uneven garage slabs. That creates point loading, uneven anchor tension, and rocking that amplifies motion. A worthwhile DIY modification is building a rigid, level base interface. On concrete, this may mean removing compressible flooring, grinding high spots, and using steel shims only where needed so the entire safe footprint bears evenly. On wood floors, a custom platform tied into joists can create a flat, load-sharing surface while keeping the safe clear of minor moisture exposure.
Base reinforcement can also lower stress at the factory anchor holes. For safes with thin bottom steel, an internal steel spreader plate installed inside the safe under the bolt heads can distribute force more evenly. Use appropriately sized plate steel with deburred edges and corrosion-resistant finish. Pair it with hardened washers where specified. This does not replace proper anchors, but it can reduce localized deformation around bolt holes during violent shaking. Another effective modification is lowering the center of gravity by placing ammunition cans, lead ballast, or other dense items on the lowest shelf or floor of the safe, provided shelf ratings and total floor load are respected. Heavy items on upper door panels should be minimized.
Tipping leverage often comes from surrounding conditions. Thick plush carpet under the front edge allows the safe to pitch. Deep external handle sets can strike walls and transmit shock to the lock area. Tall risers or home-built pedestals may improve access, but they increase overturning moment unless engineered carefully. If elevation is needed for flood protection, use a broad, low steel base anchored independently and designed to accept the safe’s footprint without wobble. Avoid narrow platforms and stacked pavers. Stability always beats convenience in seismic zones.
Upgrade door security, interior retention, and accessory mounting
When a gun safe shakes, the door and interior often suffer before the shell does. The door is the heaviest moving component, and if it flexes, racks, or bursts open due to poor closure, the contents can become dangerous projectiles. Start by checking hinge fasteners, door adjustment, boltwork travel, and seal condition. If the manufacturer provides hinge adjustment procedures, follow them exactly. A door that already drags or misaligns in normal use is more likely to bind after a quake. Do not add homemade external latches that interfere with lock operation or emergency access. Instead, keep the factory mechanism maintained, lubricate approved points sparingly, and replace worn handle bushings or spindle parts before they fail.
Inside the safe, retention matters. Long guns should not be free to whip side to side. Upgrade flimsy barrel rests with denser closed-cell foam, contoured rifle racks, or modular supports that keep each firearm separated. Shelves should be secured against jump-out with clips, screws in approved locations, or manufacturer accessories. Door organizers are useful, but overloaded pistol pockets and magazine panels put extra mass on the swinging side of the safe. In earthquake-prone homes, I prefer lighter door loads and heavier bottom storage. Optics, suppressors where legal, and documents should go in padded bins or latching interior containers that cannot slide out and strike the door during movement.
Accessory mounting deserves discipline. Motion lights, power strips, dehumidifier rods, and hardwired pass-through kits are among the most common DIY gun safe modifications. Route wires so they cannot snag boltwork or pinch between frame and door if the safe shifts slightly. Use mechanical fasteners or high-bond adhesives rated for the interior temperature range, not bargain hooks that fail in heat. Every added accessory changes weight distribution and can become a projectile if it tears loose. Secure, low-profile mounting is the standard.
Address moisture, fire lining, and post-earthquake inspection planning
Earthquake-resistant modification is not complete if the safe remains standing but develops hidden damage or moisture problems afterward. In garages, basements, and exterior-adjacent rooms, seismic movement can open hairline cracks in slabs and walls that increase humidity migration. That is why dehumidifier routing, door gasket inspection, and corrosion prevention belong in the same plan as anchoring. Use a trusted dehumidification method suited to your climate: a GoldenRod-style heater to raise internal temperature slightly, rechargeable desiccants for enclosed spaces, or both. Keep wiring tidy and protected where it exits the safe. If you drill approved pass-through points, seal exposed metal to reduce rust risk.
Fire lining also deserves caution. Many owners modify interiors aggressively and damage gypsum-based fireboard, insulation blankets, or heat-expanding door seals without realizing it. After an earthquake, inspect for new cracks at anchor points, warped interior panels, and changes in door closure resistance. A safe that looks fine outside may have shifted enough to compromise seal contact or lock alignment. If the dial, keypad, or handle suddenly feels different, stop forcing it. Document the condition and contact the manufacturer or a qualified safe technician. Forcing a misaligned mechanism can turn a survivable event into a lockout.
Create a post-earthquake checklist before you need it. Confirm the safe remains plumb, all anchors stay torqued to specification, door gaps are even, and nearby walls or shelving have not transferred load into the safe body. Check that firearms remained retained, optics held zero if impacted, and ammunition stayed dry. The best custom and DIY gun safe modifications are the ones you can inspect, maintain, and trust years later. Start with anchoring, improve the base and interior, correct weight distribution, and audit every accessory. If your safe is not yet treated as part of the structure, make that your next upgrade.
Frequently Asked Questions
What is the most important modification for making a gun safe more earthquake resistant?
The single most important upgrade is properly anchoring the safe to the structure of the building. A heavy safe may seem stable on its own, but during an earthquake, weight alone is not enough to prevent tipping, sliding, or twisting. Seismic movement can create powerful side-to-side and forward-back forces that can topple even very heavy safes, especially taller models with a high center of gravity. If the safe falls, it can become damaged, the door may warp, locking components can be stressed, firearms and valuables inside can be harmed, and the safe may become easier to access by unauthorized people afterward.
For maximum resistance, the safe should be treated as part of the building rather than as a freestanding object. That usually means fastening it with appropriate anchors into reinforced concrete or into a properly engineered wood-framed floor system, depending on where it is installed. The exact hardware matters. Anchor size, embedment depth, edge distance, and the condition of the floor all affect performance. The anchor points in the safe itself also matter, because the connection is only as strong as the metal around those holes. In many cases, using all available factory anchor points gives the best distribution of force.
Just as important is making sure the floor can actually handle the safe and the loads created during shaking. A poorly chosen location on a weak subfloor or an elevated area with inadequate support can reduce the effectiveness of even good anchors. If the safe is especially large, top-heavy, or installed on an upper story, professional evaluation is wise. In practical terms, anchoring is the foundation of every other earthquake-resistance measure. Without it, other improvements help, but they do not solve the main stability problem.
Is bolting a gun safe to the floor enough, or should it also be secured to a wall?
Bolting the safe to the floor is usually the primary and most effective step, but in many situations, adding restraint to a wall can improve earthquake performance. Whether wall attachment makes sense depends on the safe design, the wall construction, the location in the home, and the manufacturer’s guidance. Floor anchoring resists sliding and tipping by securing the base, while a properly designed wall restraint can reduce sway and limit the upper portion of the safe from lurching during severe shaking.
That said, a wall is not automatically a strong seismic attachment point. Drywall alone provides no meaningful support, and even wood framing must be evaluated carefully. Fastening into studs may help if the loads are modest and the attachment is engineered appropriately, but flimsy brackets or improvised straps can fail or transfer force in ways the safe and wall were never designed to handle. Masonry walls also require special caution, because anchors in brick, block, or older concrete can behave unpredictably if installed incorrectly or if the material is deteriorated.
A common best-practice approach is to place the safe in a corner or recessed location, anchor it securely to the floor, and then use manufacturer-approved or professionally selected upper restraints if needed. This can reduce the distance the safe can move and improve overall stability. However, wall restraint should be considered a supplement, not a substitute, for proper base anchoring. The safest path is to match the method to the building structure and the safe’s size and geometry, rather than assuming more fasteners always equal more safety.
Where is the best place in a home to install a gun safe for earthquake resistance?
The best location is generally a ground-floor area with a solid, stable structural base, minimal chance of excessive sway, and enough surrounding clearance to anchor and inspect the safe correctly. In many homes, a garage slab or a reinforced concrete floor on the lowest level offers better seismic stability than an upper-story wood-framed room. Lower placement reduces the effects of building motion, and concrete often provides a stronger anchoring surface than a framed floor, assuming the slab is sound and thick enough for the selected anchors.
Location also affects the likelihood of secondary hazards. During an earthquake, nearby shelves, appliances, tools, cabinets, and wall-mounted items can fall into the safe or obstruct access to it. Installing the safe where heavy objects are less likely to strike it helps preserve its function and reduces the chance of door or lock damage. Corner placements can be helpful because they limit the directions in which the safe can move, but only if the space still allows proper installation and service access. The safe should not be crammed into a spot so tightly that anchors cannot be checked or the door cannot open fully after minor shifting around it.
Upper floors are typically less desirable for very heavy safes unless a structural professional confirms the framing can support both the static load and the dynamic loads from an earthquake. Basements and lower-level utility rooms can be good options if moisture is controlled and corrosion is addressed. The ideal location balances structure, safety, access control, and environmental protection. In short, choose a place with the strongest support, the least building movement, and the lowest chance of surrounding impact during shaking.
What interior and door modifications help protect firearms and keep the safe functional during an earthquake?
Earthquake resistance is not only about preventing the safe from tipping. It is also about keeping the safe closed, preserving the lock and door alignment, and protecting the contents from internal impact. Inside the safe, firearms can strike each other, scopes can be knocked out of alignment, stocks can crack, and accessories can become projectiles if storage is loose or overcrowded. One of the most effective interior upgrades is to create tighter, more stable organization so each firearm has a defined position with support at multiple points. Rifle racks, barrel supports, padded dividers, and shelf lips can all reduce movement inside the safe.
Smaller items should never be left loose on shelves where they can slide or fall against guns or the door. Use bins, trays, and retention systems that keep ammunition, documents, optics, and handguns from shifting. Soft protective surfaces can help prevent scratches, but the bigger goal is reducing momentum inside the safe. If long guns are packed too closely together, even a moderate shake can transfer force through the group and cause damage. A slightly less crowded setup is often much safer than maximizing every inch of capacity.
At the door, the key concern is maintaining closure and alignment. A quality locking mechanism and robust hinge-side support are important, but modifications should not interfere with the safe’s certified locking system or fire seal. Door organizers can be useful, but overloading the door adds weight and can increase stress on hinges and alignment during shaking. If the door already feels heavy or slightly out of alignment, adding more load can make the problem worse. For maximum reliability, keep door storage balanced, avoid excessive weight, and make sure the latch engages fully every time. After any earthquake event, inspect the door for changes in clearance, latch action, and seal condition before assuming the safe is still operating normally.
Should a homeowner install seismic modifications themselves, or hire a professional?
That depends on the safe, the building, and the homeowner’s experience, but for many installations, professional help is the smarter option. A do-it-yourself installation may be reasonable for a smaller safe on a clearly suitable slab, using manufacturer-approved anchor locations and hardware exactly as specified. However, seismic performance depends on more than simply drilling a few holes. The installer needs to understand the floor material, anchor type, spacing, depth, torque, safe weight distribution, and the possibility of hidden issues such as post-tension cables, radiant heating lines, weak subfloor sections, or inadequate framing. Mistakes can reduce the safe’s holding power or damage the building.
A qualified installer, contractor, or structural professional can assess whether the chosen location is appropriate and whether additional reinforcement is needed. This is especially valuable for large safes, unusual floor systems, older homes, hillside construction, or installations above grade. Professionals can also recommend whether supplemental bracing is advisable and can help ensure the work does not void the safe manufacturer’s warranty or conflict with local building requirements. In earthquake-prone regions, that level of planning can make a major difference in real-world performance.
Even if a homeowner does part of the work, expert input is often worth it. At minimum, review the safe manufacturer’s instructions, confirm the structure can support the load, and use hardware intended for seismic or heavy-duty anchoring applications where appropriate. The goal is not just to keep the safe from moving on a calm day. It is to keep it upright, locked, and structurally sound during violent shaking, when failure has serious safety consequences. If there is any doubt about the structure or anchoring method, hiring a professional is the more reliable choice.